On this page
Setup & Integration
1. Install & Activate Plugin
Download and install MIPL WC Sync Crm . Activate the plugin from Plugins → Installed Plugins.
Menu Options
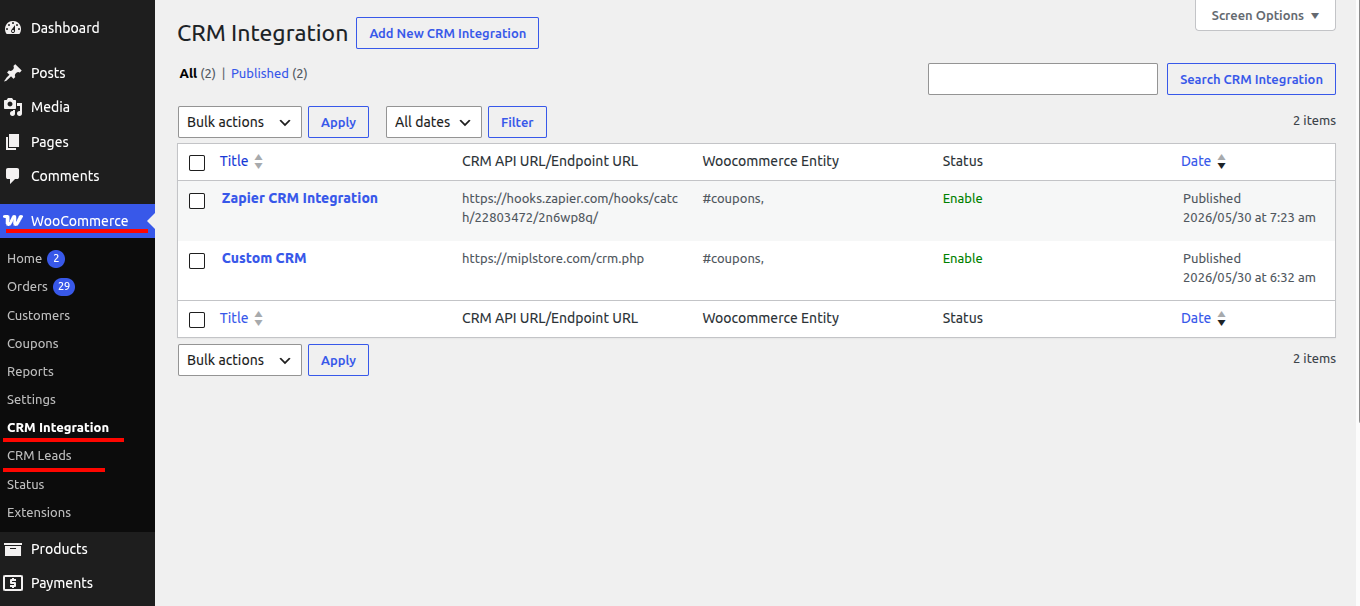
WooCommerce → CRM Integration.
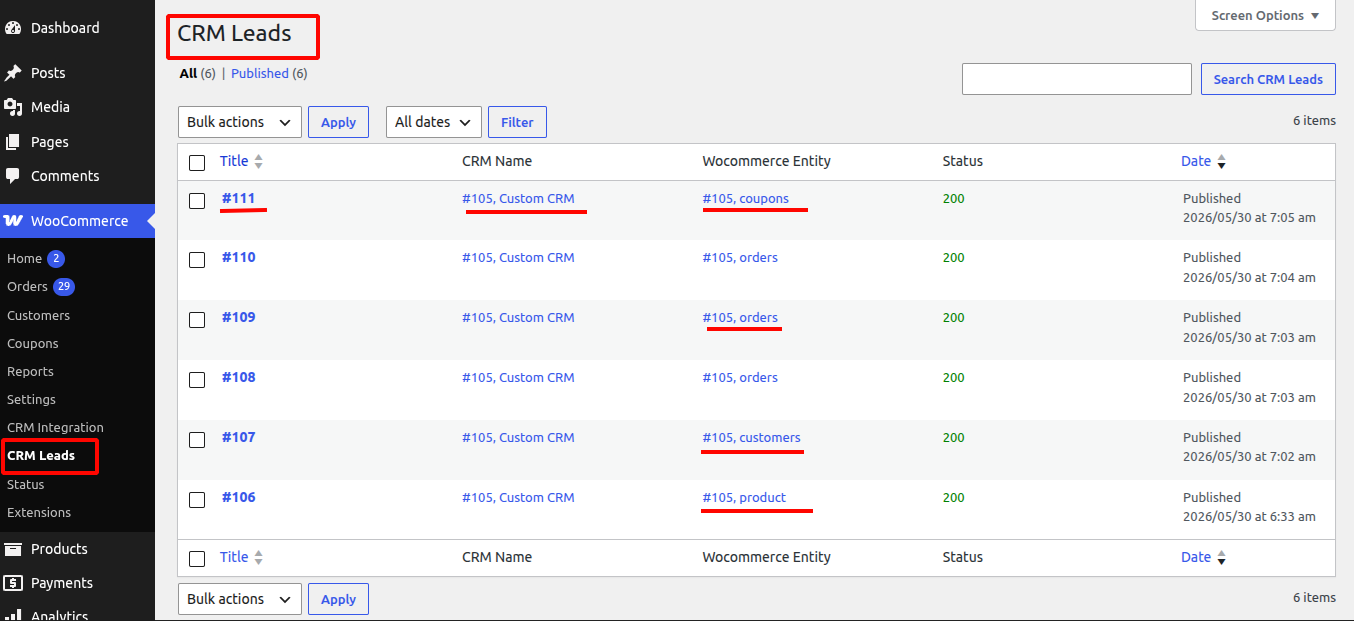
WooCommerce → CRM Leads.
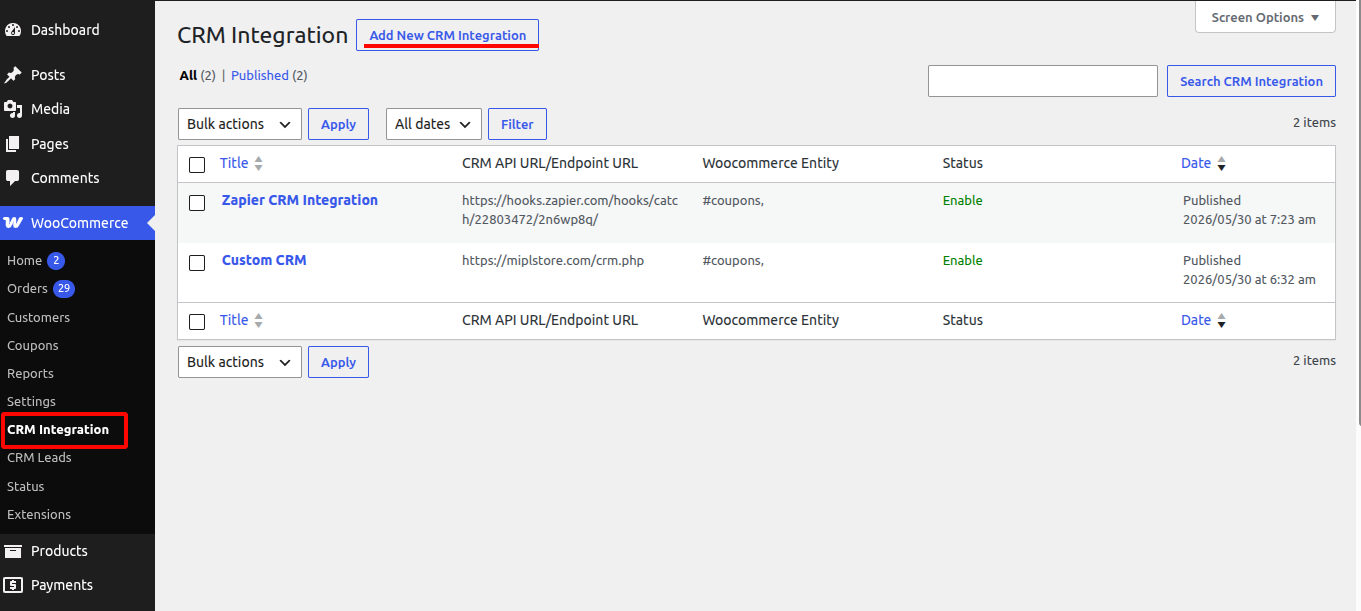
2. Add New CRM Integration
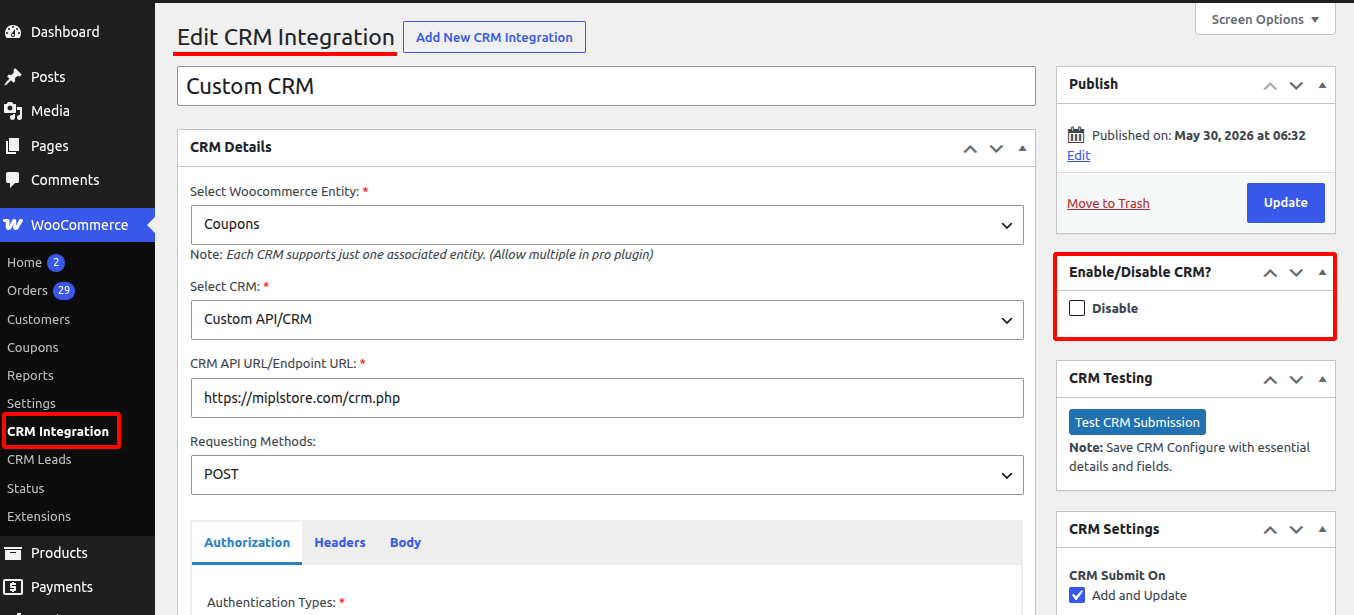
- Go to WooCommerce → CRM Integration
- Click Add New CRM Integration
- Enter Title, CRM details, and enable disable settings
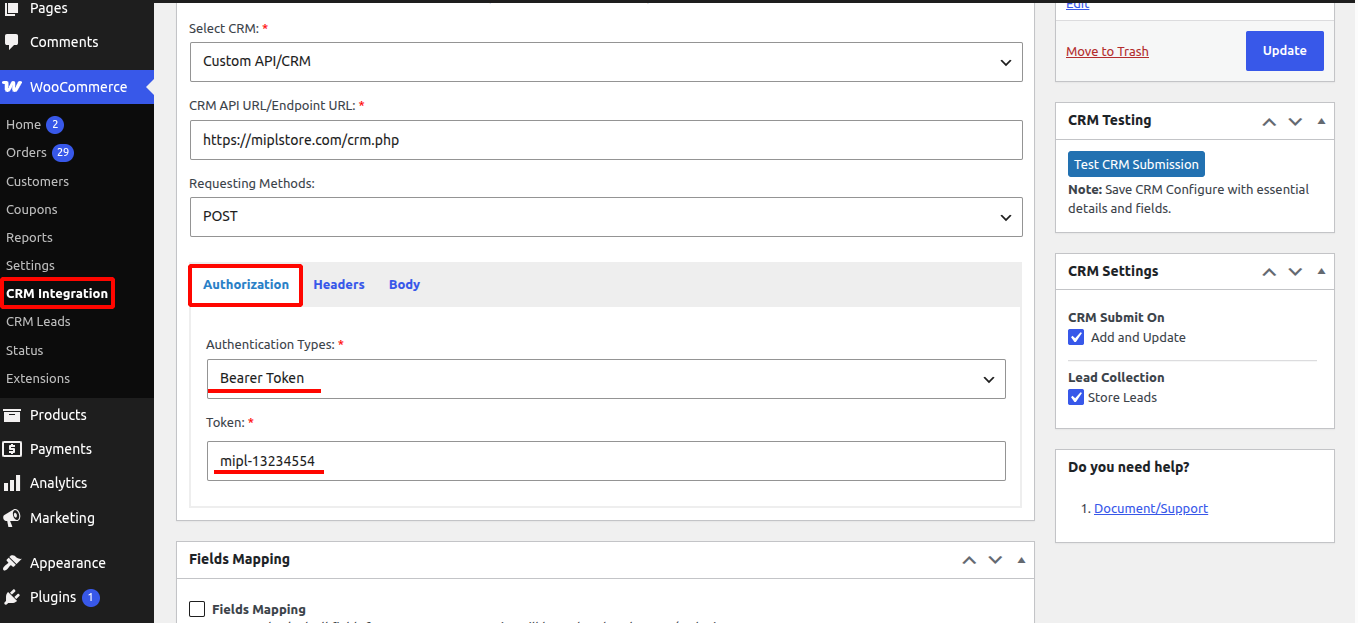
1. Custom CRM Integration
Woocommerec Entity (order, product, customer, coupon)
- Select the WooCommerce entity, such as Product, Order, Coupon, or Customer.
- Select the CRM or Custom API integration. Enter the CRM API URL or Endpoint URL. When an Product, Order, Coupon, or Customer is added or updated, the order data will be sent to the specified CRM API URL/Endpoint URL.
1. Select Requesting Methods:
Select the HTTP method: GET, POST, PUT, or DELETE.
GET – Retrieve data from the API.
POST – Create or submit new data.
PUT – Update existing data.
DELETE – Remove data.
2. Select Authorization
1. Select the authentication type:
Enter the required authentication details based on the selected authentication type.
- API Key
- Bearer Token
- Basic Authentication
- OAuth 2.0
- JWT
- OAuth 2.0 JWT
- API key : API Key field to authenticate the connection between the application and the integration.This key securely identifies your account and allows data to be sent and received through the API.
If you select API Key, then:
- Enter the API Key Name (Key field)
- Enter the API Key Value (Value field)
Choose where to send the API key:
- Header
- Query Parameters
Save the settings.

2. Bearer Token
Bearer Token in the Authorization Token or Bearer Token field to authenticate API requests securely. The token is included in the request header and grants access to the connected service.
1) Select Authentication Type as Bearer Token.
2)Enter your Token in the Token field.
3)Save the settings.
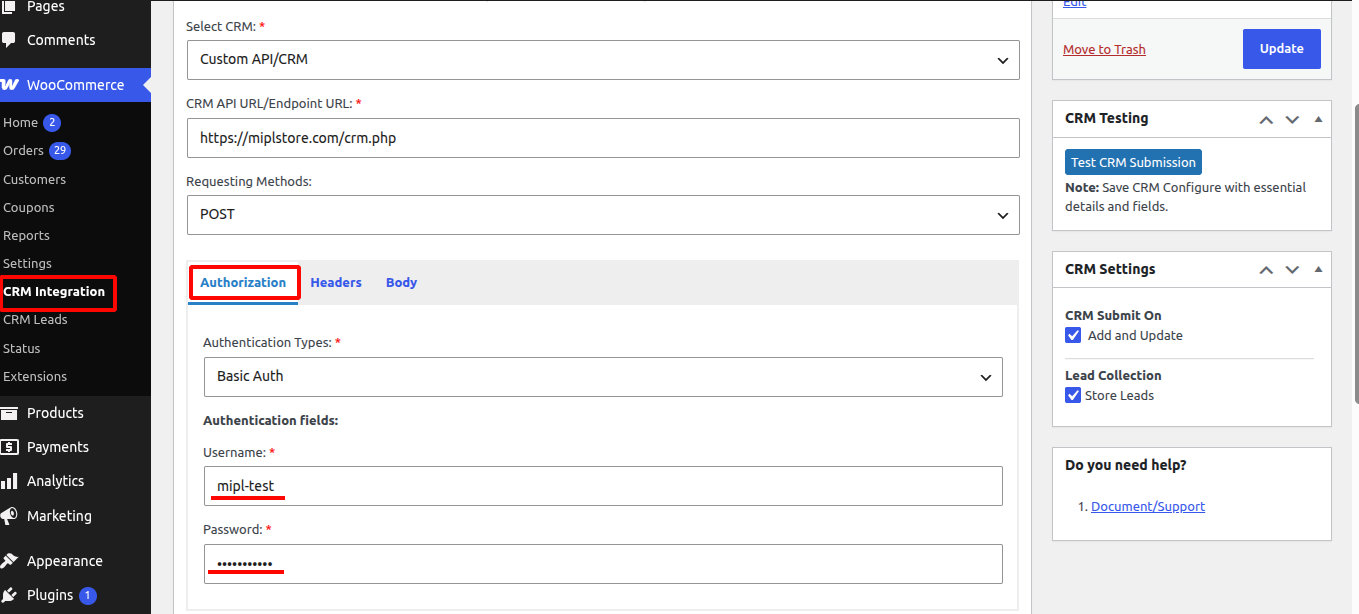
3. Basic Authentication:
1) Select Authentication Type as Basic Auth.
2) Enter your username and password .
3) Save the settings.
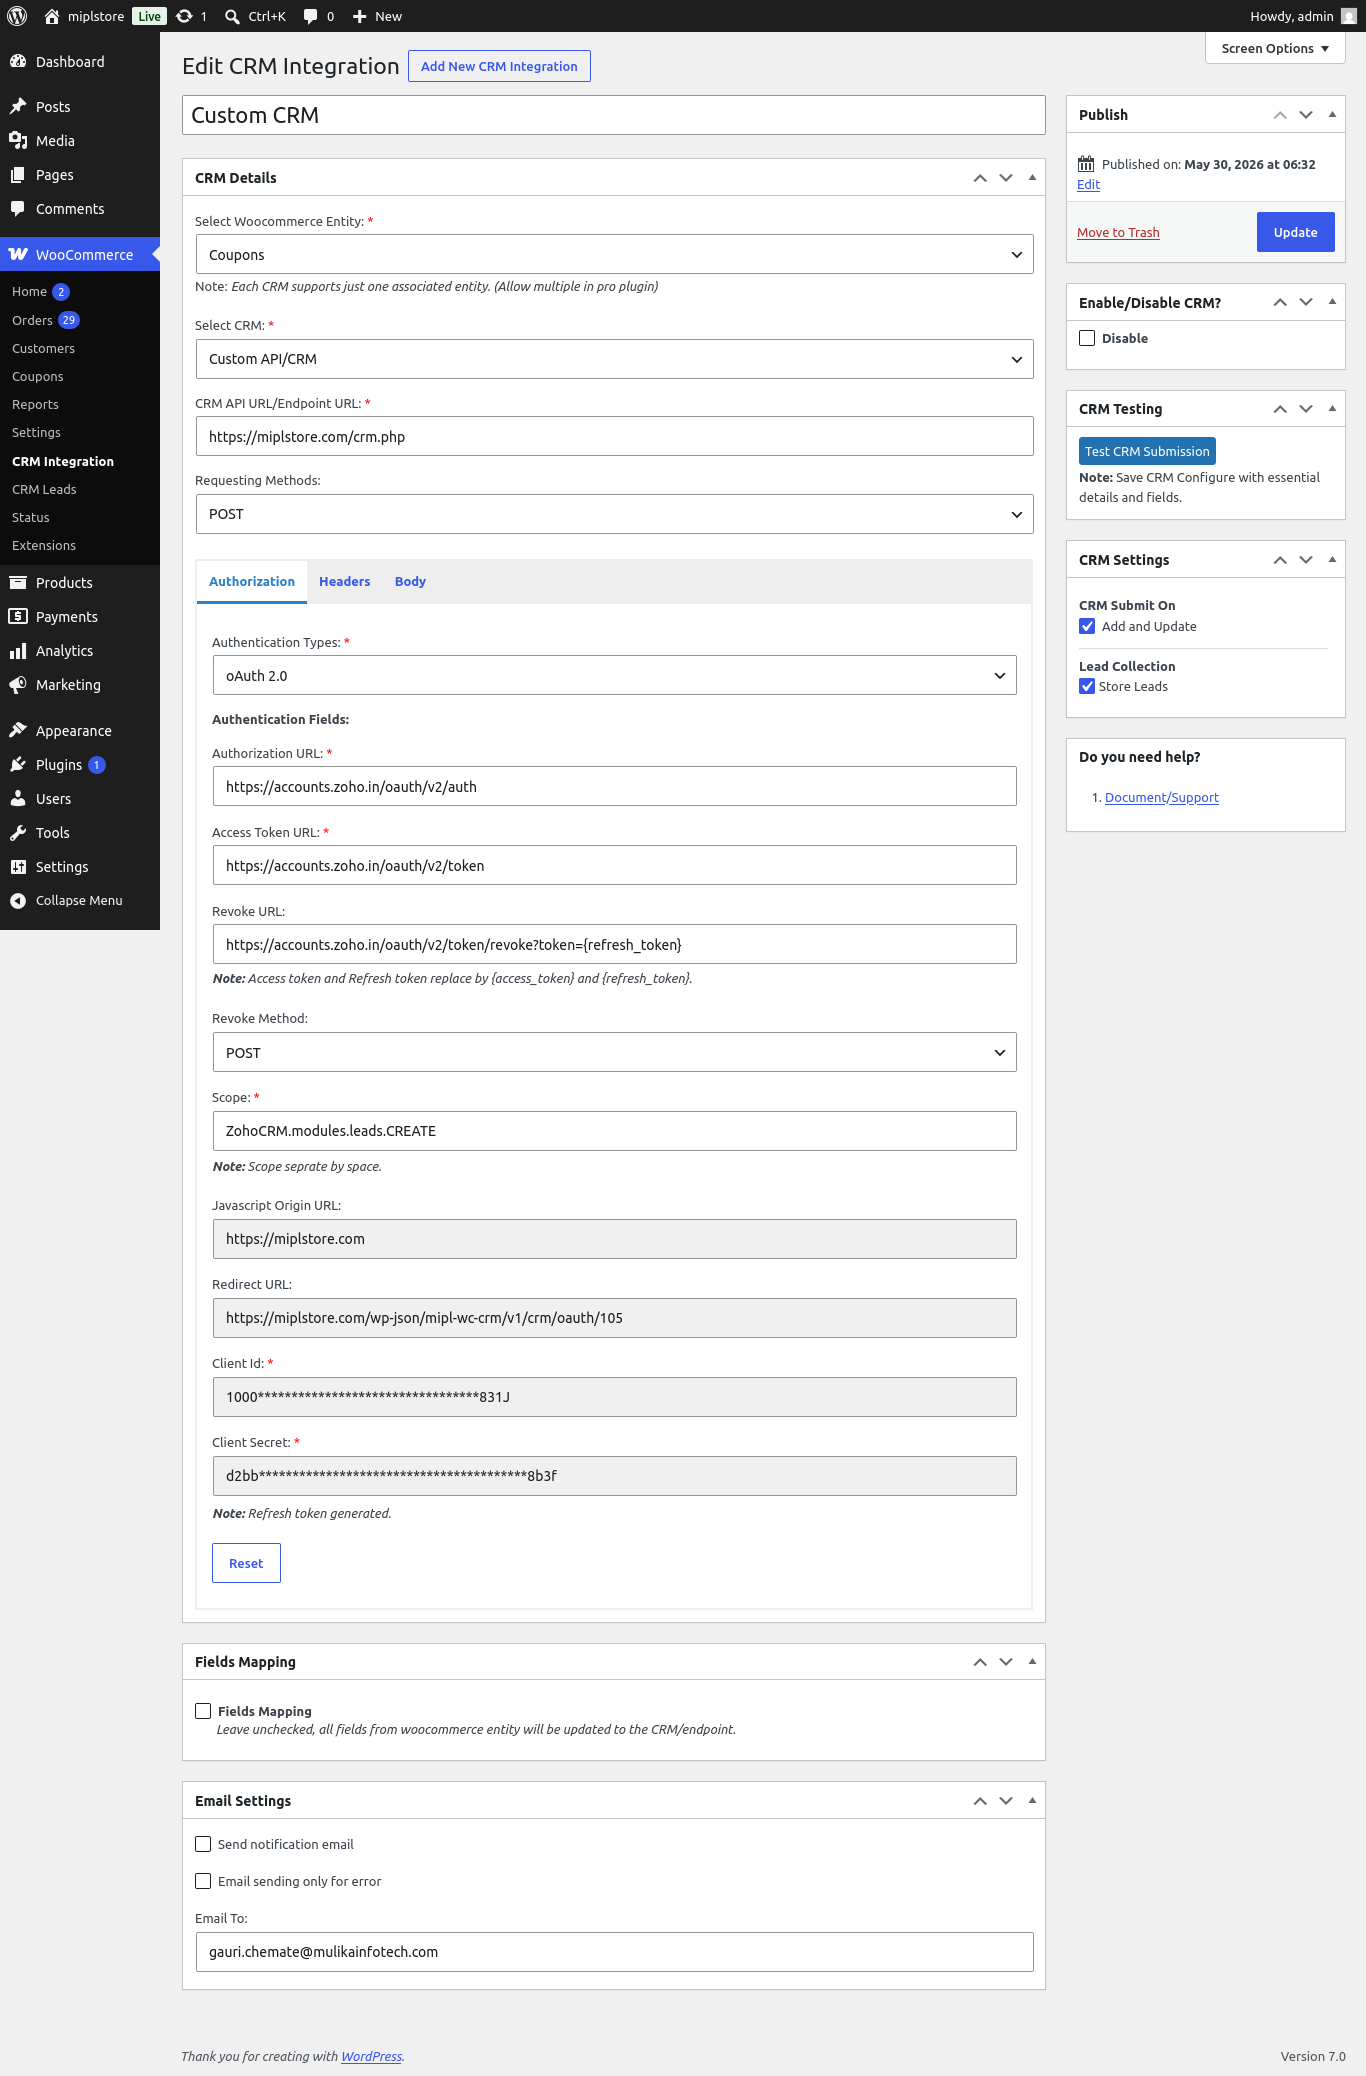
4. OAuth 2.0
1. Select Authentication Type
Go to the Authorization tab.
Select OAuth 2.0 from the Authentication Types dropdown.
2. Authorization URL
Purpose : Directs users to the CRM login page to grant access.
Example : https://accounts.zoho.in/oauth/v2/auth
Required by : CRM provider (e.g., Zoho CRM).
3. Access Token URL
Purpose : Exchanges the authorization code for an access token.
Example : https://accounts.zoho.in/oauth/v2/token
Required by : CRM provider.
4. Revoke URL
Purpose : Disconnects the CRM account and revokes access tokens.
Example : https://accounts.zoho.in/oauth/v2/token/revoke?token=[refresh_token]
Note : [refresh_token] is automatically replaced with the actual refresh token.
5. Revoke Method
Purpose: HTTP method used when revoking access.
6. Scope
Purpose : Defines what permissions the integration requests from the CRM.
Example : ZohoCRM.modules.leads.CREATE
Multiple Scopes : ZohoCRM.modules.leads.CREATE ZohoCRM.modules.contacts.CREATE
Note : Separate multiple scopes with spaces.
7. JavaScript Origin URL
Purpose : Specifies the domain allowed to initiate OAuth requests.
Example : https://yourwebsite.com
8. Redirect URL
Purpose : The URL where the CRM sends users after authorization.
Example : https://yourwebsite.com/wp-json/plugin-slug/v1/crm/oauth/105
Important:
Copy this URL from the plugin.
Add it exactly as shown in your CRM application’s OAuth settings.
9. Client ID
Purpose : Identifies your CRM application.
How to Get It:
Create an OAuth application in your CRM developer console.
Copy the generated Client ID.
Paste it into this field. Example:1000xxxxxxxxxxxxxxxxxxxx
10. Client Secret
Purpose: Used with the Client ID to securely obtain access tokens.
How to Get It :
Create an OAuth application in your CRM developer console.
Copy the generated Client Secret.
Paste it into this field. Example:d2bbxxxxxxxxxxxxxxxxxxxx
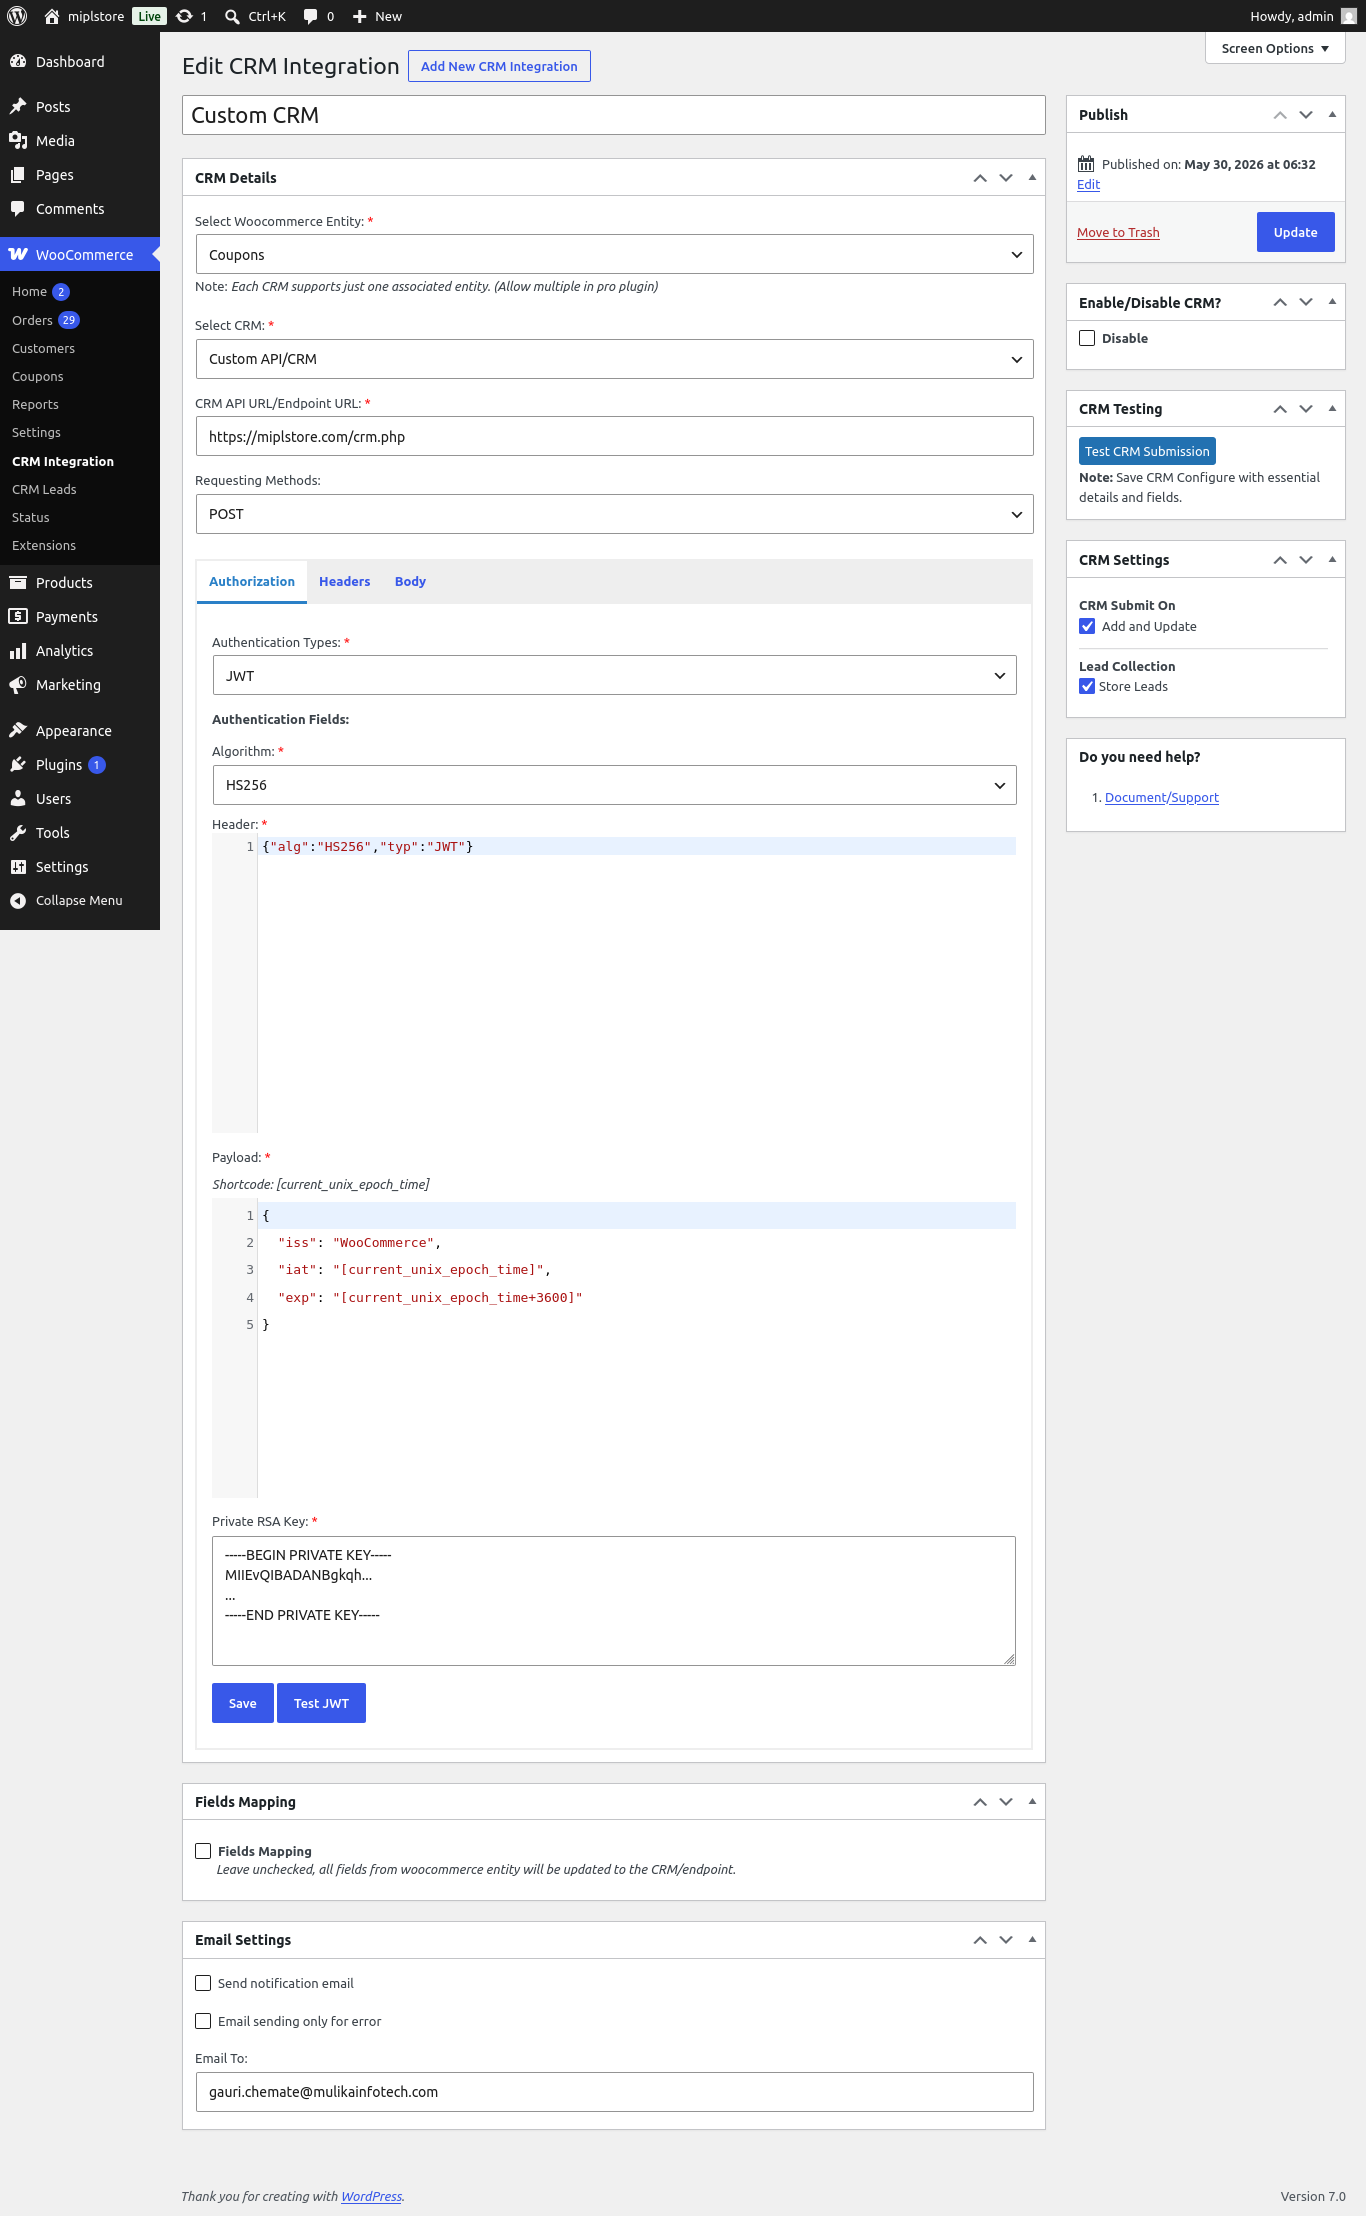
5. JWT
1. Select Authentication Type
- Go to the Authorization tab.
- Select JWT from the Authentication Types dropdown.
- Purpose: Enables JWT-based authentication for all CRM API requests.
2.Select Algorithm
Select the algorithm required by your CRM or API provider. The selected algorithm must match the one expected by the receiving system; otherwise, JWT authentication will fail.
3. Configure JWT Header
Default Example: {
“alg”: “HS256”,
“typ”: “JWT”
}
4. Configure JWT Payload
Example Payload
{
“iss”: “WooCommerce”,
“iat”: “[current_unix_epoch_time]”,
“exp”: “[current_unix_epoch_time+3600]”
}
5. Enter Private RSA Key
—–BEGIN PRIVATE KEY—–
MIIEvQIBADANBgkqh…
…
—–END PRIVATE KEY—–
6. Save Configuration
After completing all JWT settings:
The JWT configuration will be stored.
Click Save.
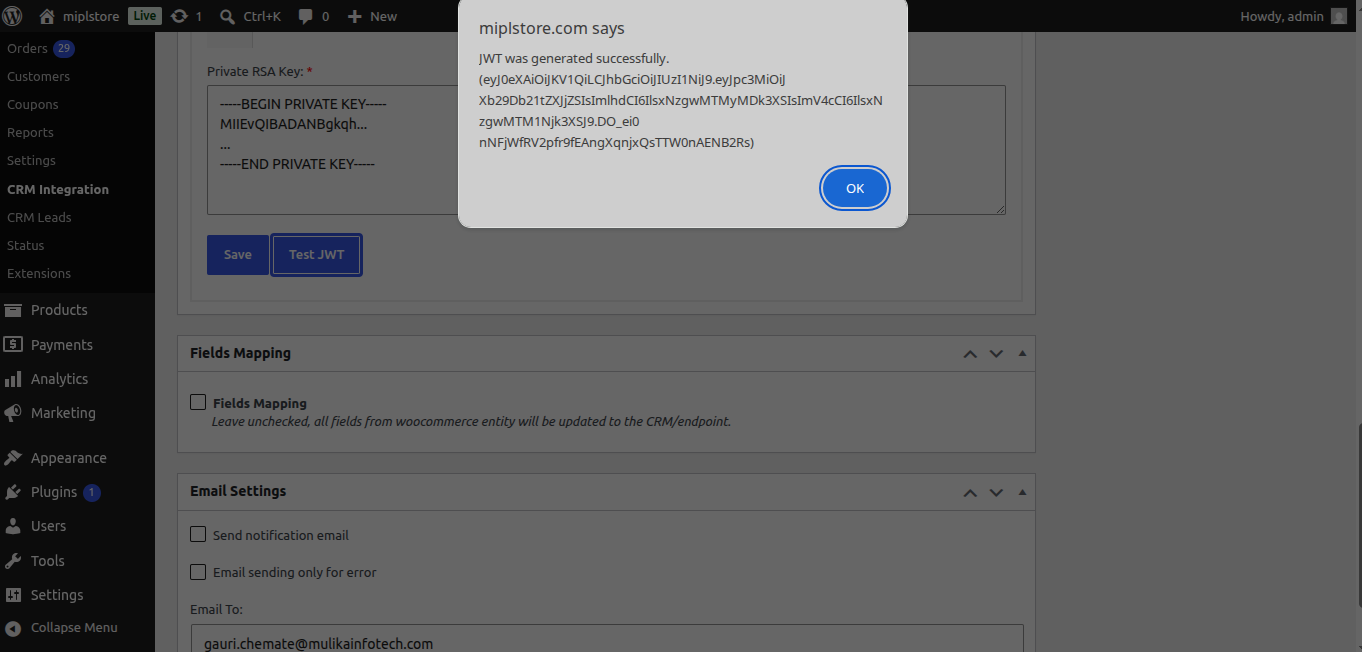
7. Test JWT Token
- Click Test JWT.
- The plugin generates a JWT token using:
- Selected Algorithm
- Header
- Payload
- Private Key
- The generated token is validated before use.
Click “Test JWT”. If the configuration is correct, you will see the message: “JWT generated successfully.“
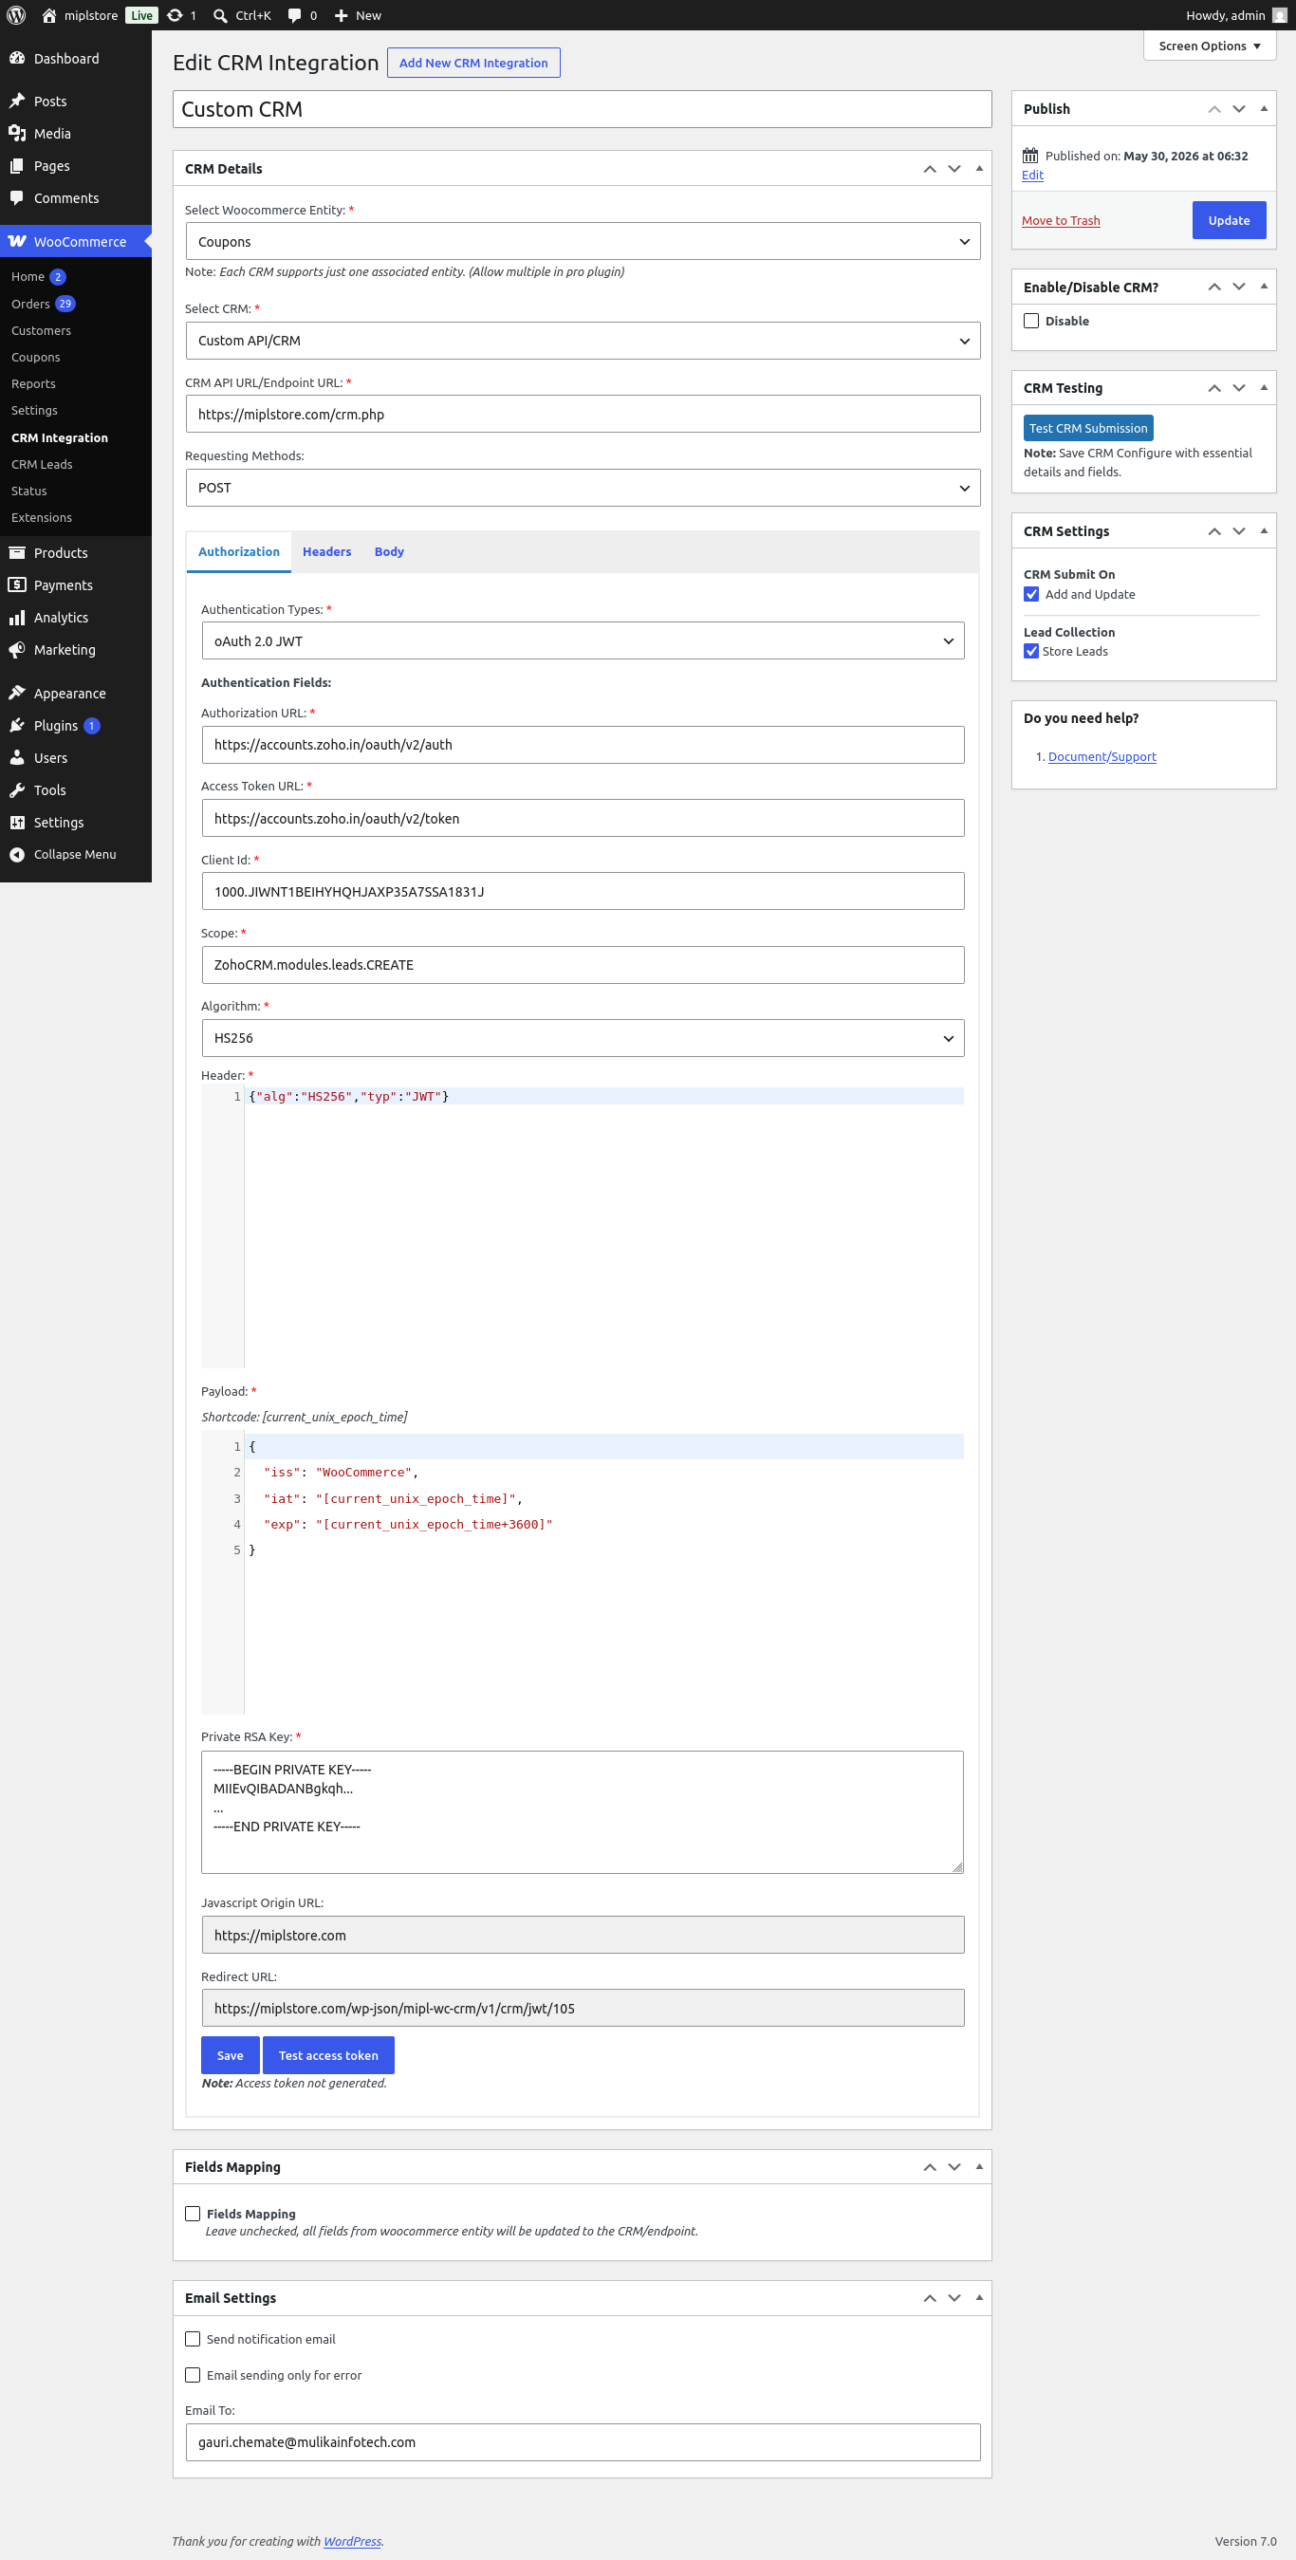
6. OAuth 2.0 JWT
1. Authentication Type select : OAuth 2.0 JWT
2. Enter Authorization URL
Purpose : Directs users to the CRM login page to grant access.
Example : https://accounts.zoho.in/oauth/v2/auth
Required by : CRM provider (e.g., Zoho CRM).
3. Enter Access Token URL
Purpose : Exchanges the authorization code for an access token.
Example : https://accounts.zoho.in/oauth/v2/token
Required by : CRM provider.
4. Enter Client Id
Purpose : Identifies your CRM application.
How to Get It:
Create an OAuth application in your CRM developer console.
Copy the generated Client ID.
Paste it into this field. Example:1000xxxxxxxxxxxxxxxxxxxx
5. Enter Scope
Purpose : Defines what permissions the integration requests from the CRM.
Example : ZohoCRM.modules.leads.CREATE
Multiple Scopes : ZohoCRM.modules.leads.CREATE ZohoCRM.modules.contacts.CREATE
Note : Separate multiple scopes with spaces.
6. Enter Revoke URL
The Revoke URL is used to revoke or disconnect an authorized access token. When a user disconnects their CRM account, the plugin sends a request to this URL to invalidate the token and remove access.
7. Enter Revoke Method
The Revoke Method specifies the HTTP request method used when sending a token revocation request to the Revoke URL.
8. Select Algorithm
Select the algorithm required by your CRM or API provider. The selected algorithm must match the one expected by the receiving system; otherwise, JWT authentication will fail.
9. Payload
. Configure JWT Payload
Example Payload
{
“iss”: “WooCommerce”,
“iat”: “[current_unix_epoch_time]”,
“exp”: “[current_unix_epoch_time+3600]”
}
10. Private RSA Key
—-BEGIN PRIVATE KEY—–
MIIEvQIBADANBgkqh…
…
—–END PRIVATE KEY—–
11. Javascript Origin URL
The JavaScript Origin URL specifies the website domain that is allowed to initiate authentication requests. Some OAuth providers use this URL to verify that requests are coming from an authorized website.
12. Enter Redirect URL
https://yourwebsite.com/wp-json/plugin-slug/v1/crm/oauth/105
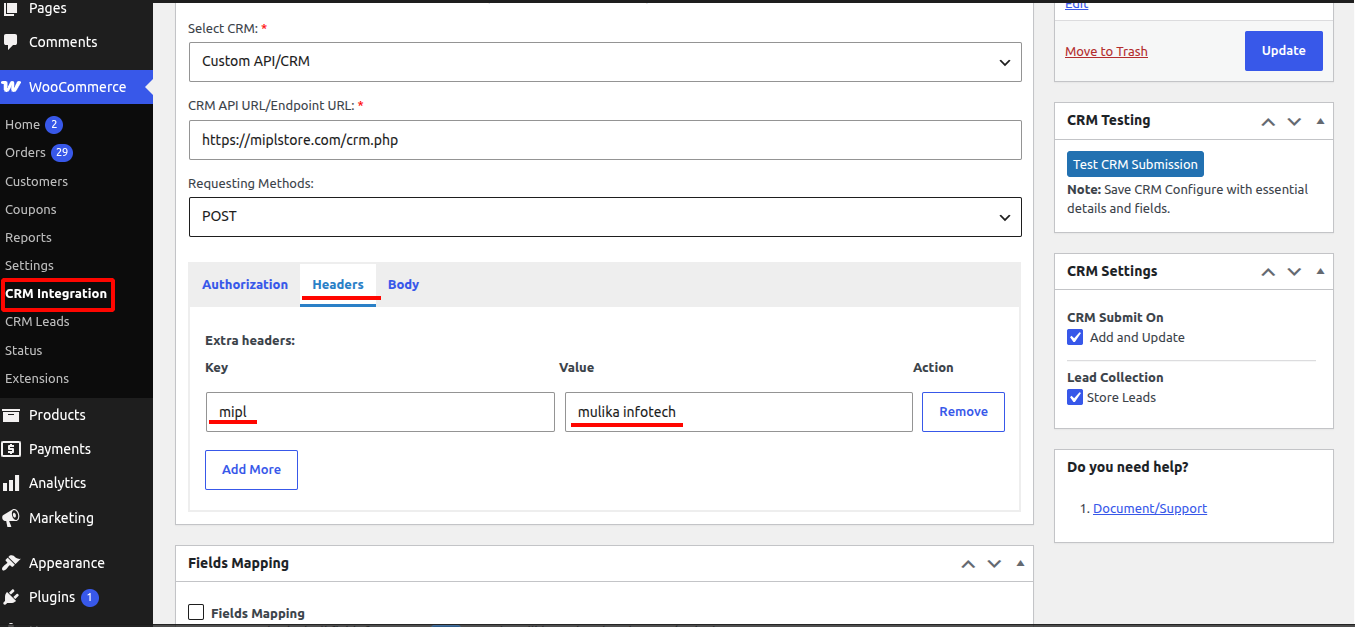
3. Select Headers
If you want to add extra headers, go to WooCommerce →CRM Integration -> Edit CRM Integration. In the Headers section, click the ‘Add More’ button, enter the header key and value, then click ‘Update’ to save the changes.
To remove a header, click the ‘Remove’ button.
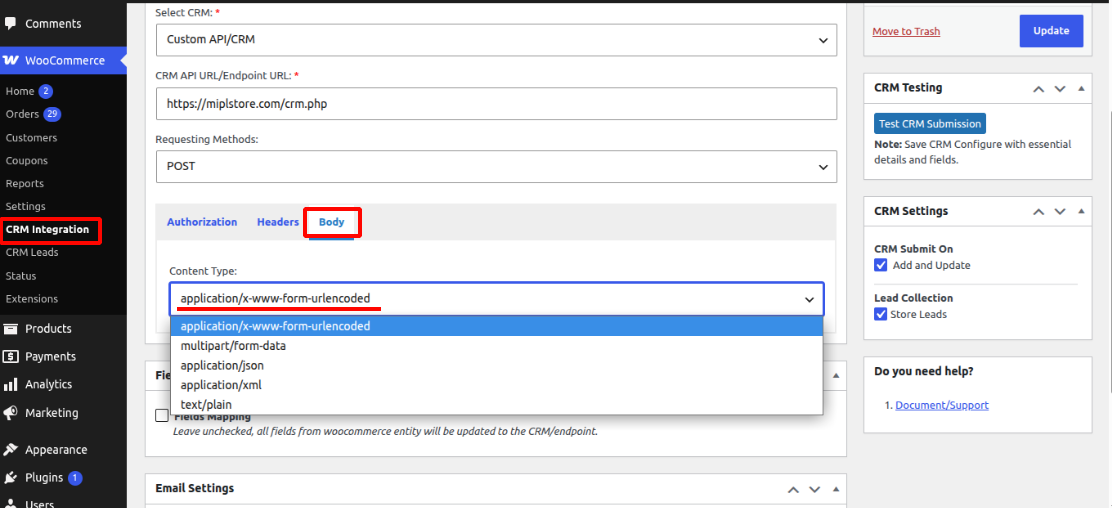
4. Body (Content Type)
In the Body section, select a content type based on your requirement:”
- application/x-www-form-urlencoded – Data will be synced in URL-encoded format.
- multipart/form-data – Data will be synced in multipart form format.
- application/json – Data will be synced in JSON format. You can also use shortcodes in the request body, and the data will be mapped accordingly.
- application/xml – Data will be synced and sent in XML format.
- text/plain – Data will be sent in plain text format.
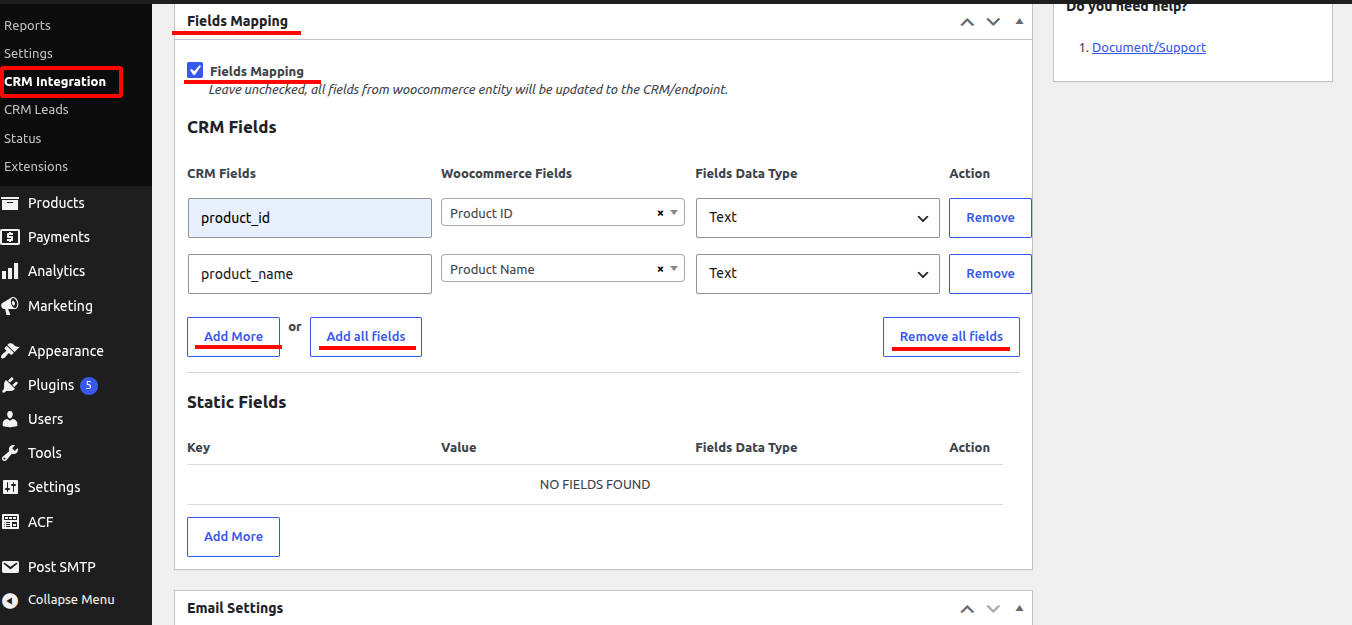
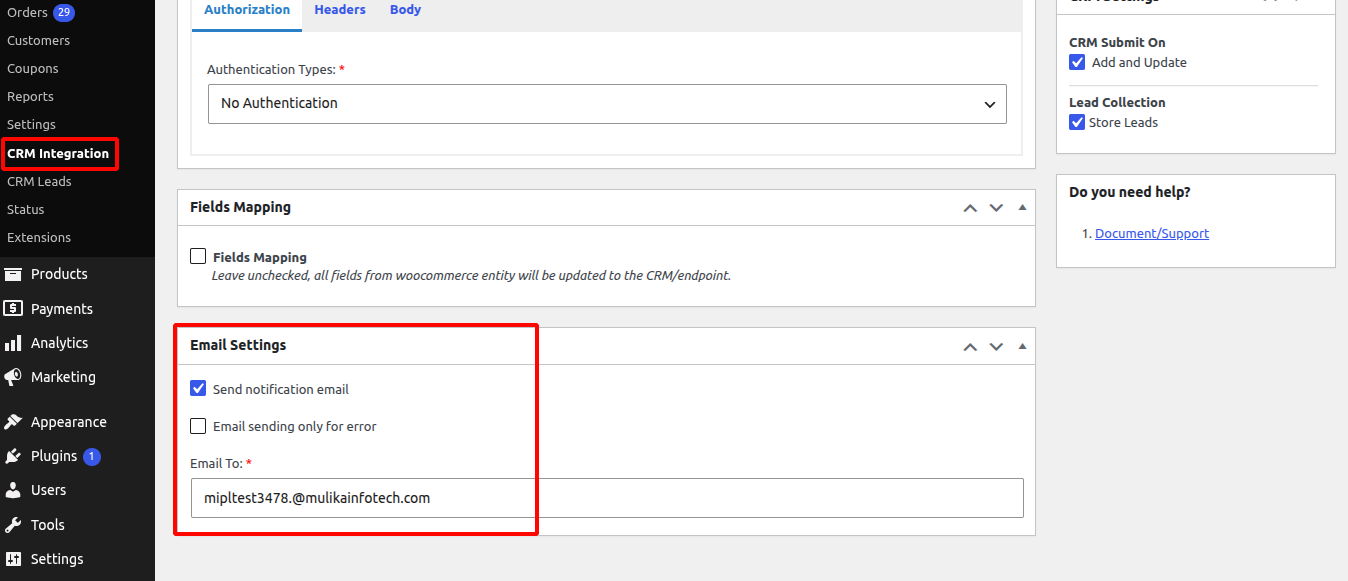
3. Field Mapping
When you select the Field Mapping checkbox, the ‘Add More’ and ‘Add All Fields’ buttons will appear. Clicking ‘Add More’ lets you add fields one by one, while ‘Add All Fields’ displays all selected WooCommerce entity fields. After that, enter the CRM fields and choose the appropriate data type.
Static Fields:
In the Static Fields section, you can use the ‘Add More’ button to add static fields as needed.
4. CRM Settings
When the ‘Add and Update in CRM’ option is checked in the ‘Submit On’ section, the CRM submission will be triggered whenever a WooCommerce entity such as Product, Order, Coupon, or Customer is updated. If this option is not checked, the data will not be submitted to the CRM.
When the ‘Store Lead in Lead Collection’ option is checked, updated WooCommerce entities such as Product, Order, Coupon, and Customer will be stored in the Lead section.
To view stored leads, go to WooCommerce → CRM Lead.
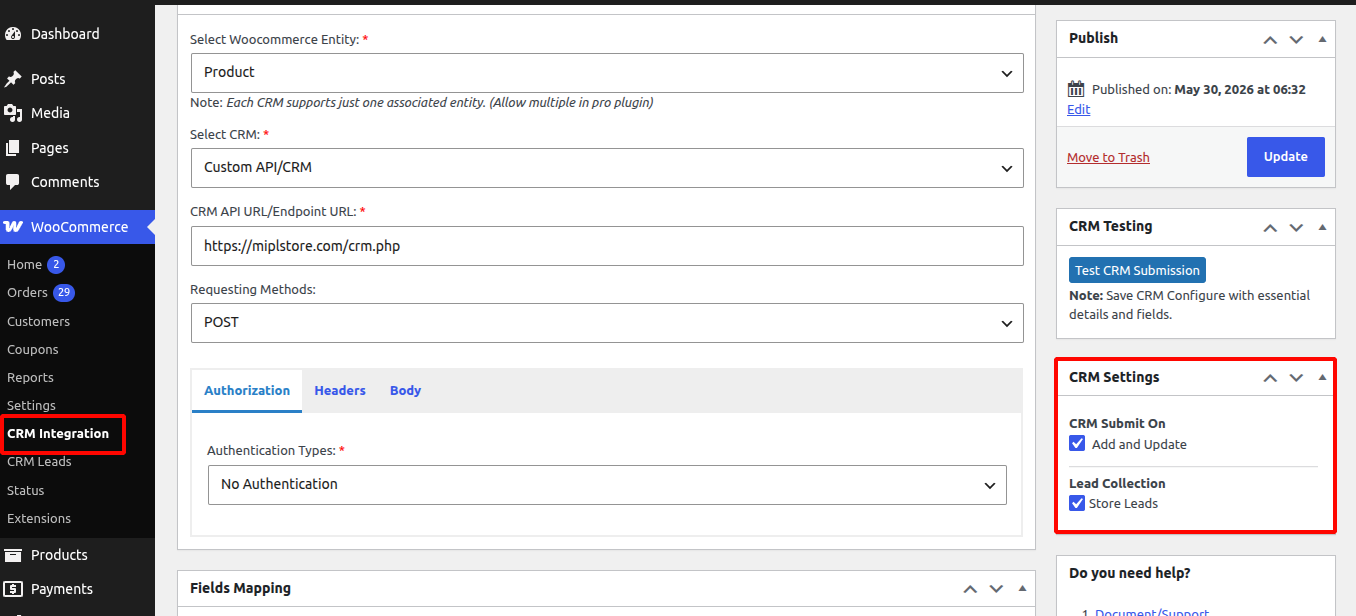
If you want to disable the CRM integration, uncheck the ‘Enable/Disable CRM’ option or checked Disable.
When the ‘Send Notification Email’ option is checked, an email notification will be sent to the entered email address whenever a WooCommerce entity such as Product, Order, Coupon, or Customer is submitted to the CRM after an update.”
“If you want to receive email notifications only for errors, select the ‘Email Sending Only for Error’ option.
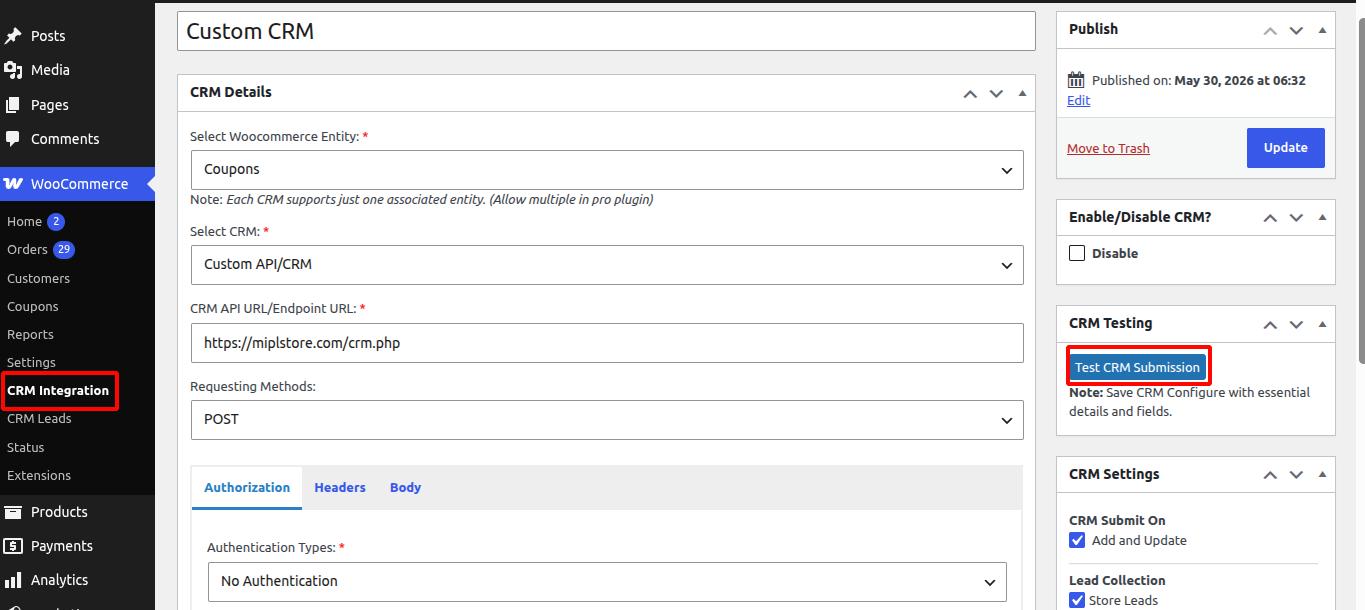
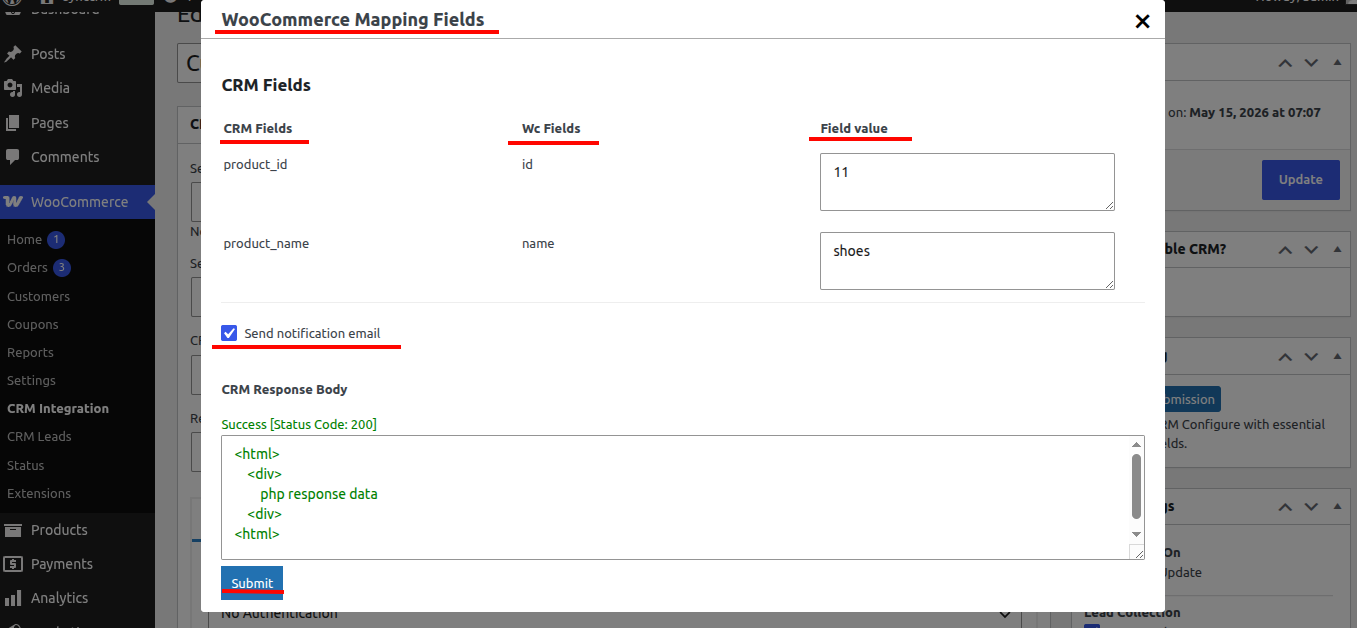
5. CRM Testing
When you click the ‘Test CRM Submission’ button, a popup will appear displaying all WooCommerce mapping fields used for CRM testing. Fill in all the required fields and click ‘Submit’ to test the CRM submission.
To receive email notifications, enable the ‘Send Notification Email’ option and submit the CRM test. If the submission is successful, a 200 response will be displayed in the CRM Response Body.
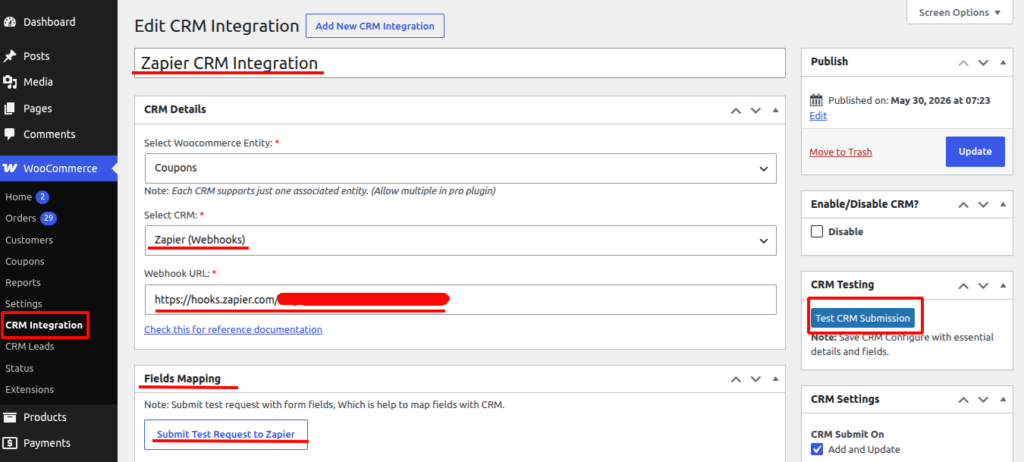
2. Zapier CRM Integration
1. Select CRM
- Go to WooCommerce → CRM Integration
- In Select CRM, choose:
Zapier (Webhooks)
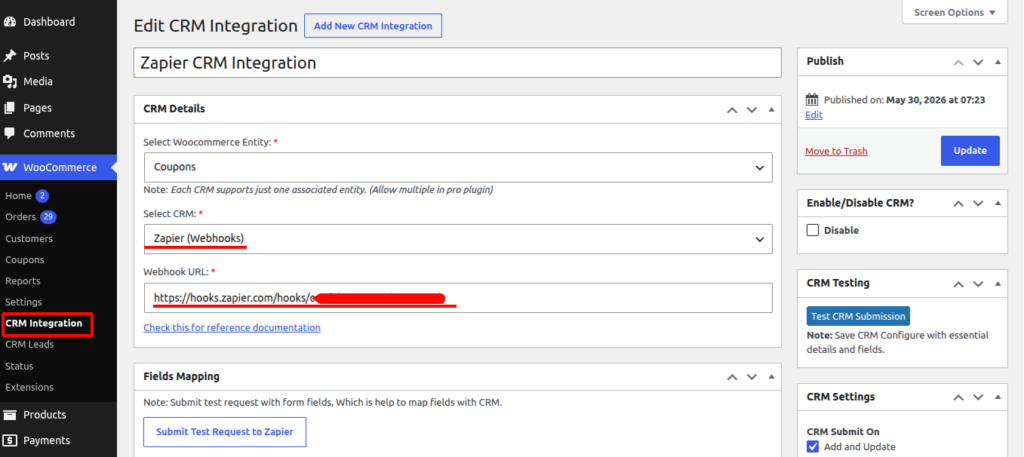
2. Add Webhook URL
- Copy your Zapier webhook URL
- Paste it into the Webhook URL field
Example:https://hooks.zapier.com/hooks/catch/xxxxxxxx/xxxxxxx/ - How to get Webhook url:
1) Login to Zapier at https://zapier.com using your account credentials.
2) From the dashboard, click “Create Zap” to start building a new automation workflow.
3) In the Trigger step, search and select “Webhooks by Zapier,” which allows external apps like WooCommerce to send data into Zapier.
4) Choose the trigger event “Catch Hook,” then click Continue so Zapier generates a unique webhook URL that you will later paste into WooCommerce for CRM/webhook integration.

- Click Update to save the CRM integration
3. Field Mapping
- Go to Fields Mapping section
- Click Submit Test Request to Zapier
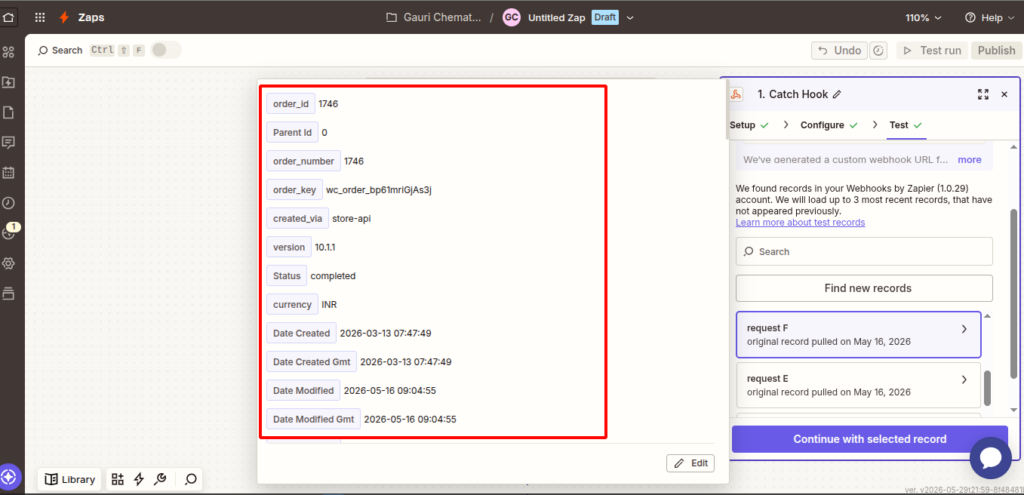
- This will send a sample request to Zapier

4. View Data in Zapier
Frequently Asked Questions (FAQ)
1. What authentication methods are supported?
Answer : The CRM Integration supports multiple authentication methods, including OAuth 2.0, JWT, API Key, and Basic Authentication. The available options may vary depending on your CRM or API provider.
2. How can I verify my OAuth 2.0 configuration?
Answer : Save the configuration and click the authorization button. If the CRM account connects successfully and tokens are generated, the OAuth setup is working correctly.
3.Why is authentication failing?
Answer : Authentication may fail due to:
Invalid JWT Header or Payload
Incorrect Client ID or Client Secret
Invalid Authorization or Access Token URL
Incorrect Scope values.
4. How can I verify my JWT configuration?
Answer : Click the Test JWT button. If the configuration is valid, the plugin will display a success message indicating that the JWT token was generated successfully.