
Setup & Integration
1. Install & Activate Plugin
Important : The plugin is install only on the Main Site .The Main Site controls synchronization. Sub-Sites do not need the plugin install.
All sync actions are controlled from : Main Site→ Admin → WooCommerce
Download and install MIPL Multistore Sync . Activate the plugin from Plugins → Installed Plugins.
Menu Options
WooCommerce → Sync Settings.
2. Add Sync Site
1. Connect Site Automatic
- Go to WooCommerce → Sync Settings ->Sites
- Enter the Sub-Site URL.
- Click Connect and Approve to establish the connection between the main site and the sub-site.
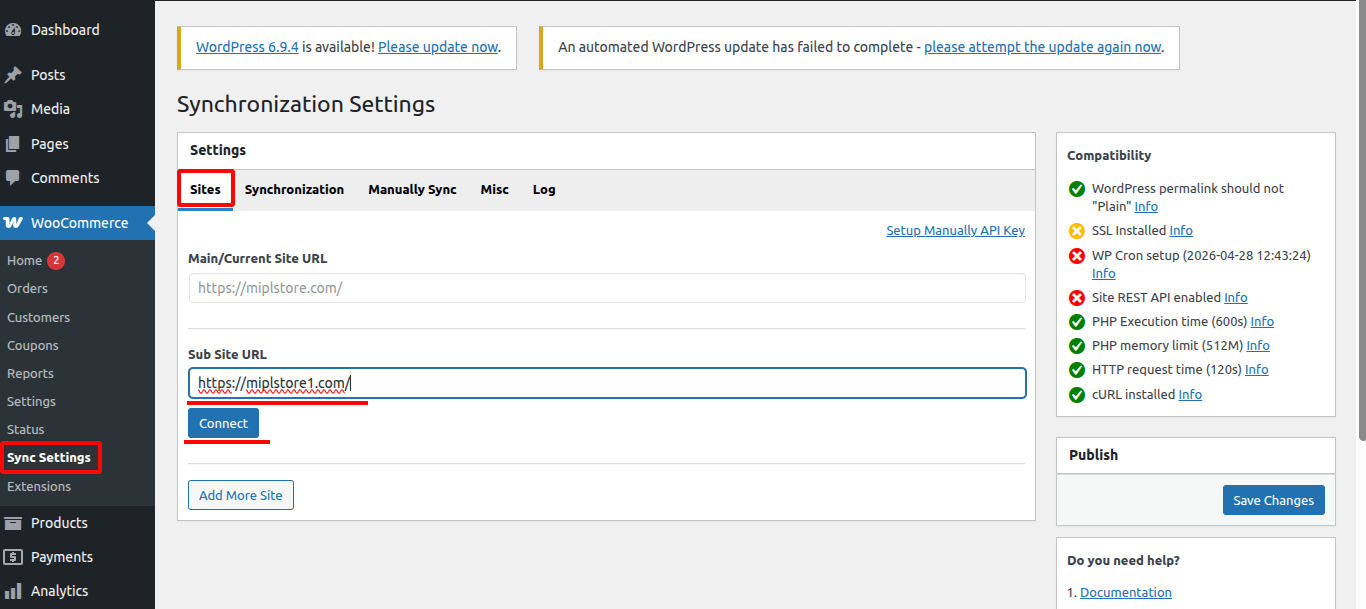
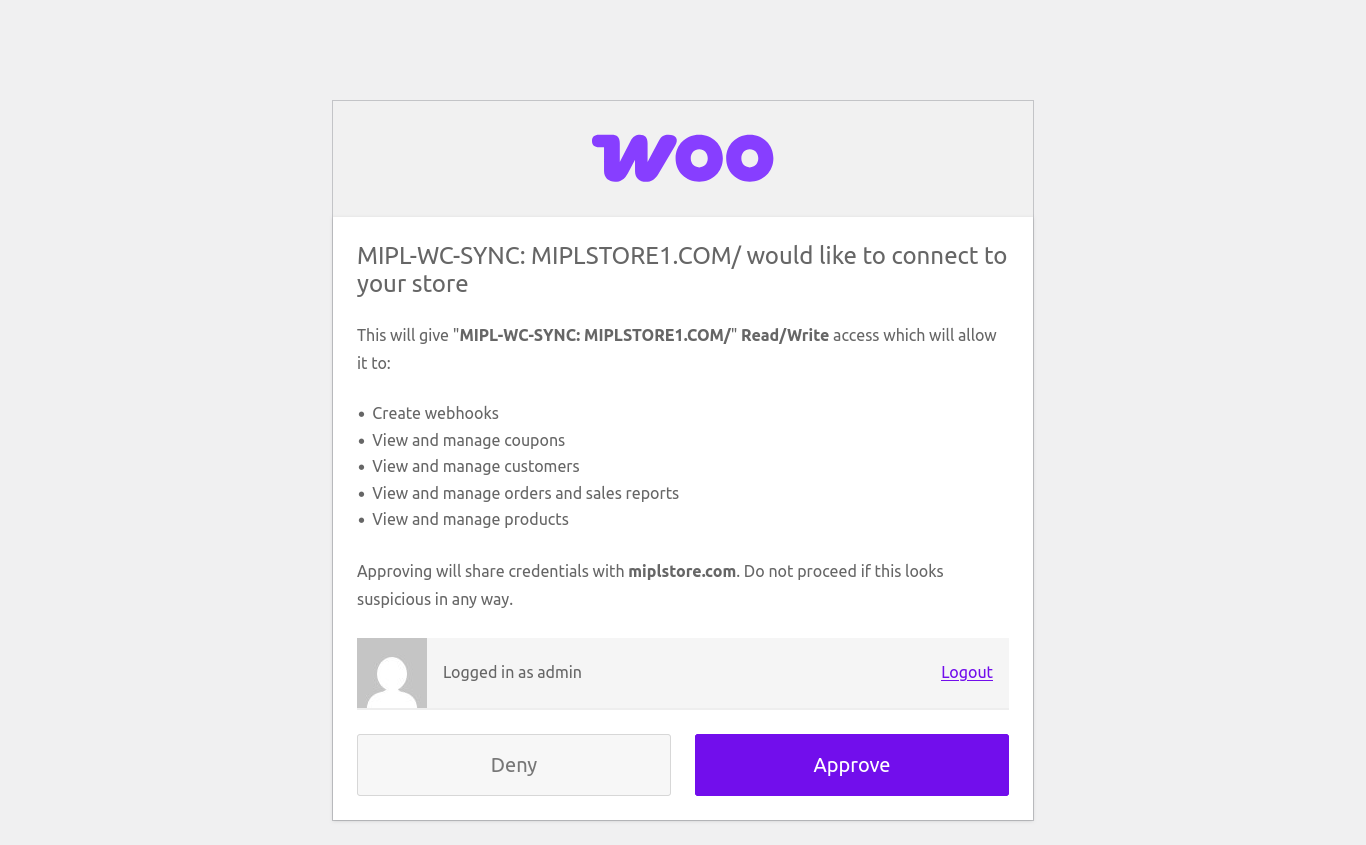
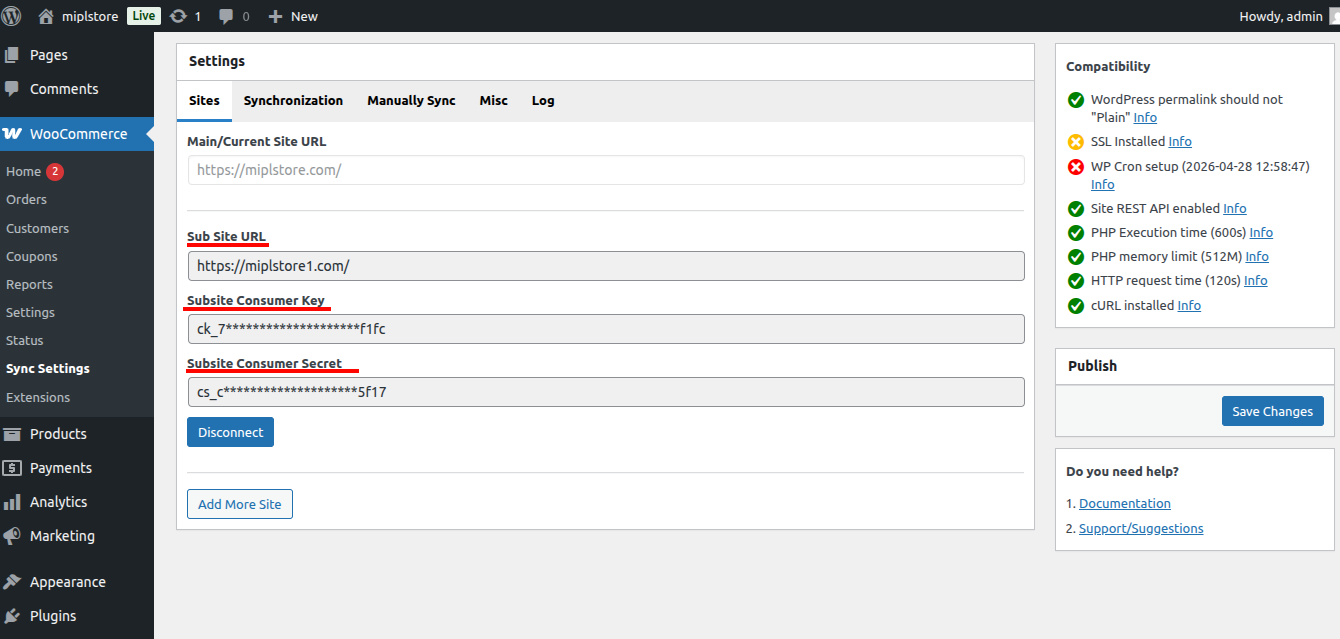
If “Sync-Site Automatically” is not working, you can use “Add Sync-Site Manually (Using API Keys)” to configure it manually. This option lets you connect the sync-site by entering the Consumer Key and Consumer Secret generated from the sync-site.
If you’re managing multiple sites, you can purchase our MIPL WC Multisite Sync Pro plugin directly from our website:
https://store.mulika.in/product/mipl-wc-multisite-sync-pro/
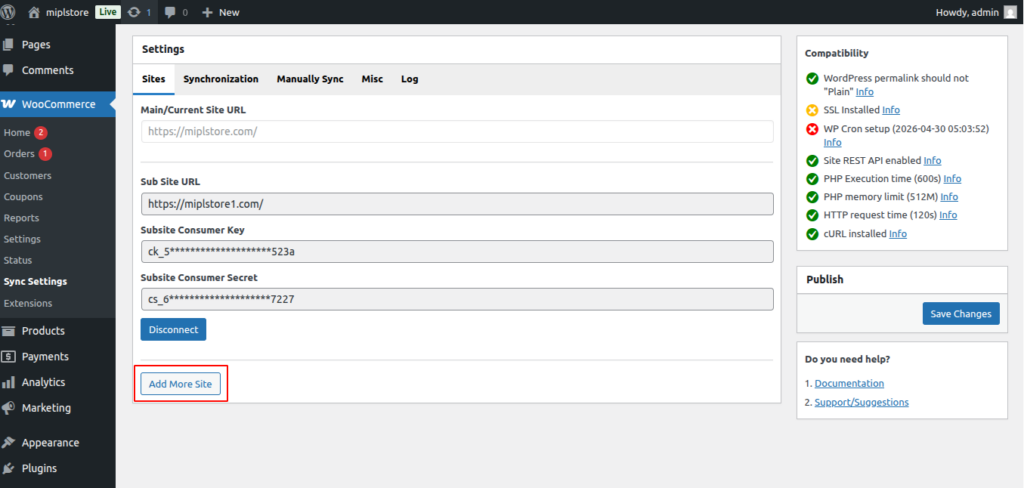
2. Connect Site Manually (Using API Keys)
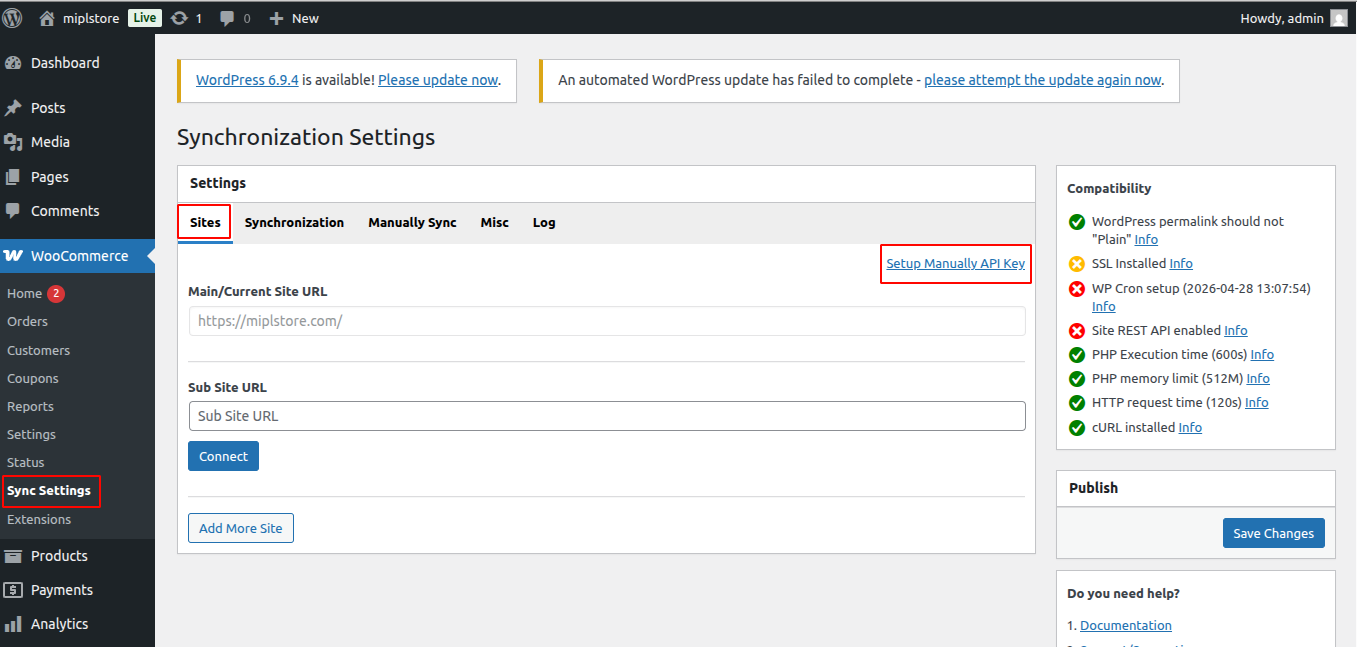
Step 1: Add Sync Site
- Go to WooCommerce → Sync Settings
- Click Setup Manually (API Key)
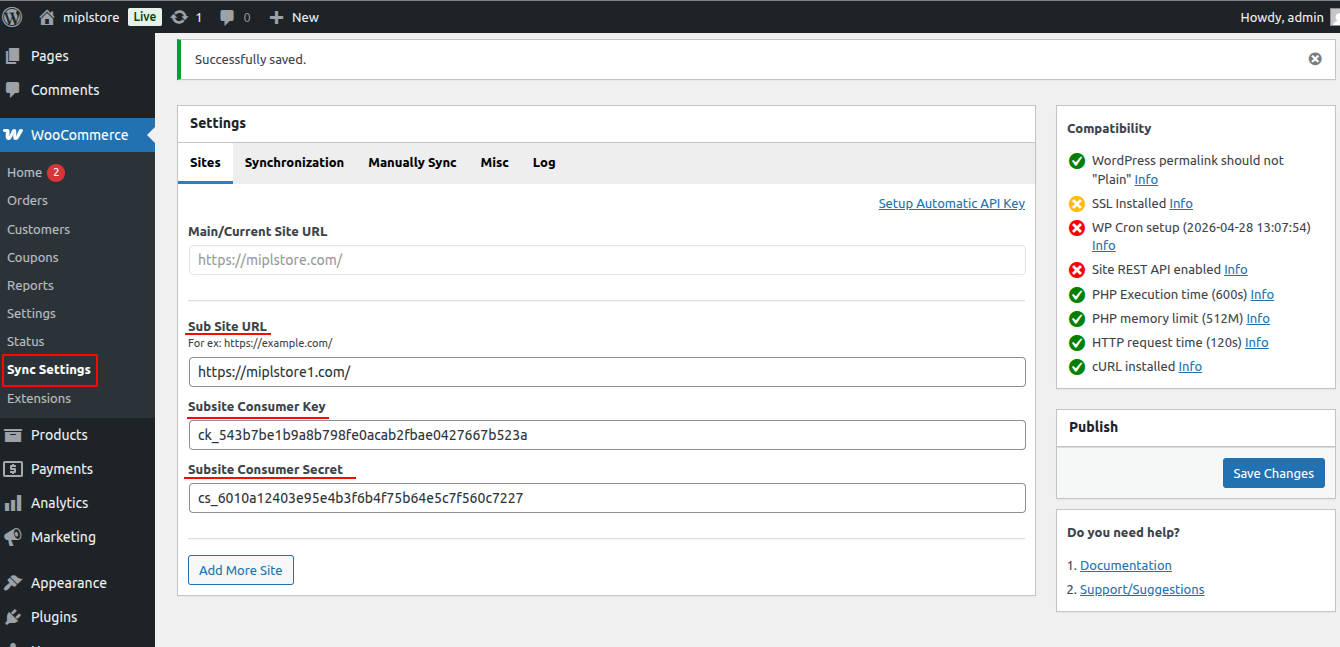
- Enter the following details:
- Sub-Site URL
- Sub-Site Consumer Key
- Sub-Site Consumer Secret
- Click Save change.
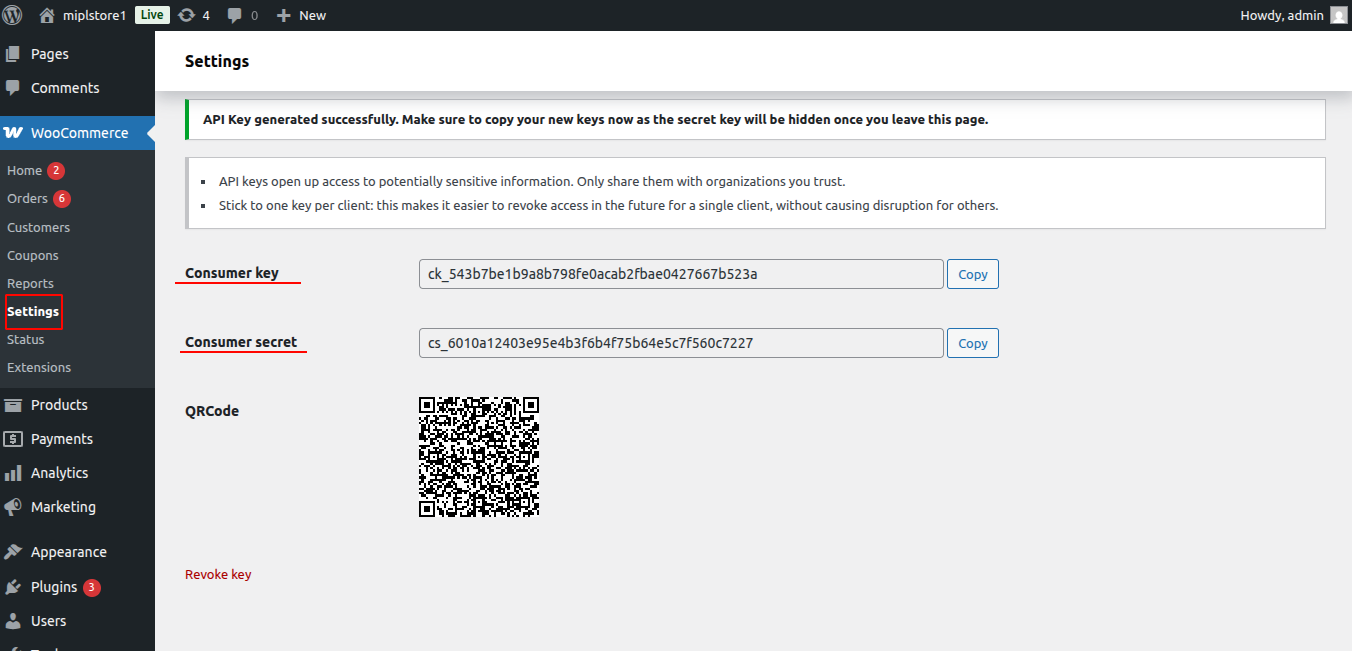
Step 2 : How to Generate Consumer Key & Consumer Secret On the Sub-site
The Consumer Key & Consumer Secret are generated on the Sub-Site (not on the main site).
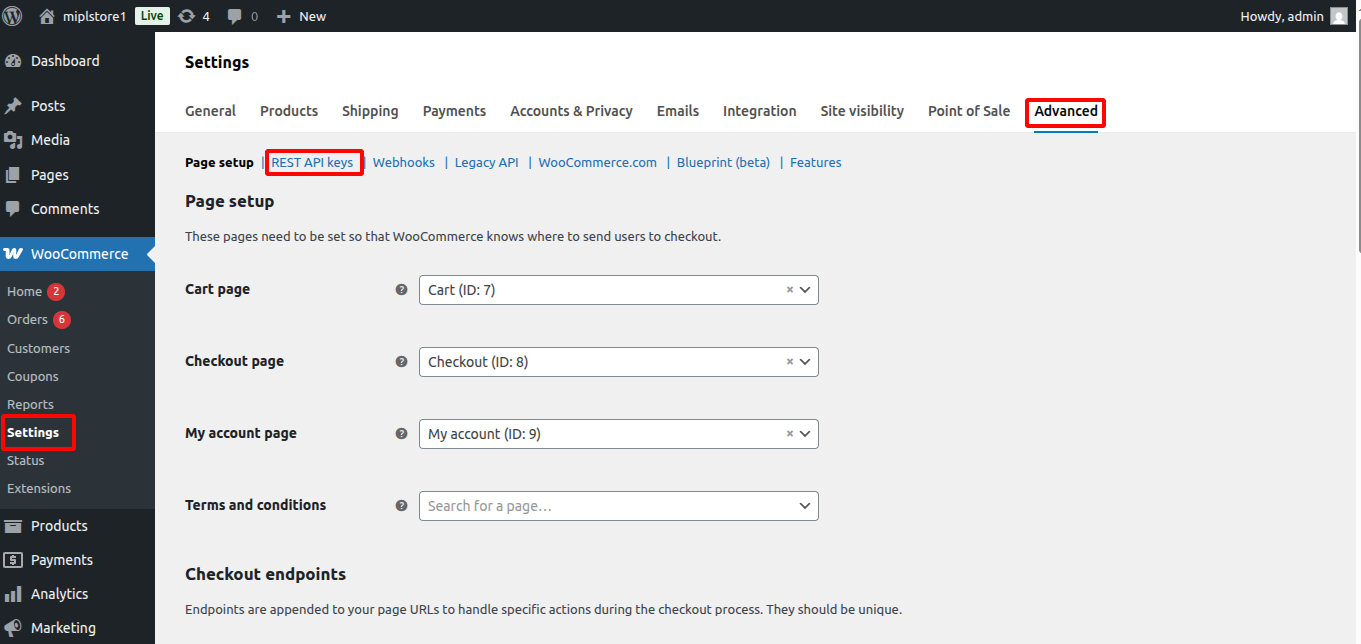
- Log in to your Sub-site WordPress Admin Panel.
- Go to WooCommerce → Settings → Advanced → REST API Keys
- Click Add Key
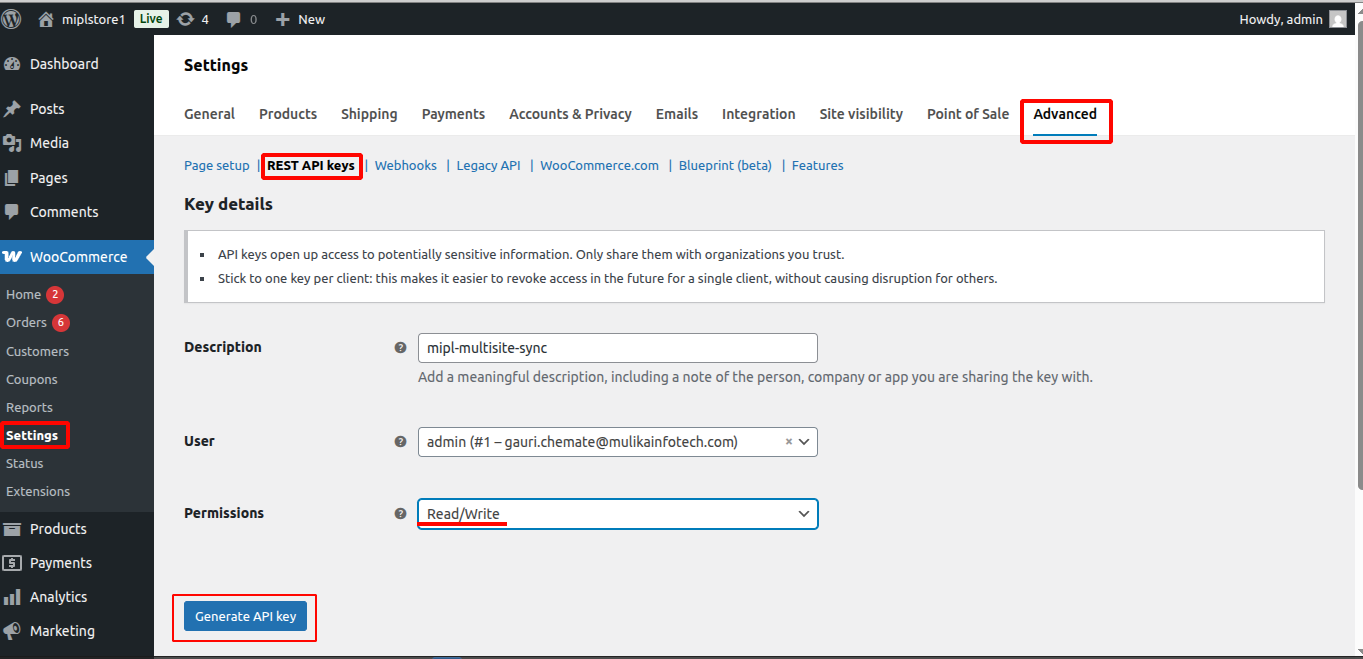
- Set : Permissions: Read/Write
- Click Generate API Key
- Copy the Consumer Key and Consumer Secret
- Paste them into the Add Site Manually form on the main site.
3. Sync Site Compatibility
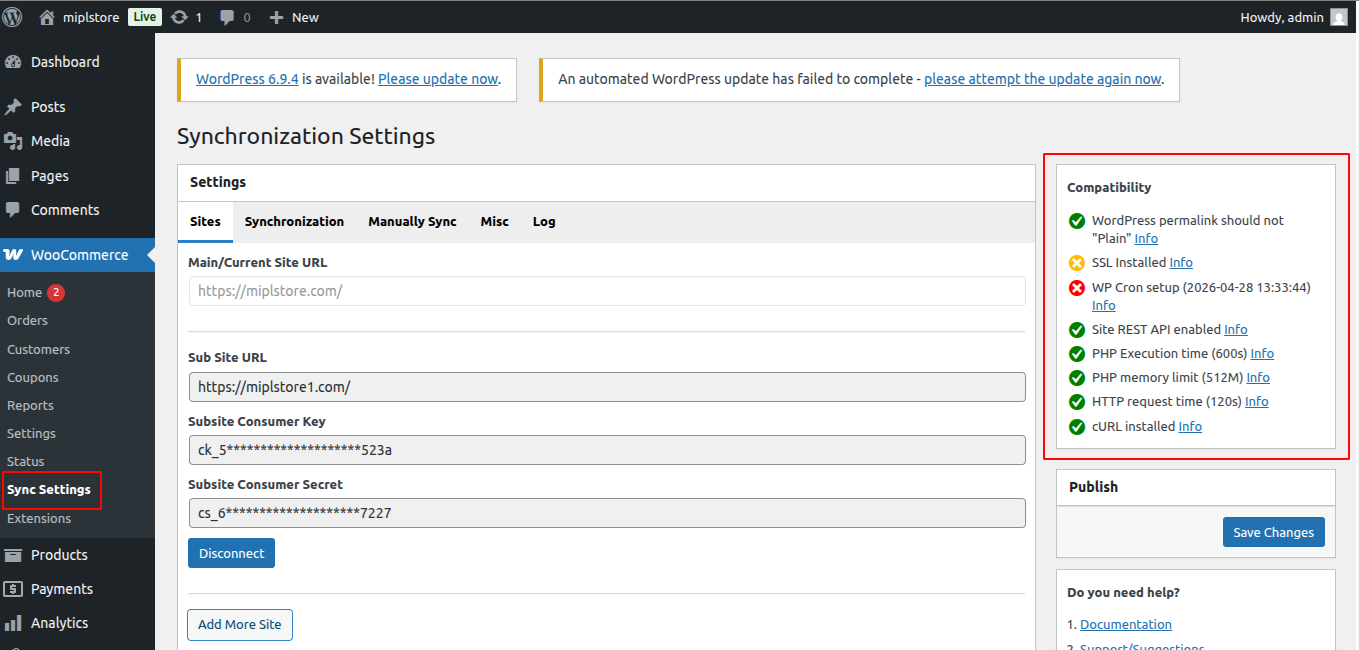
Before Syncing a Site – Check Compatibility. Make sure all compatibility checks show green before starting the sync.
- Go to WooCommerce.
- Click on Sync Settings.
- Check Compatibility.
WordPress Permalink (Should Not Be “Plain”) : Your website should use SEO-friendly URLs (like yourwebsite.com/sample-page) instead of default links with numbers (like ?p=123).This improves search engine visibility and compatibility with most themes and plugins.
SSL Installed : Your website should have an SSL certificate installed (HTTPS enabled). This keeps data secure, protects visitors, and is required for many modern integrations and payment systems.
WP-Cron Setup : WP-Cron handles scheduled tasks in WordPress (like backups, emails, and updates).It should be properly configured to ensure automatic tasks run on time. PHP Execution Time (30s)The server should allow scripts to run for at least 30 seconds. This ensures larger tasks (like importing data or updates) can complete without timing out.
PHP Memory Limit (256M) : The server should allow at least 256 MB of memory for WordPress. This helps prevent errors when using themes, plugins, or processing larger content.
HTTP Request Time (120s) : The server should allow HTTP requests to run for up to 120 seconds.This ensures smooth communication with external services (APIs, payment gateways, etc).
cURL Installed : The server must have cURL enabled. cURL allows WordPress to securely connect to external services and APIs.
4. Configure Sync Settings
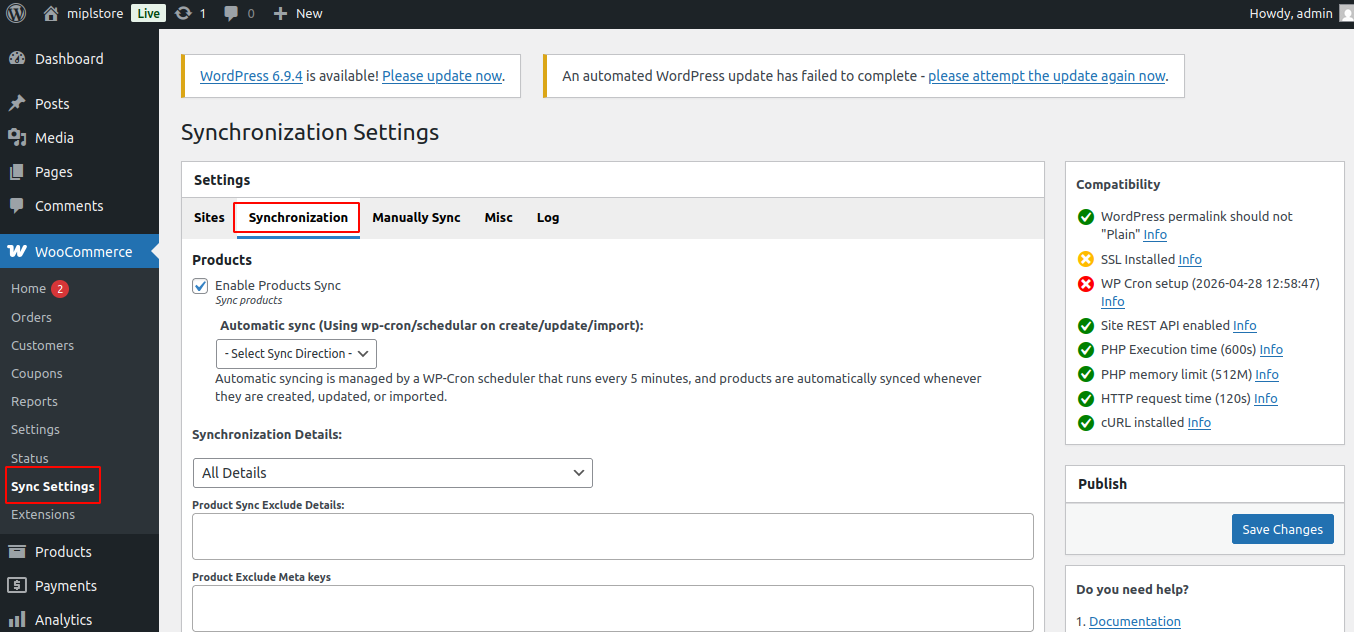
- Navigate to WooCommerce → Sync Settings.
- You will see a Synchronization option .
- Scroll to the Synchronization Settings section.
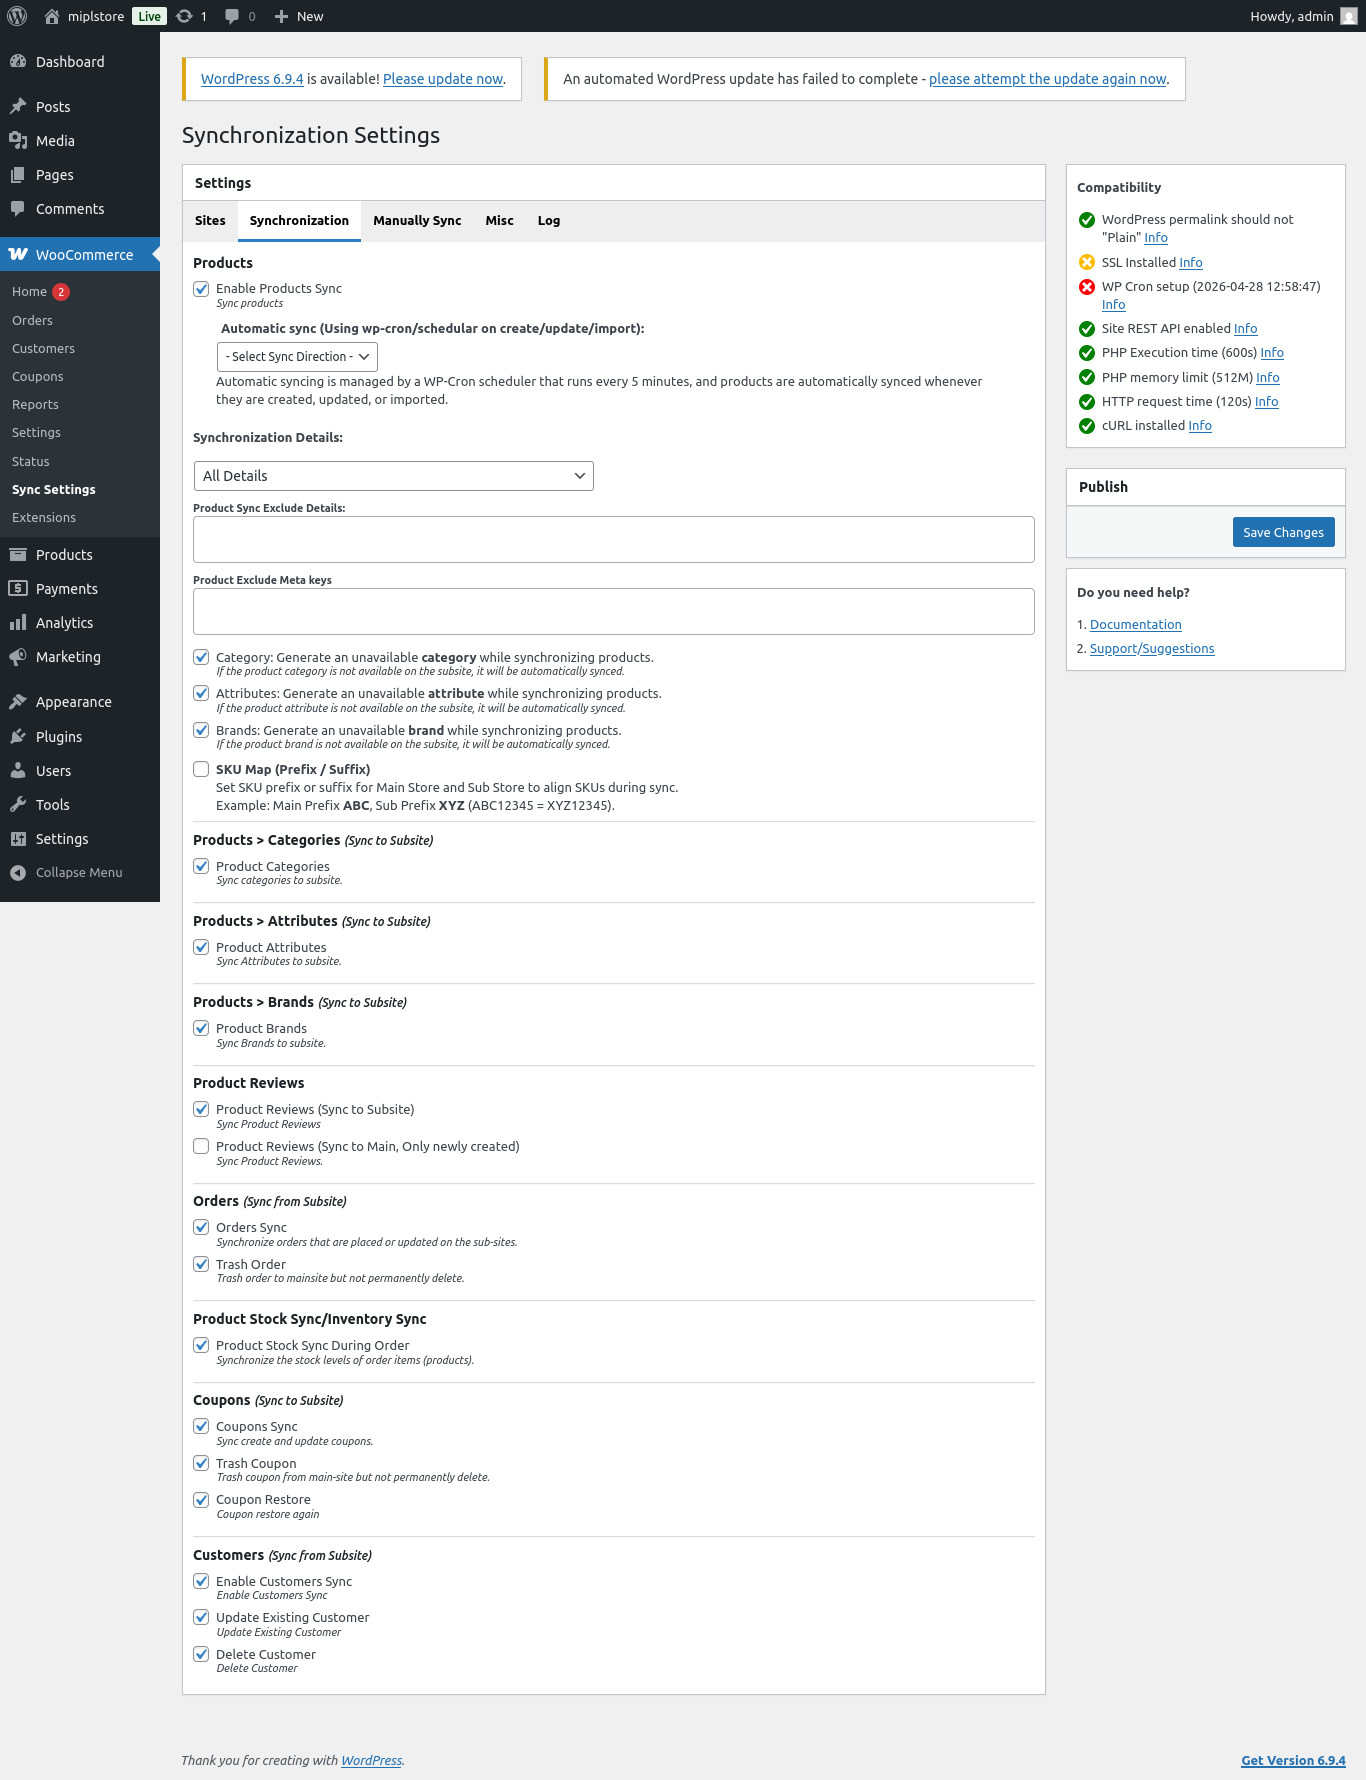
- Configure the required sync options (e.g., Products Sync, Orders Sync, Coupons Sync, etc.).
- Review the configuration.
- Click to save changes button.
Configure Sync Settings
1 . Enable Products Sync : Automatically syncs products main-site to sub-site and sub-site to main-site when they are: Imported , Created , Updated. Sync to subsite – Automatically syncs products main-site to sub-site. Sync from Subsite – Automatically syncs products sub-site to main-site.
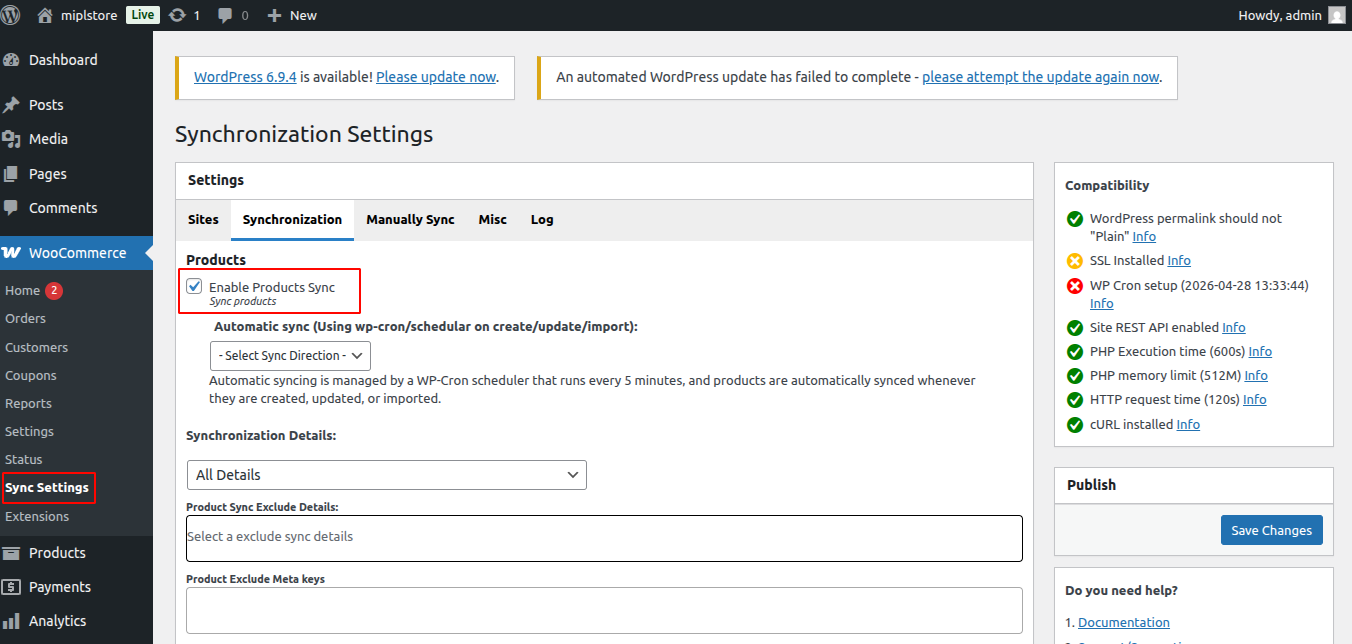
2. Synchronization Details : Choose what product data should be synced: Specific options – Sync only selected data (price, stock, etc.) All Details – Syncs all product data.
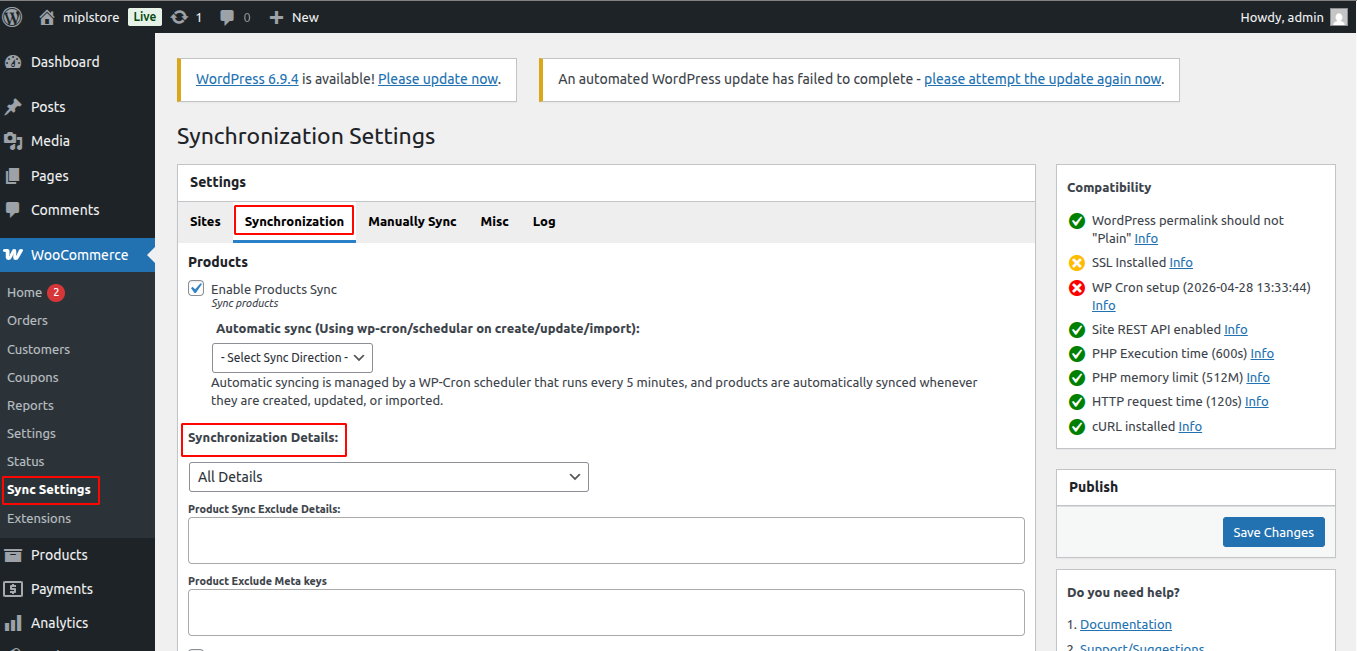
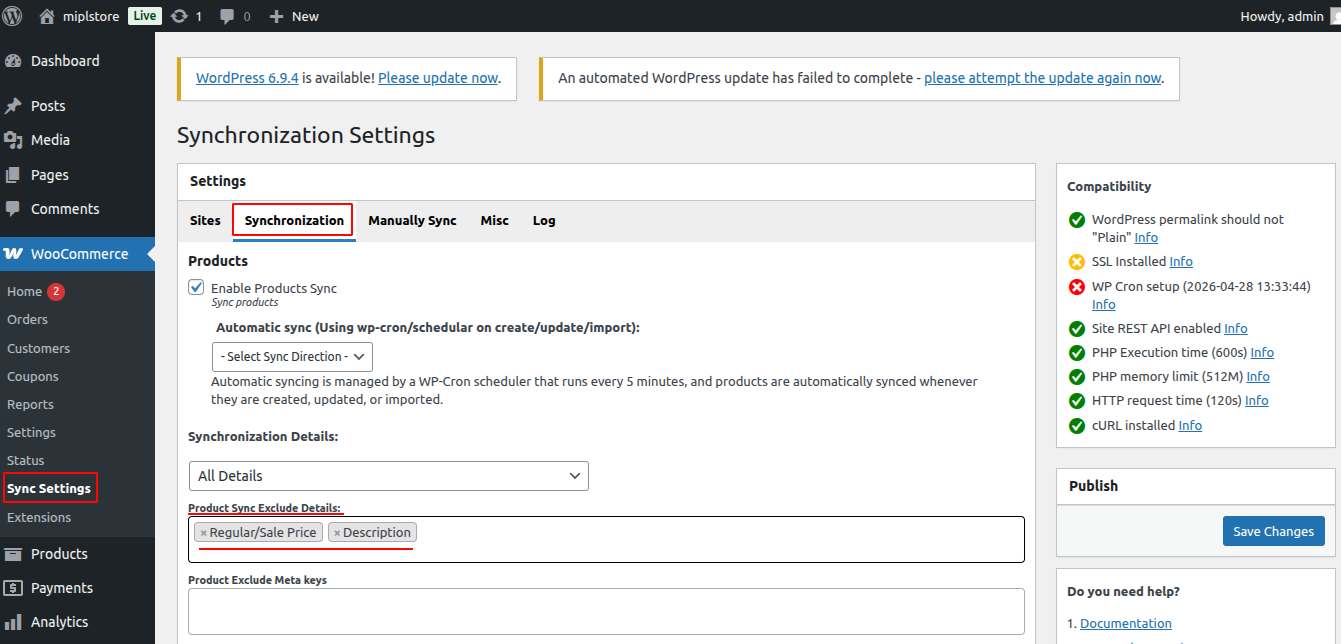
3. Product Sync Exclude Details : Select product data that should not be synced (for example: images or descriptions). This setting applies to Automatic syncronization, Bulk syncronization, and Manually syncronization.
Go to WooCommerce → Sync Settings → Synchronization →Synchronization Details → All Details →Sync Exclude Details
Under the Synchronization Details section, you can manage what product data should not be synced.
Exclude Product Meta Keys: Select the meta keys that should not be synchronized.
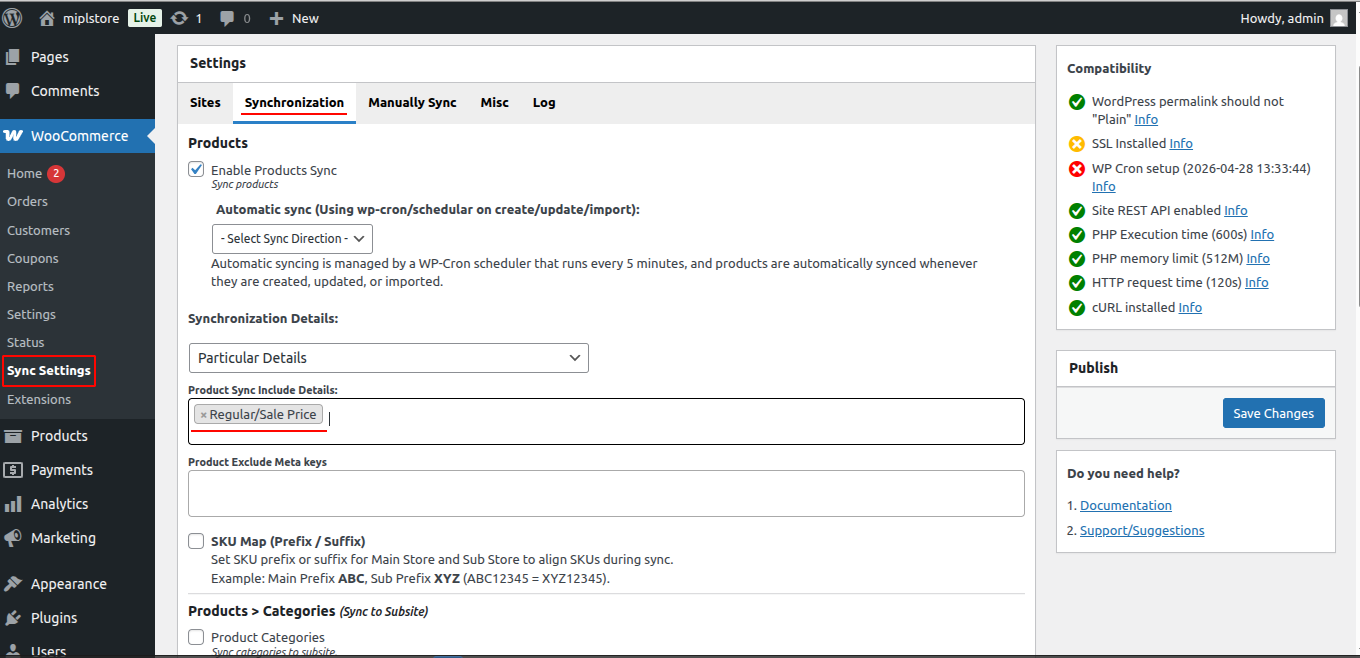
4. Product Sync Include Details : Use this setting to select specific product information to sync.
For example, if you select Price and Description, only the product price and description will be synchronized.
Go to WooCommerce → Sync Settings → Synchronization →Synchronization Details → All Details →Sync Include Details
5. Generate Missing Categories : Automatically creates categories on the sub-site if they don’t exist during product syncronization
To enable this sync setting, follow these steps:
Go to WooCommerce → Sync Settings → Synchronization →Synchronization Details →Generate Missing Categories.
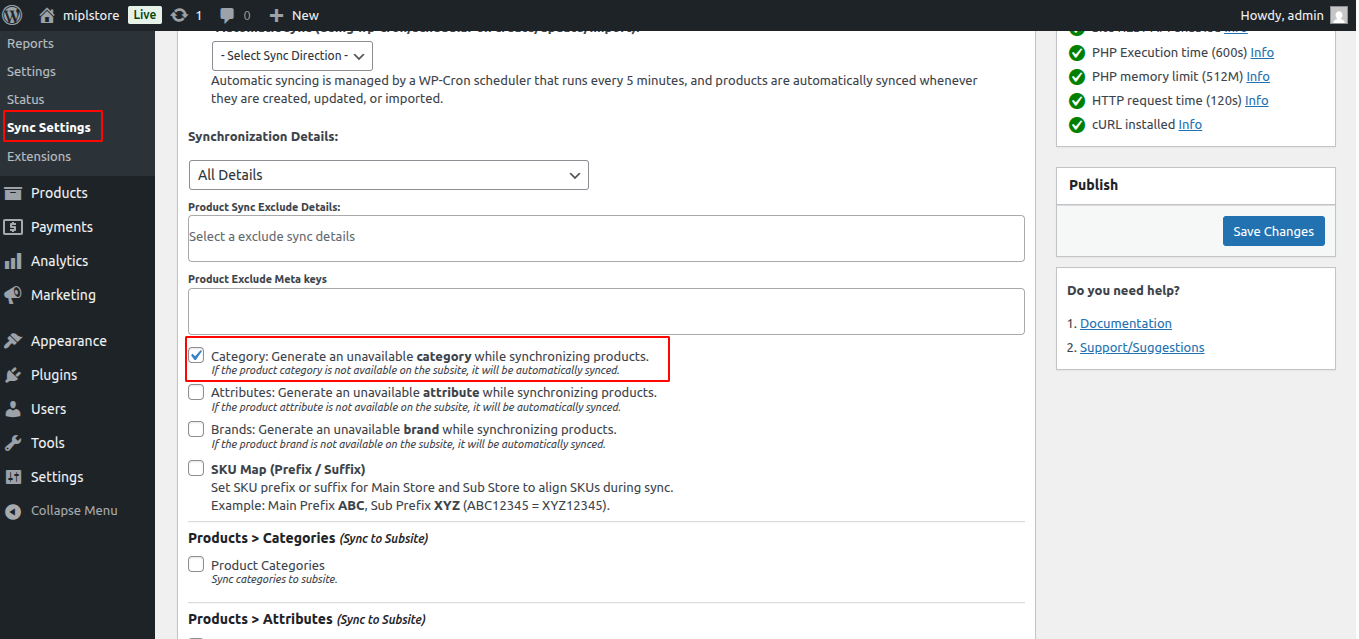
6. Generate Missing Attributes : If a product attribute is not present on the sub-site, it will be created automatically during product synchronization.
Go to WooCommerce → Sync Settings → Synchronization →Synchronization Details →Generate Missing Attributes.
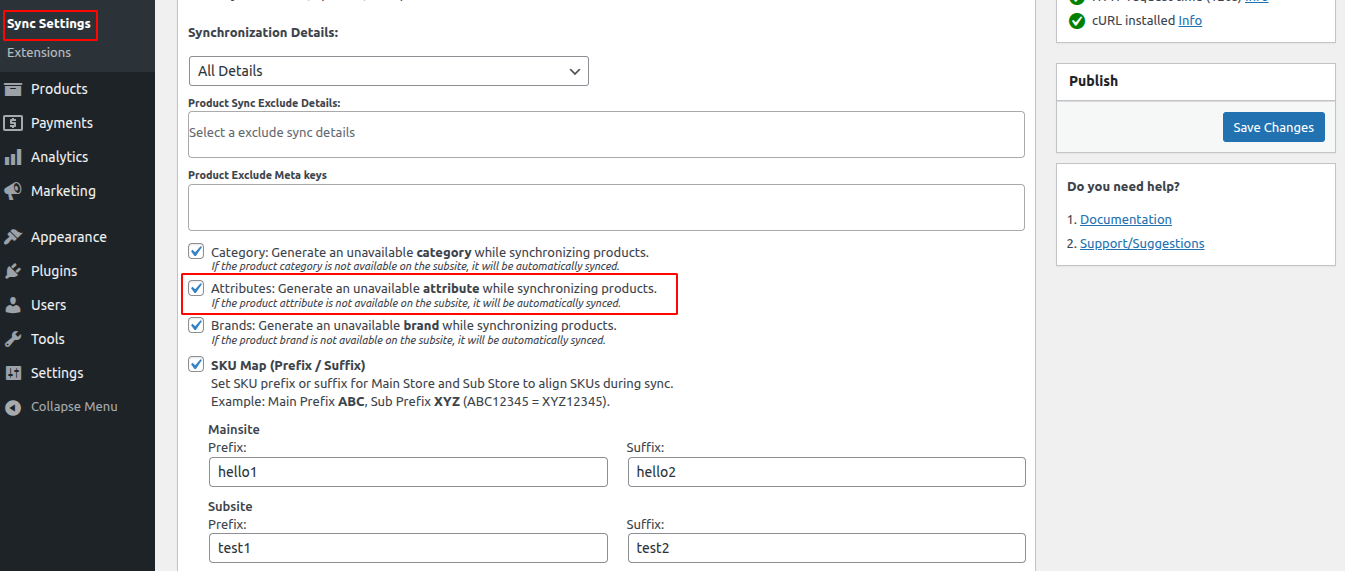
7. Generate Missing Brands : Automatically creates brands on the sub-site if they don’t exist during product sync.
Go to WooCommerce → Sync Settings → Synchronization →Synchronization Details →Generate Missing brands.
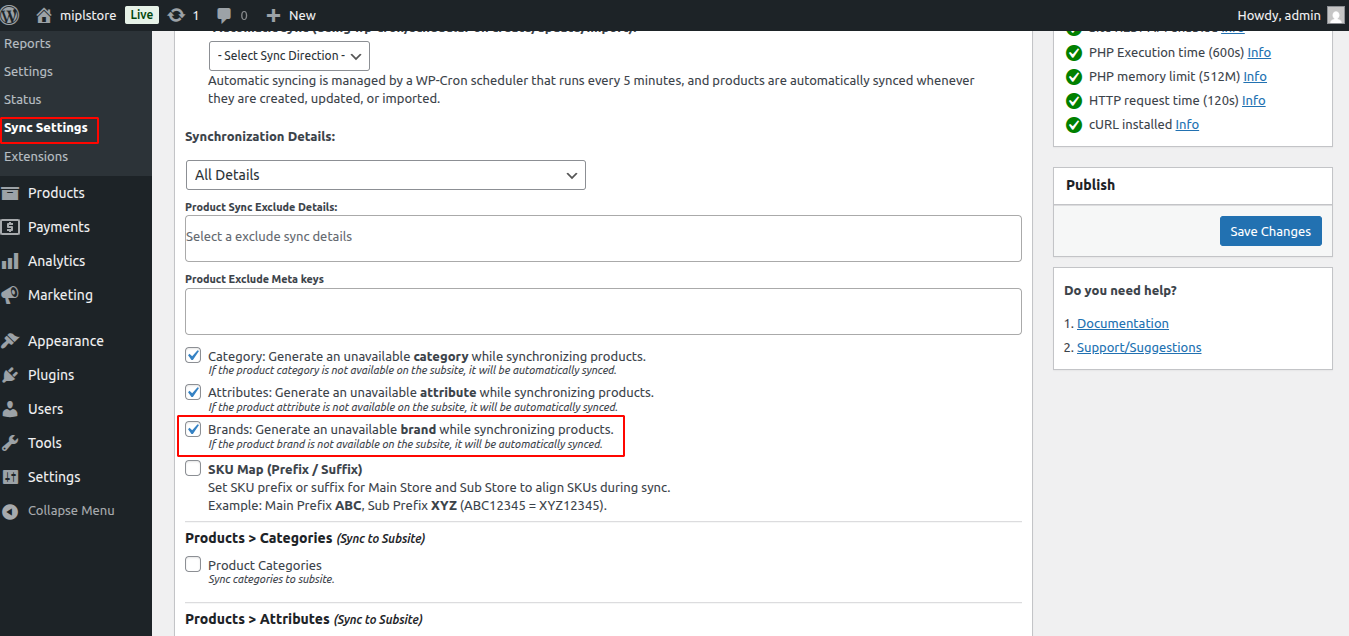
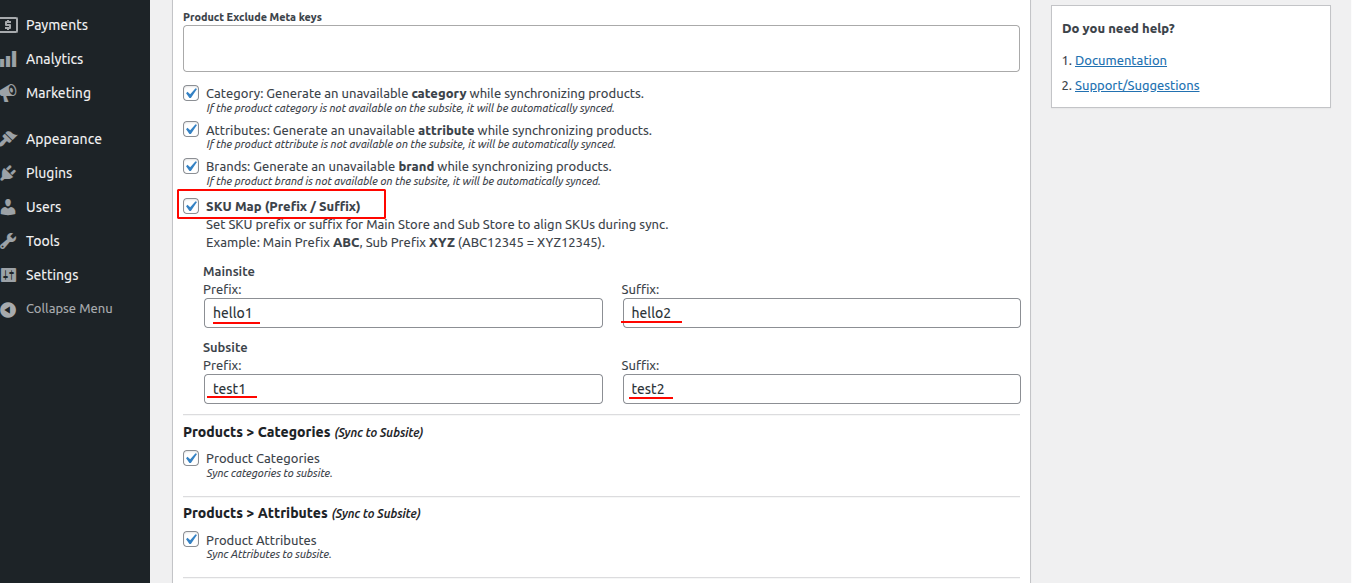
8. SKU Mapping – Subsite (Prefix / Suffix) : Adds a prefix or suffix to SKUs on the sub-site to avoid SKU conflicts. Example : Set SKU prefix or suffix for Sub Site to align SKUs during sync.
Example: Main Prefix hello1, Sub Prefix test1 (hello12345 = test12345).
First, enable SKU mapping for the subsite:
Go to WooCommerce → Sync Settings → Synchronization →Synchronization Details →SKU Map (Prefix / Suffix).
Here, add the Prefix and Suffix for the subsite.
For example:
Mainsite Prefix & Suffix :
Prefix : hello1
Suffix : hello2
Subsite Prefix & Suffix :
Prefix : test1
Suffix : test2
Now, when you create or edit a product in the main site and enter the SKU as:
hello1mipltestinghello2
After syncing the product to the subsite, the SKU will automatically change based on the subsite’s prefix and suffix settings.
So in the subsite, the SKU will appear as:
test1mipltestingtest2
This setting helps keep SKUs aligned between the main site and subsite while using different prefixes and suffixes automatically during synchronization.
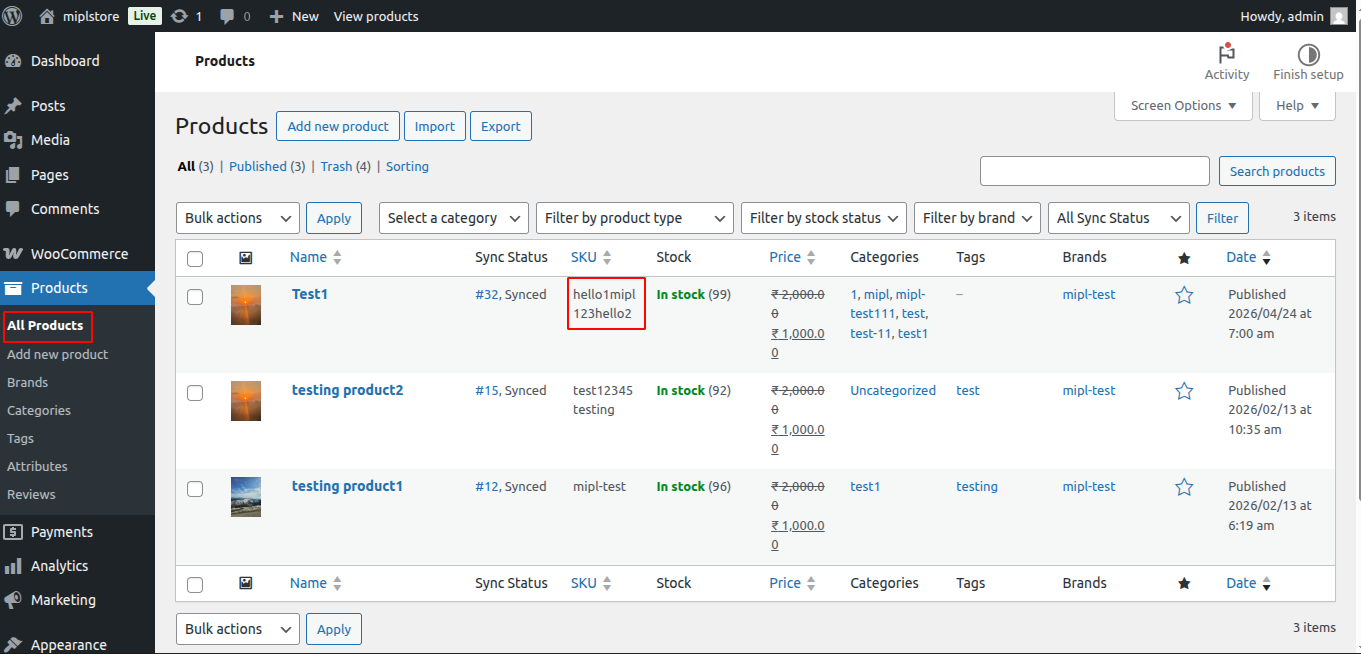
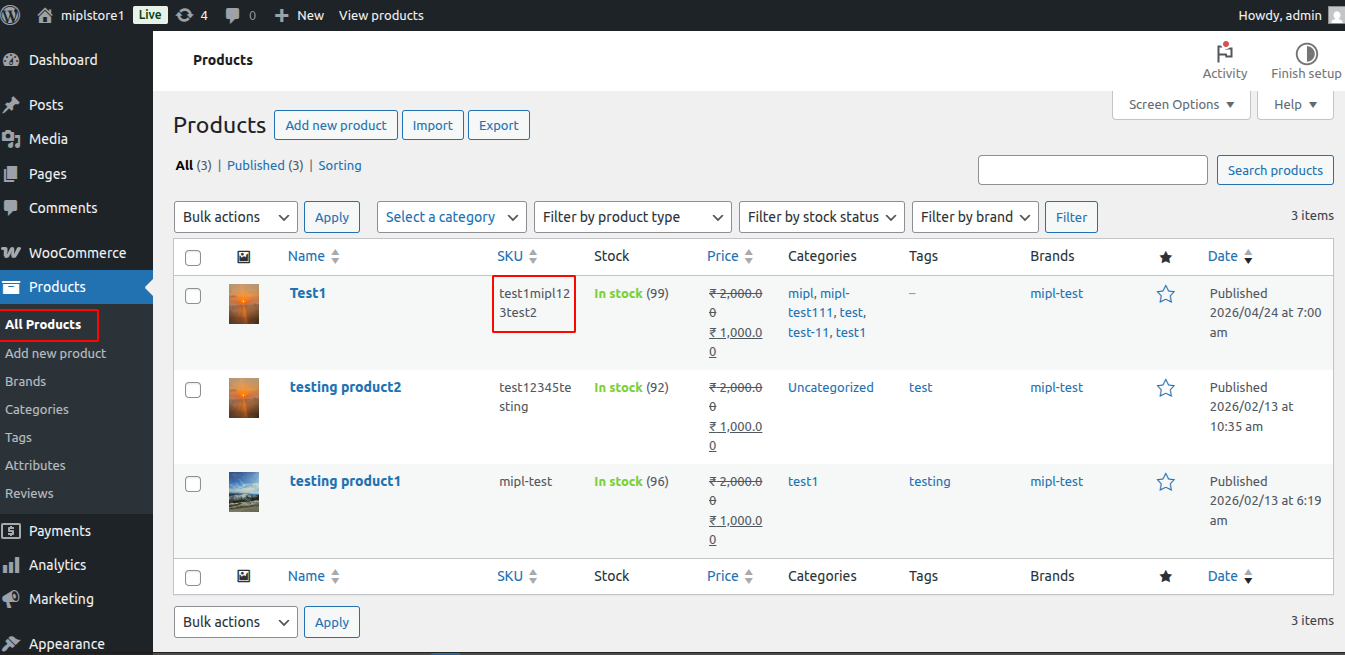
9. Product/Categories (Sync to Subsite) : Syncs all product categories from the main site to the sub-site.
To enable this sync setting, follow these steps: Go toGo to WooCommerce → Sync Settings → Synchronization →Synchronization Details →Product/Categories (Sync to Subsite).
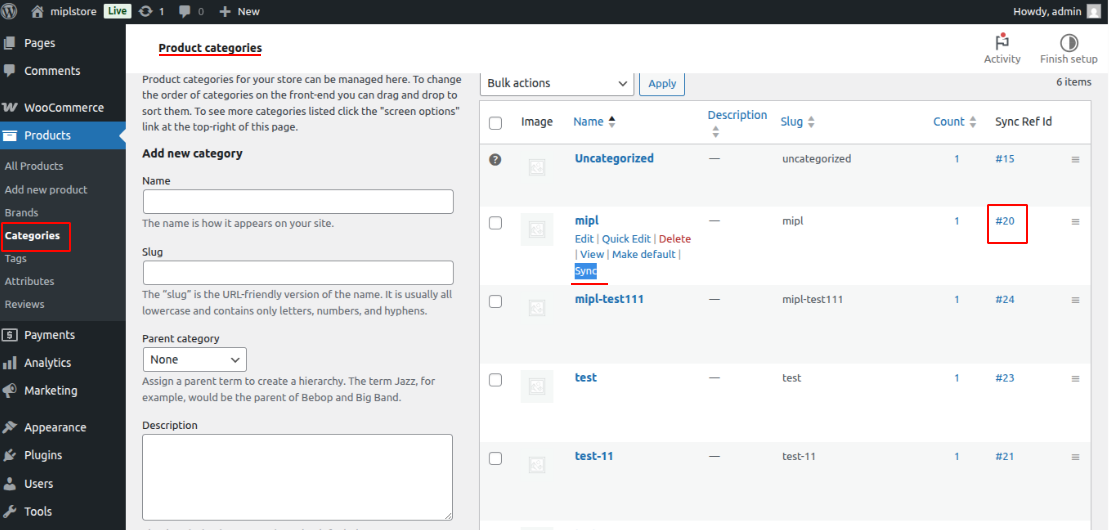
If the Product/Categories (Sync to Subsite) setting is enabled, a Sync option will appear in the category row actions.
- Go to Products → Categories.
- Click the Sync link in the row actions.
The Sync Ref ID column shows the synced Subsite Category ID.
This ID is created in the Subsite after synchronization. You can use this ID to identify and track the synced item in the Subsite. In some cases, clicking the ID will open the related item directly in the Subsite.
The Sync Ref ID shows the category ID from the Subsite. When a category is synced, it gets its own ID in the Subsite, and that ID is shown here. If you click on the Sync Ref ID (for example, #20), it will take you directly to that category in the Subsite. This helps you quickly view and manage synced categories.
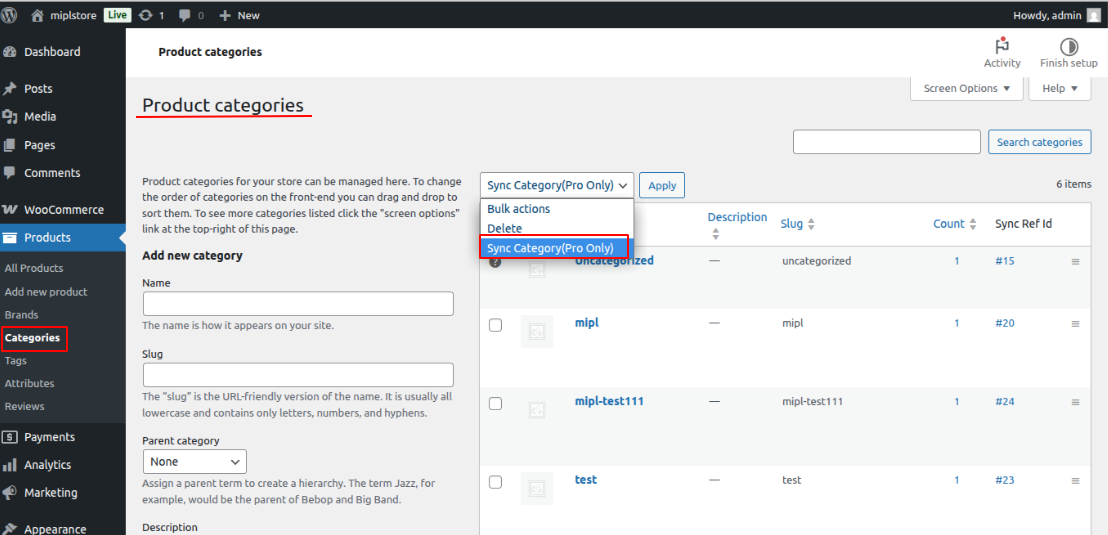
The Sync Categories bulk action allows you to sync multiple categories to the Subsite at the same time.
If you want to sync multiple categories at once, the bulk action feature is available. However, this feature is not included in the Free plugin by default.
To enable syncing, you can purchase our MIPL WC Multisite Sync Pro plugin from our website:
https://store.mulika.in/product/mipl-wc-multisite-sync-pro/
To use it:
- Go to Products → Categories.
- Select the categories using the checkboxes.
- Choose Sync Categories from the bulk actions dropdown.
- Click Apply.
This will sync all selected categories to the connected subsite in one step.
Choose Sync Categories from the bulk actions dropdown.
The Sync Ref ID shows the category ID from the Subsite. When a category is synced, it gets its own ID in the Subsite, and that ID is shown here. If you click on the Sync Ref ID (for example, #20), it will take you directly to that category in the Subsite. This helps you quickly view and manage synced categories.
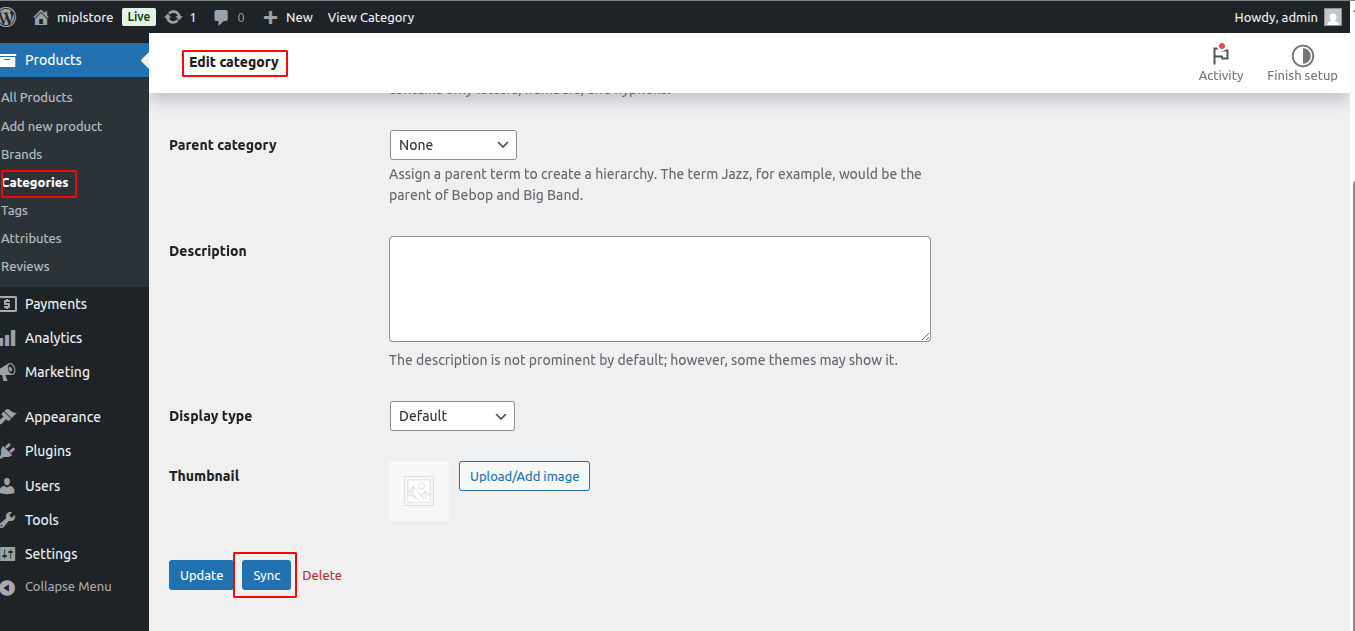
When you edit a category, the Sync button will be enabled. Click the Sync button to sync the category to the connected subsite.
10. Product Attributes (Sync to Subsite) : Syncs all product attributes from the mainsite to the Subsite.
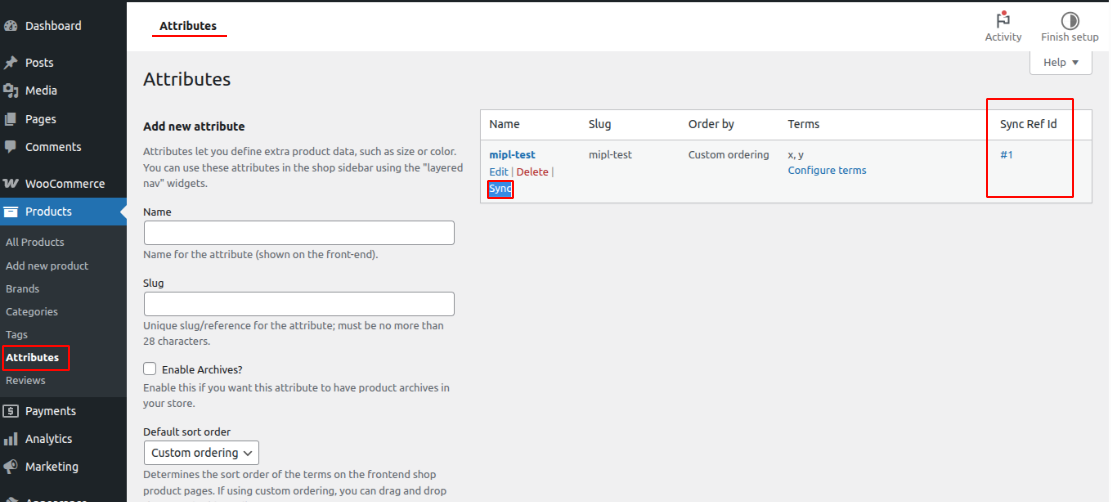
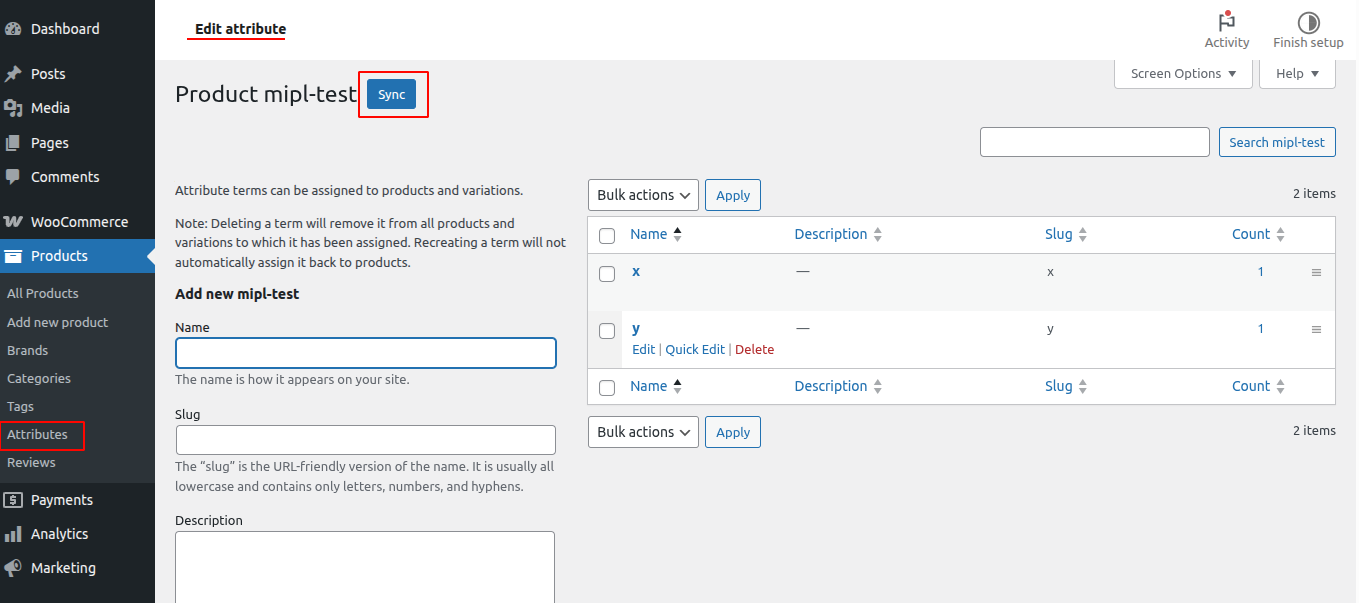
To enable this sync setting, follow these steps : Go to WooCommerce → Sync Settings → Synchronization →Synchronization Details ->Product Attributes (Sync to Subsite).
If the Product Attributes (Sync to Subsite) setting is enabled, the Sync button will be available in row action and attribute edit page.
11. Product/Brands (Sync to Sub-site) : Syncs product brands from the main site to the sub-site.
To enable this sync setting, follow these steps: Go toGo to WooCommerce → Sync Settings → Synchronization →Synchronization Details ->Product/Brands (Sync to Sub-site).
- If the Product/Brands (Sync to Subsite) sync setting is enabled, a Sync option will appear in the brand row actions.
- Click Sync to send that brand to the subsite.
You can also use the Sync Brands bulk action to sync multiple brands at once but this functionality available in pro plugin:
To enable syncing, you can purchase our MIPL WC Multisite Sync Pro plugin from our website:
https://store.mulika.in/product/mipl-wc-multisite-sync-pro/ - Select the brands using the checkboxes.
- Choose Sync Brands from the dropdown.
- Click Apply.
The Sync Ref ID shows the category ID from the Subsite. When a category is synced, it gets its own ID in the Subsite, and that ID is shown here. If you click on the Sync Ref ID (for example, #16), it will take you directly to that category in the Subsite. This helps you quickly view and manage synced categories.
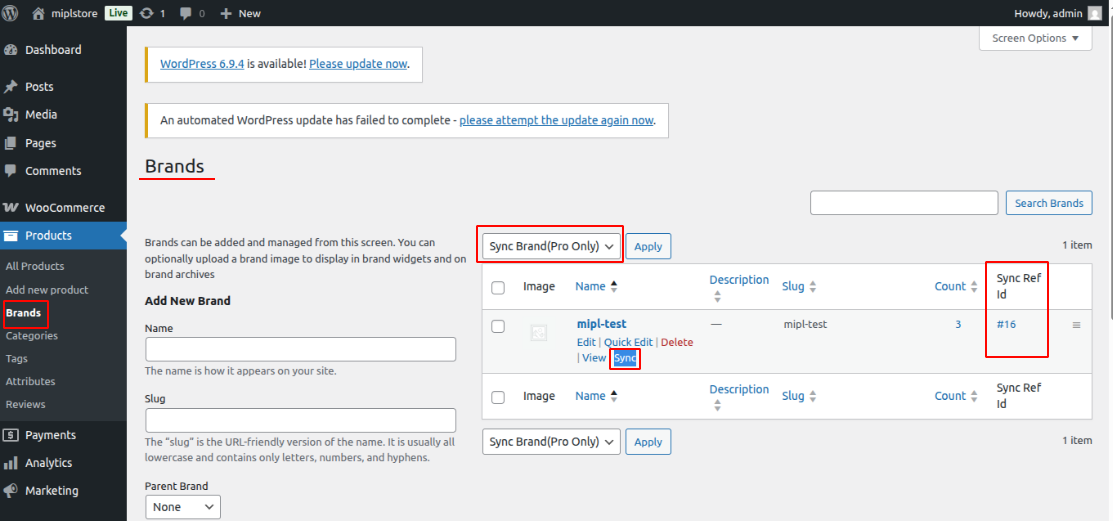
When you edit a brand, the Sync button will be enabled. Click the Sync button to sync the brand to the connected subsite.
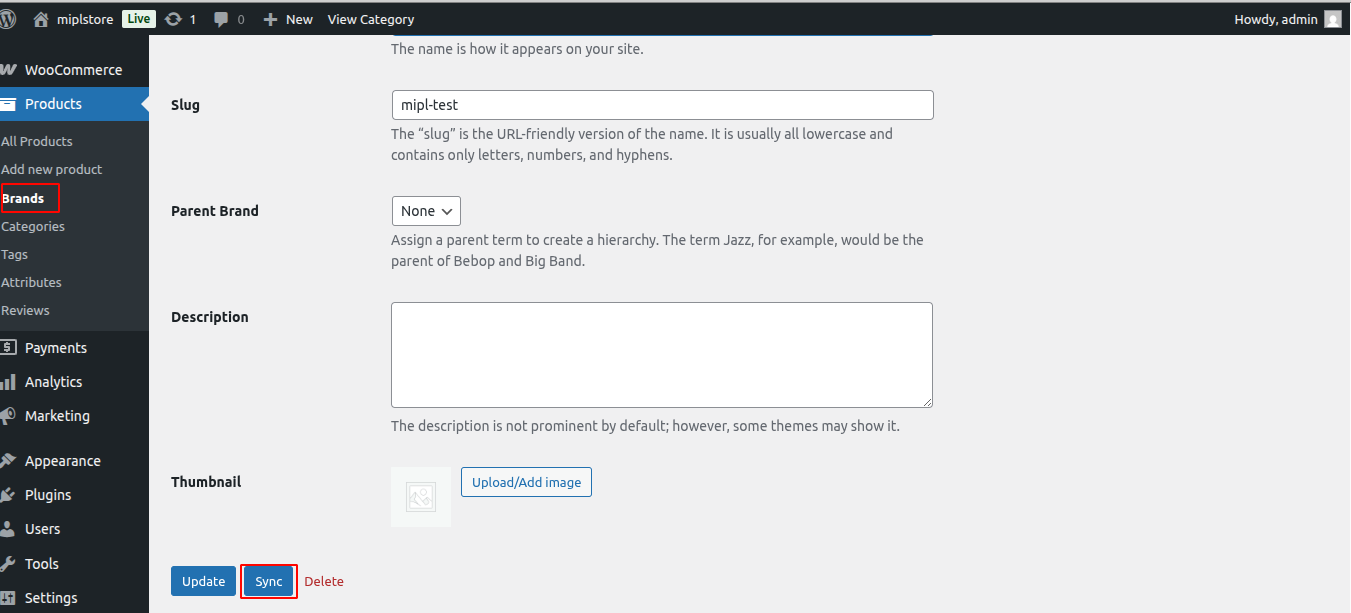
12. Product Reviews (Sync to Subsite) : Sync product reviews from the main site to the sub-site.
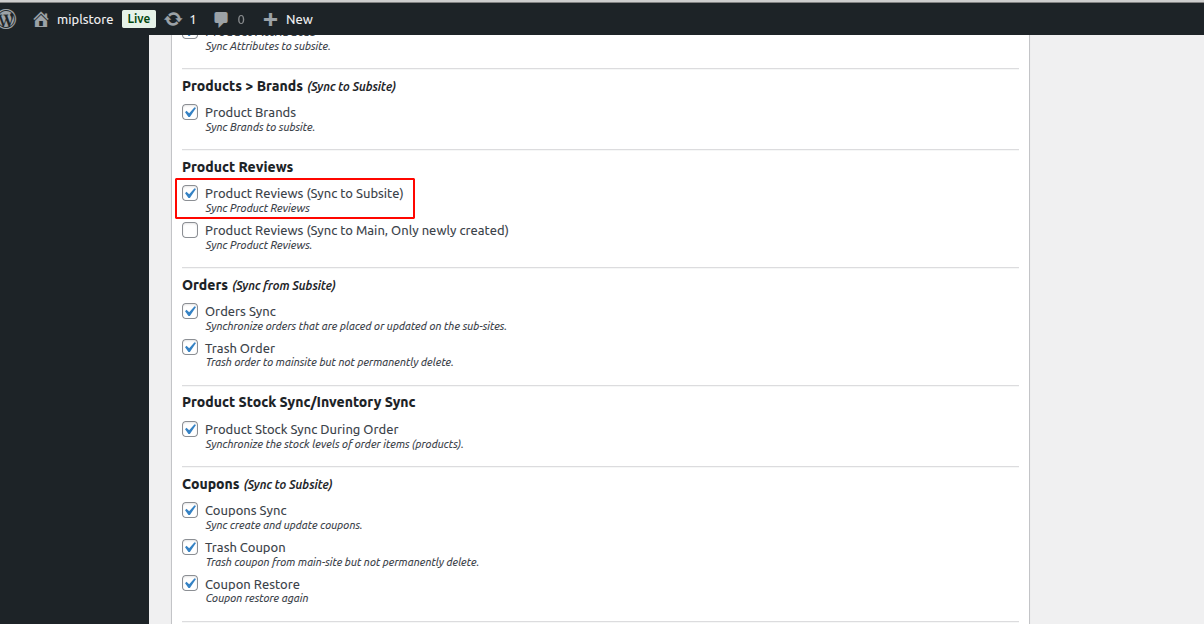
13. Product Reviews (Sync to Main Using Corn/Scheduler) : Syncs product reviews from the sub-site back to the main site using cron.
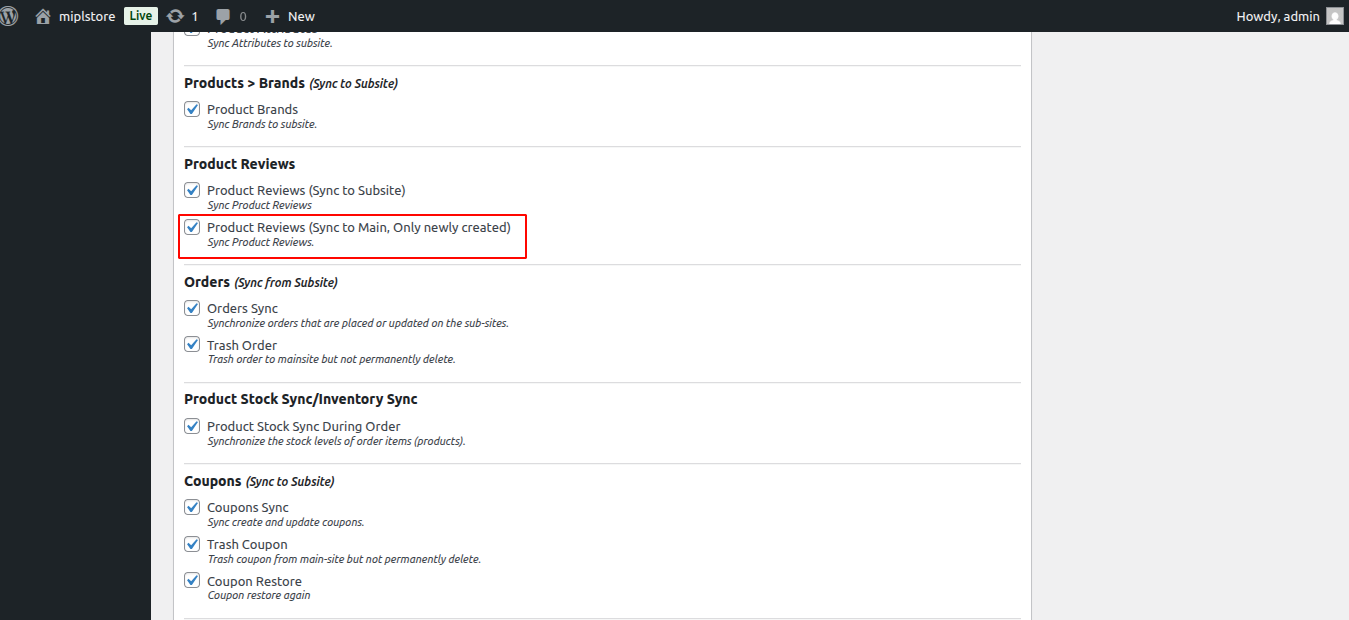
14. Orders Sync : Automatically syncs orders subsite to mainsite.
WooCommerce → Sync Settings → Synchronization →Synchronization Details -> and enable Orders (Sync from Subsite)
When Orders Sync is enabled, new and updated orders will automatically sync between the subsite to mainsite.
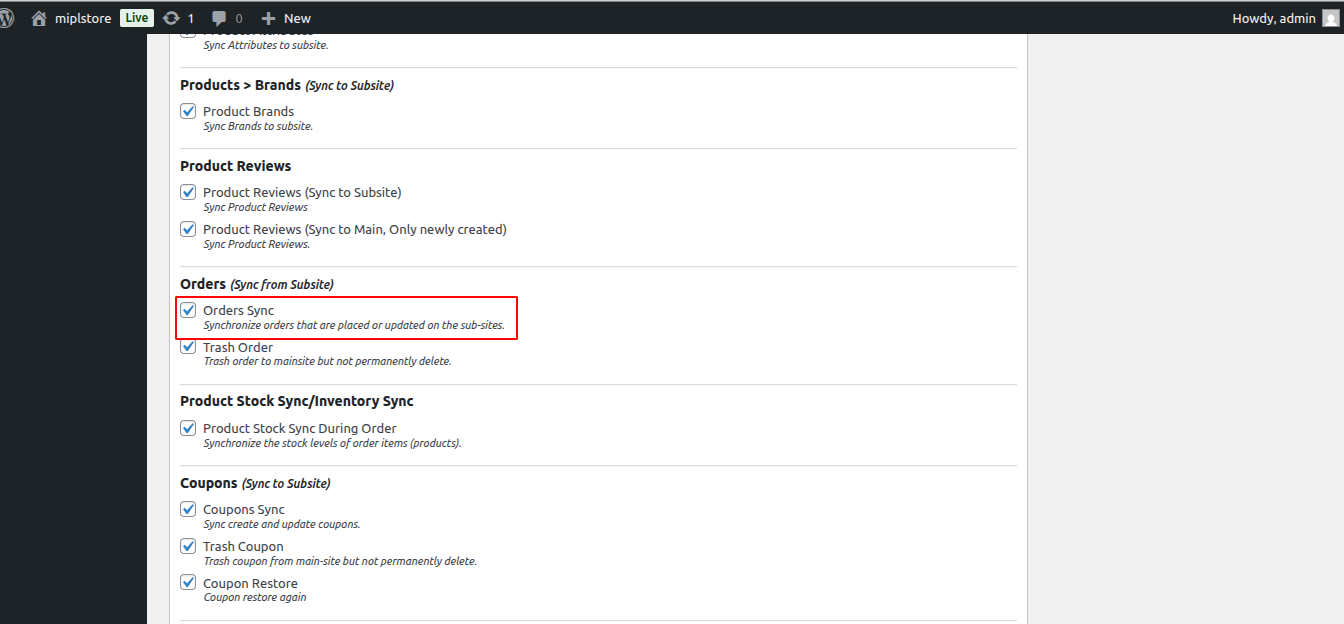
To sync orders from the main site to a subsite, you can purchase the MIPL WC Multisite Sync Pro plugin from our website:
https://store.mulika.in/product/mipl-wc-multisite-sync-pro/
This functionality is available in the Pro version of the plugin.
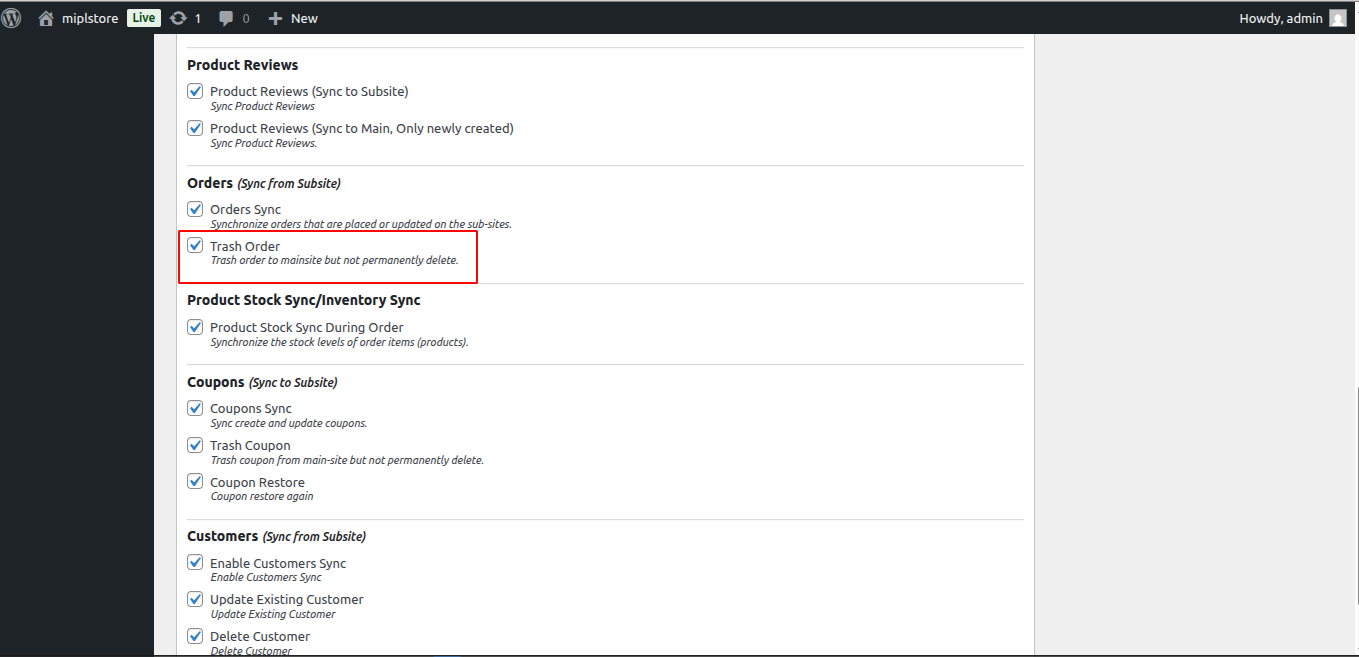
15. Trash Order : Moves deleted orders to trash instead of permanently deleting them.
Go to WooCommerce → Sync Settings → Synchronization →Synchronization Details ->and enable Orders (Sync from Subsite)
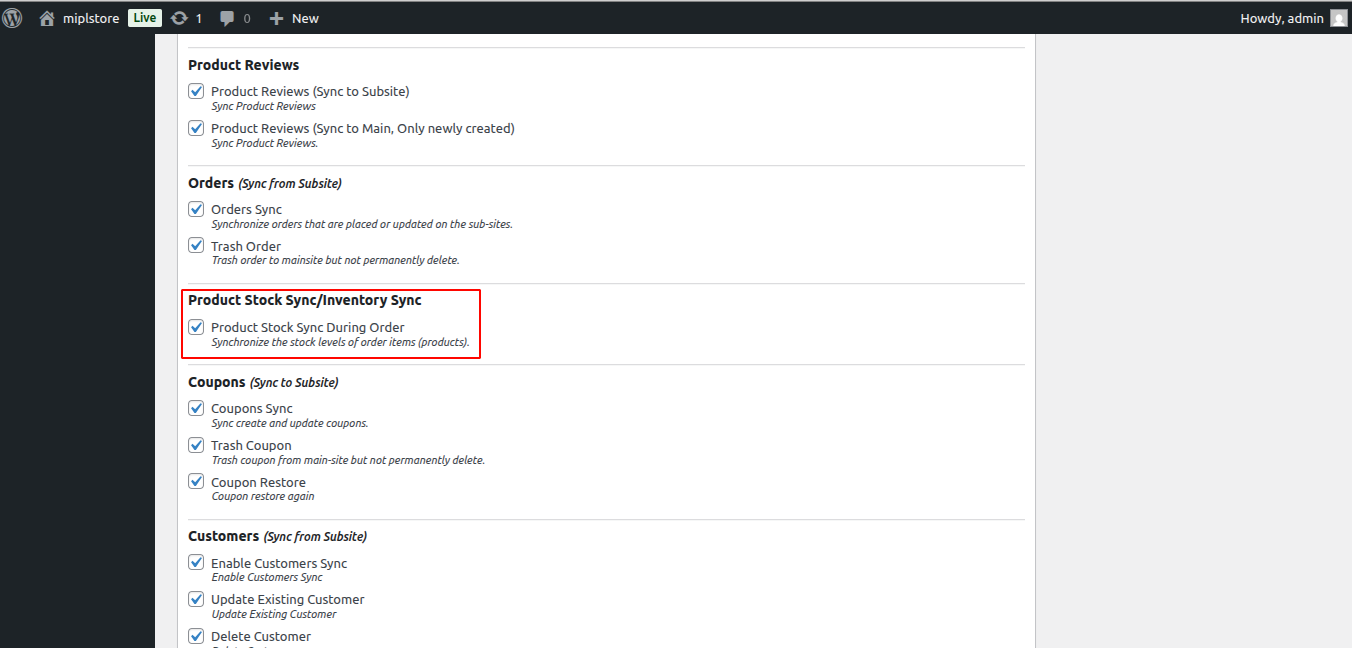
16. Product Stock Sync/Inventory Sync : Automatically updates stock levels when orders are created or updated.
To automatically update stock when an order is created or updated, enable Product Stock Sync (On Order update, Stock reduce & Stock restore).
Go to WooCommerce →Sync Settings → Synchronization →Synchronization Details -> then scroll to Product Stock Sync / Inventory Sync and check this option.
Once enabled, the product stock will automatically decrease when an order is placed and restore if the order is updated or cancelled.
This setting does not depend on order or product settings.
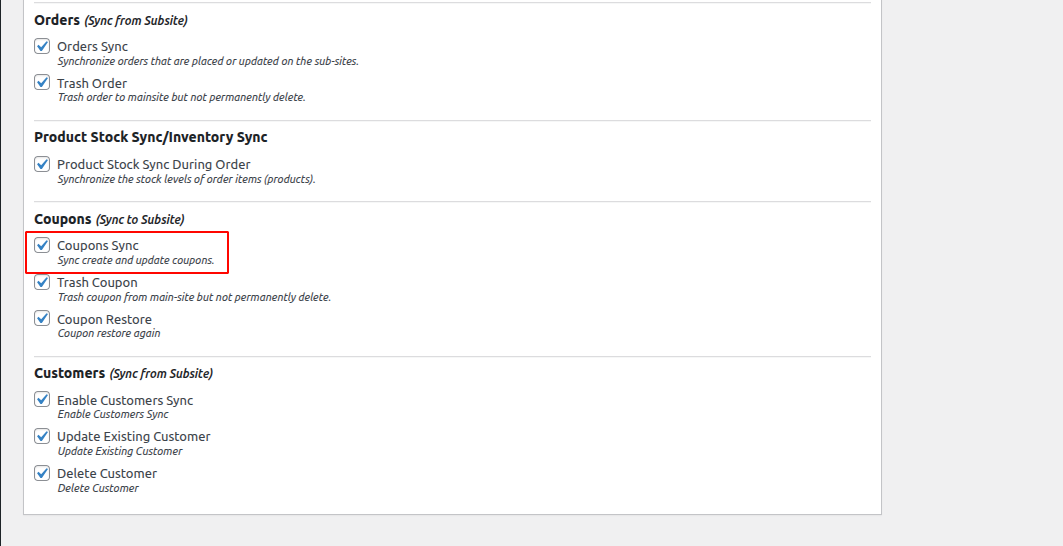
17. Coupons Sync : Syncs coupon creation and updates to the sub-site.
Go to WooCommerce → Sync Settings → Synchronization →Synchronization Details -> then scroll to Coupons Sync and check this option.
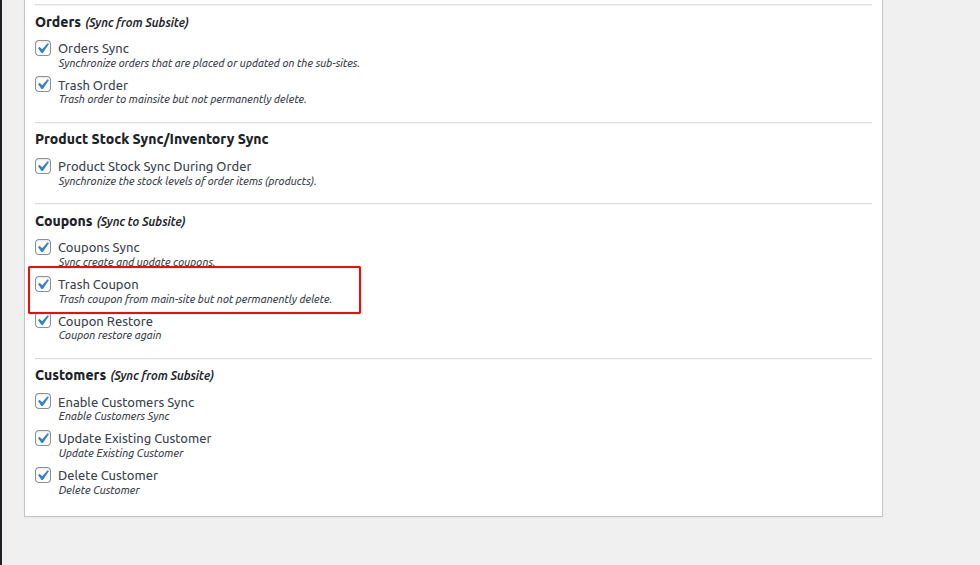
18. Trash Coupon : Moves deleted coupons to trash instead of permanently deleting them.
Go to WooCommerce → Sync Settings → Synchronization →Synchronization Details -> then scroll to Coupons (Sync to subsite)-> Trash Coupon setting and check this option.
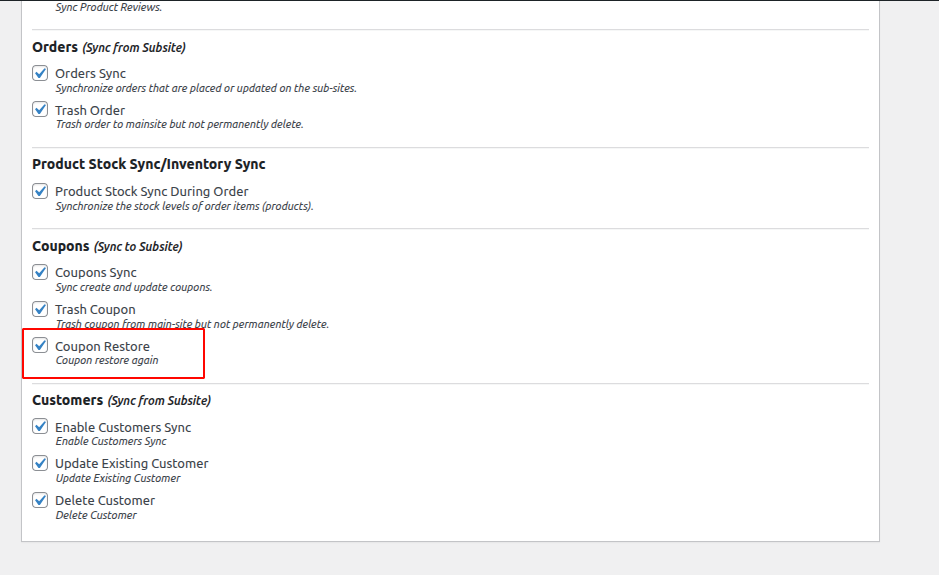
19. Coupon Restore : Restores previously trashed coupons.
Go to WooCommerce → Sync Settings → Synchronization →Synchronization Details -> then scroll to Coupons (Sync to subsite)-> Coupon Restore setting and check this option.
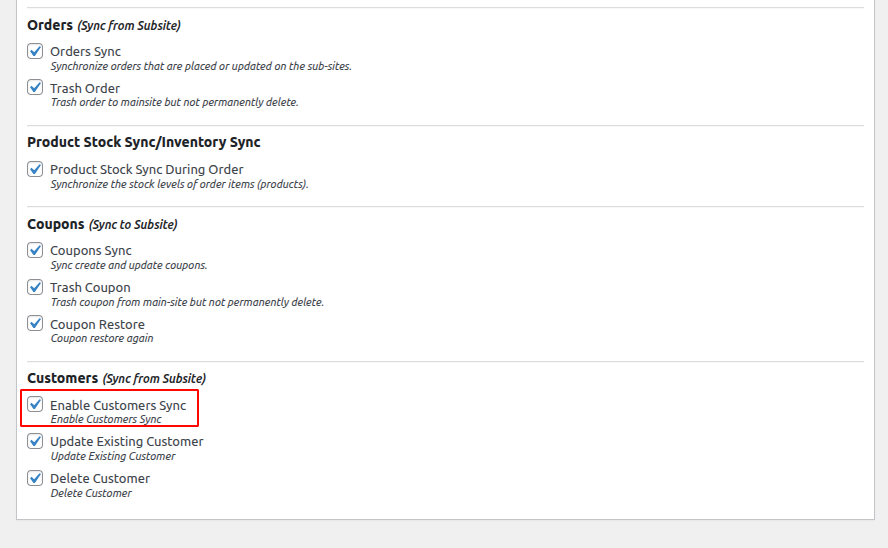
20. Enable Customers Sync : Syncs customers from sub-site to the main site.
Go to WooCommerce → Sync Settings → Synchronization →Synchronization Details ->Under the Customers (Sync from Subsite) section, enable the Enable Customers Sync option.
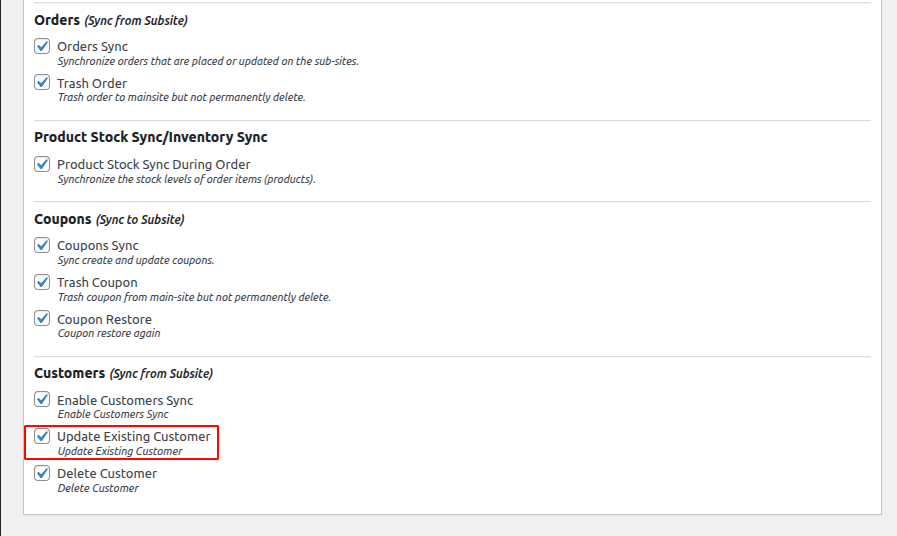
21. Update Existing Customer : Updates existing customer details during sync.
Go to WooCommerce → Sync Settings → Synchronization →Synchronization Details -> Customers -> Update Existing Customer.
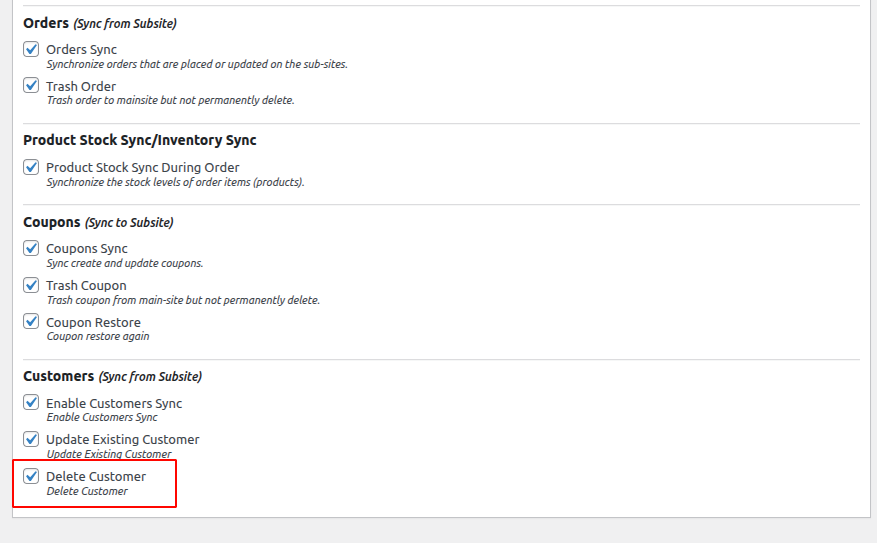
22. Delete Customer : Deletes customers from the main site when removed from sub-site.
Go to WooCommerce → Sync Settings → Synchronization →Synchronization Details -> Customers –>Delete Customer
4. Multisite Sync – Misc Settings
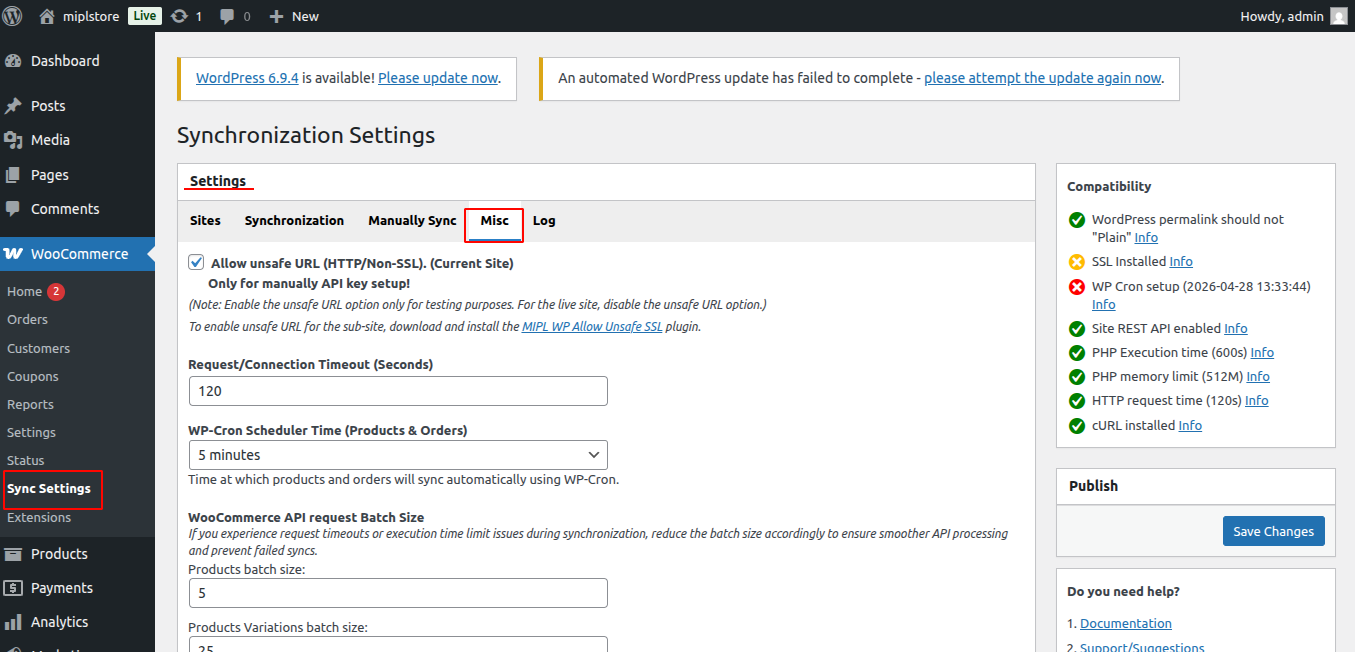
- Go to WooCommerce .
- Select Sync Settings.
- Click on Misc.
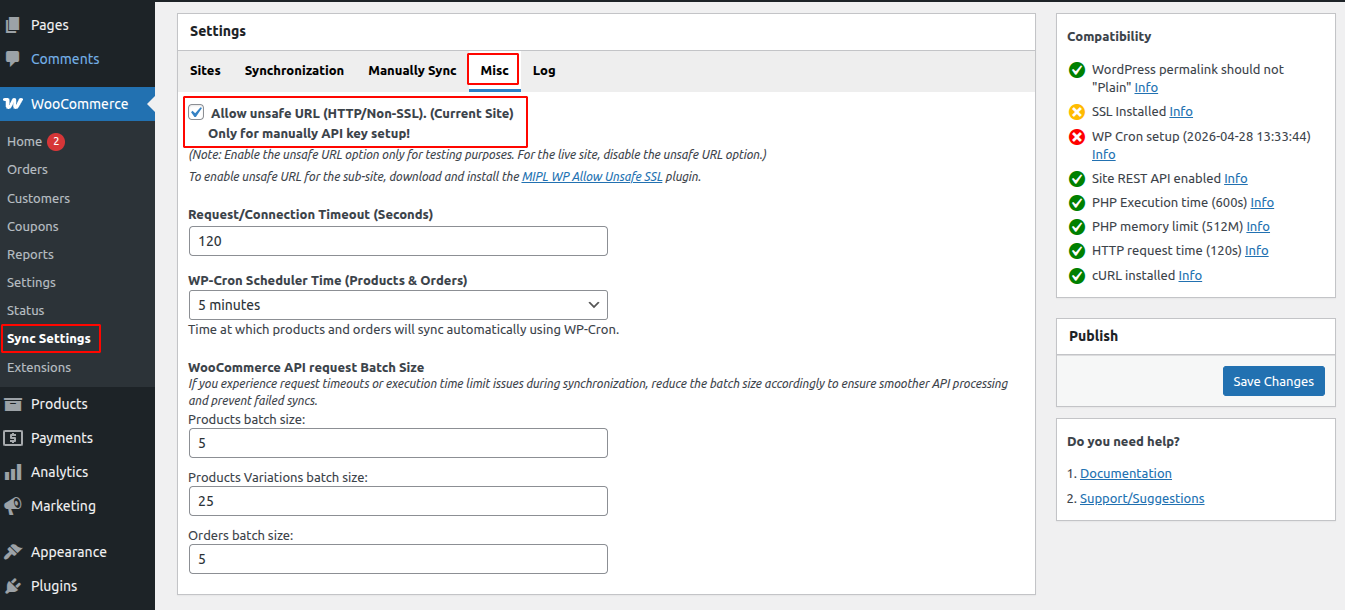
1) Allow Unsafe URL (HTTP / Non-SSL) : Current Site Allows connecting site that use HTTP instead of HTTPS. This option should be used only for testing or development environments. It is not recommended for live or production site, as non-SSL connections are not secure and may expose sensitive data during transmission. For production websites, always use HTTPS and keep this option disabled to ensure secure site communication.
- Go to WooCommerce .
- Select Sync Settings.
- Click on Misc.
- Allow Unsafe URL (HTTP / Non-SSL)
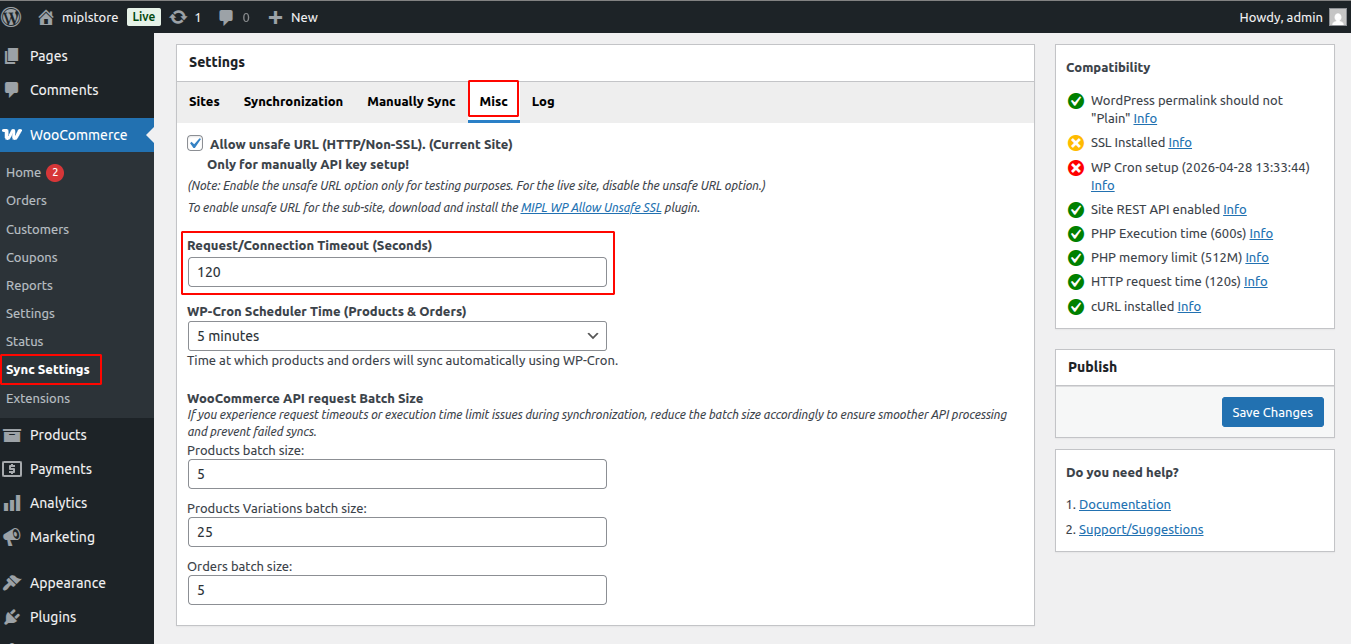
2) Request / Connection Timeout (Seconds) : Sets how long the system waits for a response during sync.This setting controls how long the system waits for the other site to respond during synchronization. The default time is 120 seconds.
If the sync process stops or shows a timeout error, you can increase this value to give it more time to complete—especially when syncing large amounts of data.
- Go to WooCommerce .
- Select Sync Settings.
- Click on Misc.
- Request / Connection Timeout (Seconds)
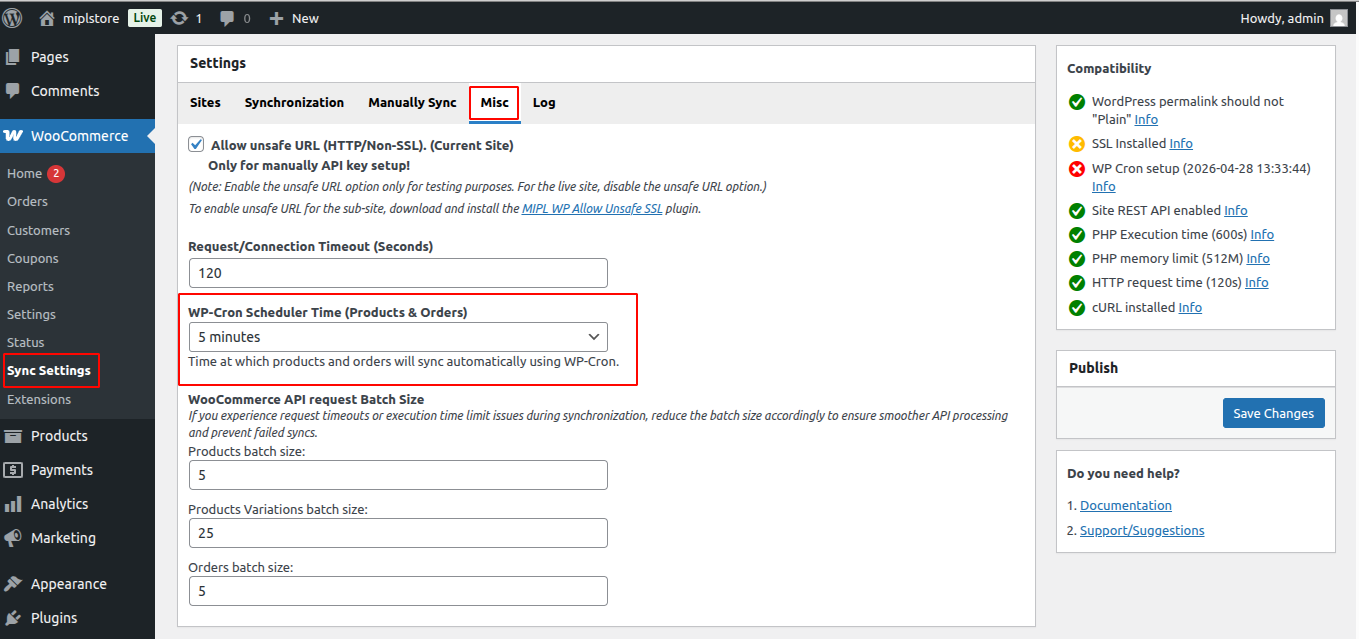
3) WP-Cron Scheduler Time (Products & Orders) : This setting controls how often products and orders are automatically synchronized between site using WP-Cron. You can choose the time interval for automatic syncing (for example: every 5 minutes, 15 minutes, hourly, etc.). Shorter intervals will sync data more frequently but may increase server load.
It is recommended to choose a balanced interval based on your site traffic and server performance.
- Go to WooCommerce .
- Select Sync Settings.
- Click on Misc.
- WP-Cron Scheduler Time (Products & Orders)
4) WooCommerce API Request Batch Size : Controls how much data is synced per API request.
- Go to WooCommerce .
- Select Sync Settings.
- Click on Misc.
- WooCommerce API request Batch Size
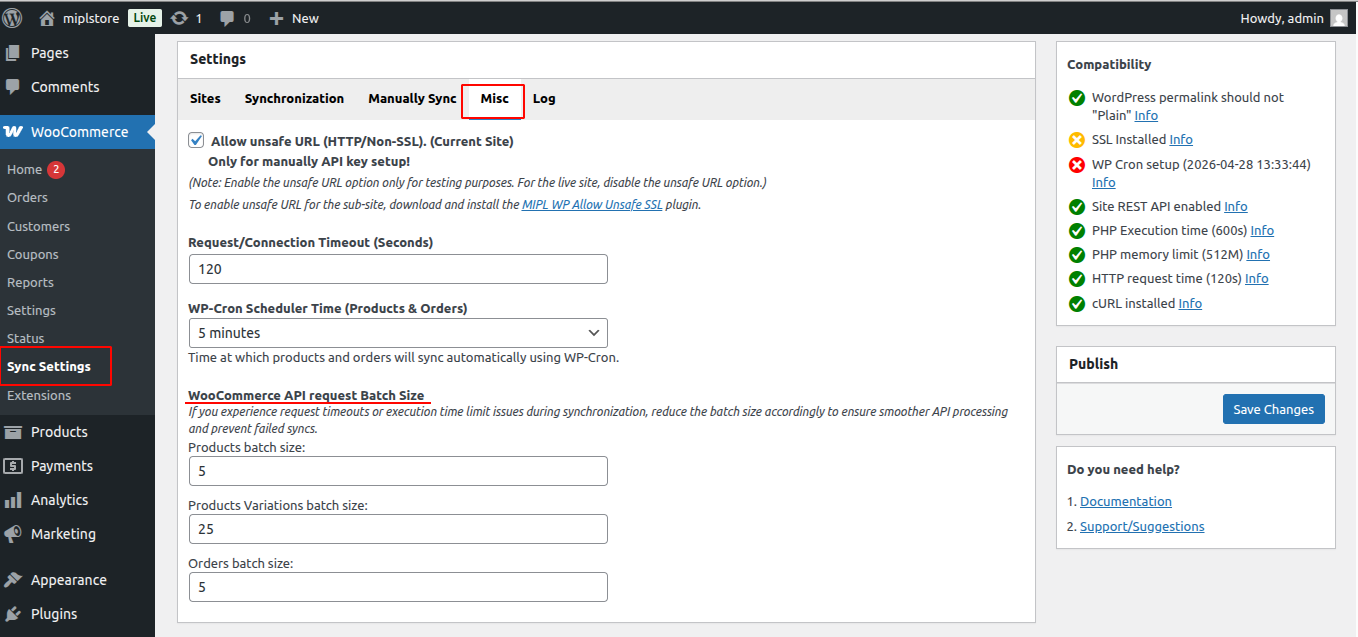
5) Products Batch Size : Number of products processed per request.
- Go to WooCommerce .
- Select Sync Settings.
- Click on Misc.
- Products batch size
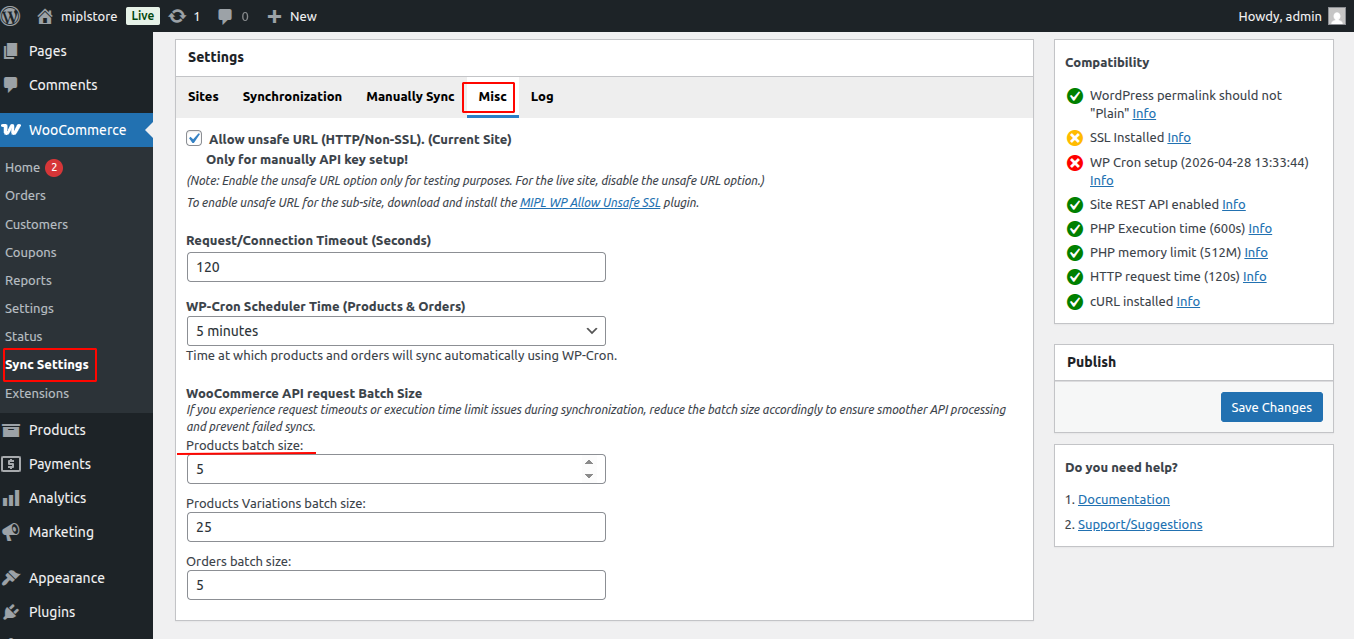
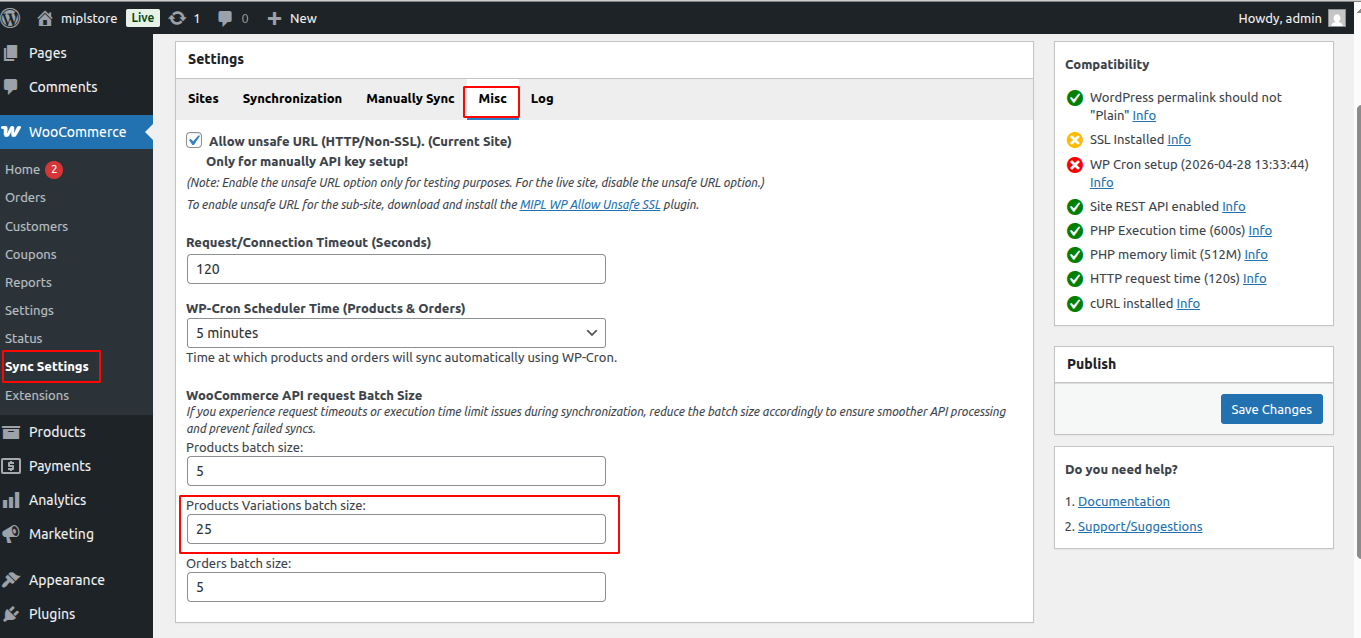
6) Product Variations Batch Size : Number of variations processed per request.
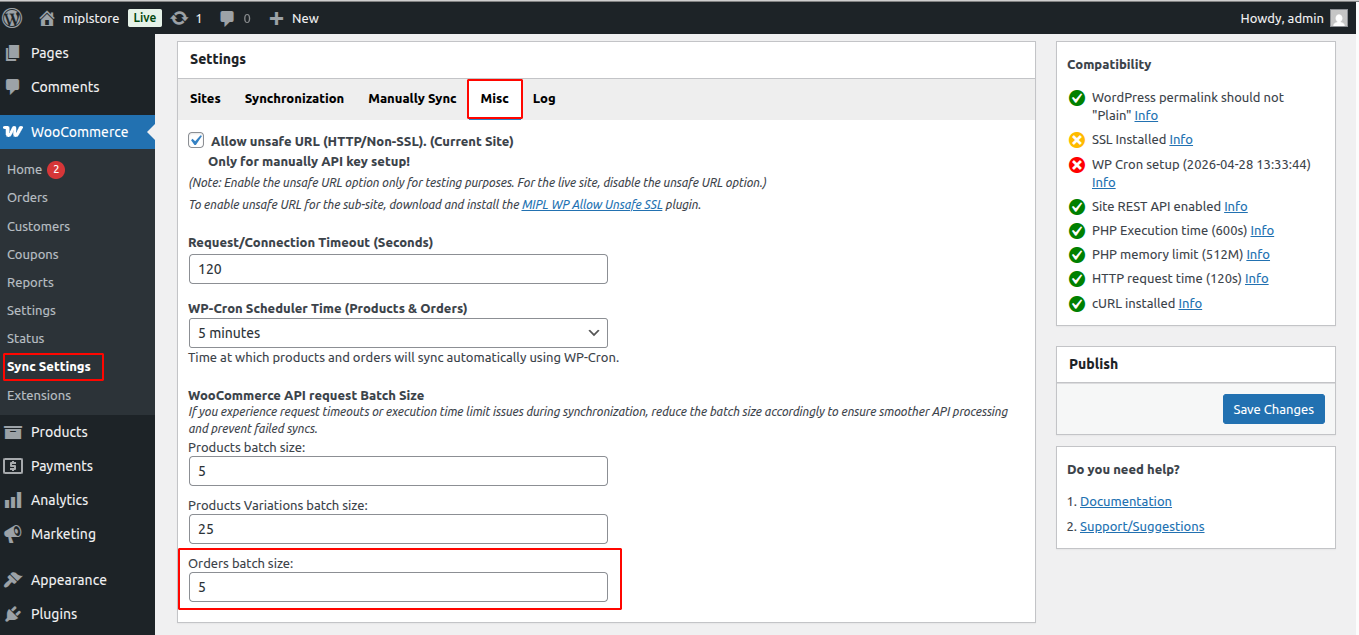
7) Orders Batch Size : Number of orders processed per request. Smaller values improve stability on slow servers . Reduce batch size if you face timeout or failed sync issues.
Product Synchronization
1. Syncing from Main Site to Sub-Site
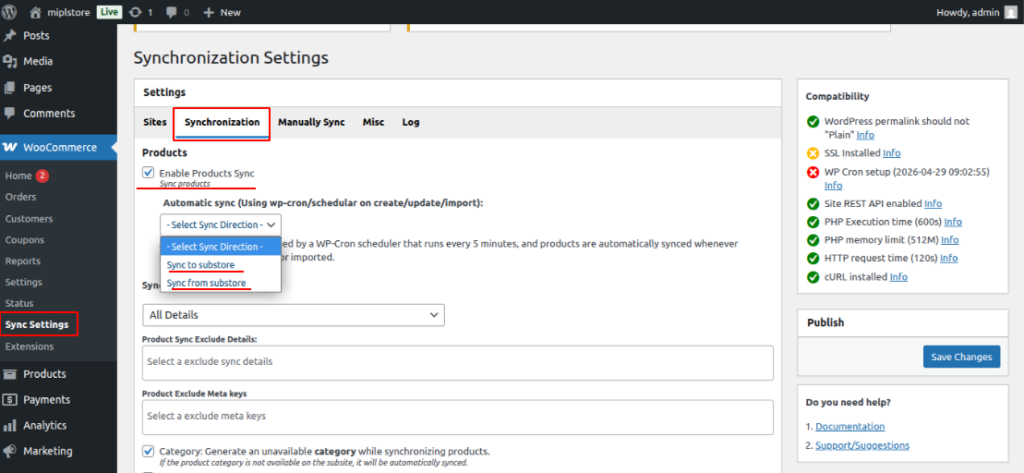
Step 1. Automatic sync (Using wp-cron/schedular on create/update/import) :
Automatically syncs products main-site to sub-site and sub-site to main-site when they are: Imported , Created , Updated. Sync to Substore – Automatically syncs products main-store to sub-store. Sync from Substore – Automatically syncs products sub-store to main-store .
To enable automatic product synchronization, turn on the Automatic sync (Using wp-cron/scheduler on create/update/import) option.This setting is not applied during manual synchronization.
Once enabled, products will automatically sync to the subsite whenever they are created, updated, or imported.All sync settings are applied during automatic synchronization.
If Enable Products Sync is turned ON, you will see the Sync Products option in the Bulk Actions dropdown on the Products page.
If Enable Products Sync is turned OFF, the Sync Products option will NOT appear in the Bulk Actions dropdown.
- Go to WooCommerce → Sync Settings on the Main Site.
- Click Synchronization
- Enable the option Enable Products Sync.
- In the sync direction setting, select Sync to subsite.
- Click Save Chnages.
Step 2. Sync via Product Edit Page :
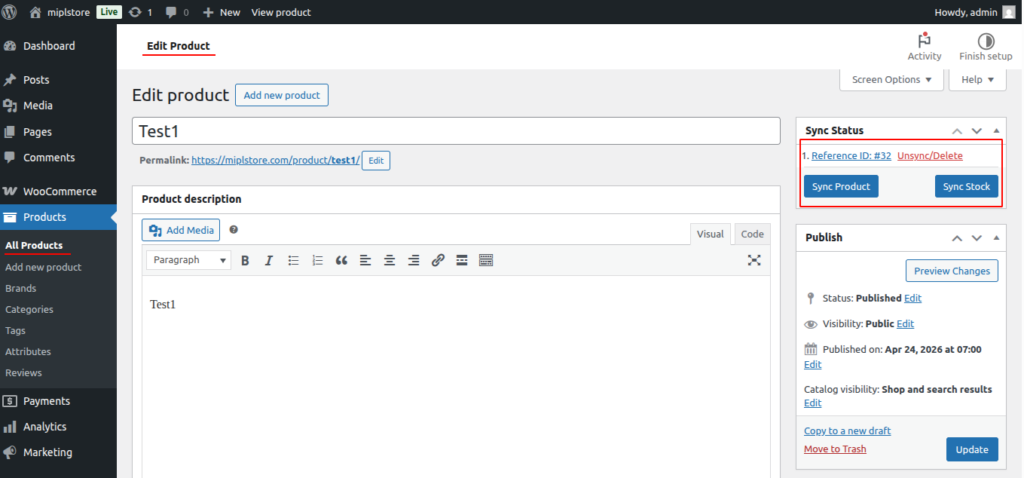
Open a product for editing. After making updates, click the Sync button to push changes to subsite. After completing the setup and connect the sub-site, you can start syncing products between the main site and subsite.
- Go to : Products → All Products → Edit Product
- Sync Product – product data sync.
- Sync Stock – Manually syncs only the product stock quantity.
After syncing the product, the Main Site can be viewed in two ways.
Method 1 :
Reference ID – This is the Subsite Product ID. You can click this ID to open and view the product directly in the Subsite.
You can use the Unsync/Delete button to remove the synced product from the subsite.
- Unsync /Delete – This will permanently delete the synced product from the subsite.
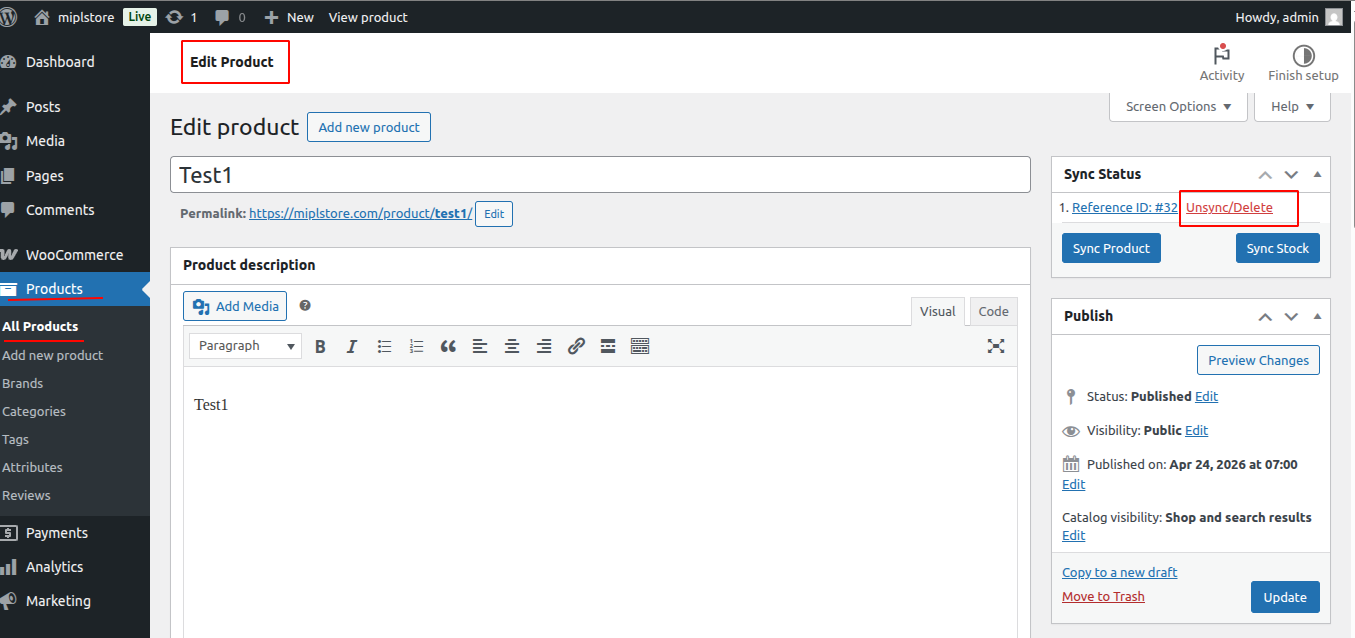
After syncing a product, you can view the Sync Status section. In the Sync Status, you will see:
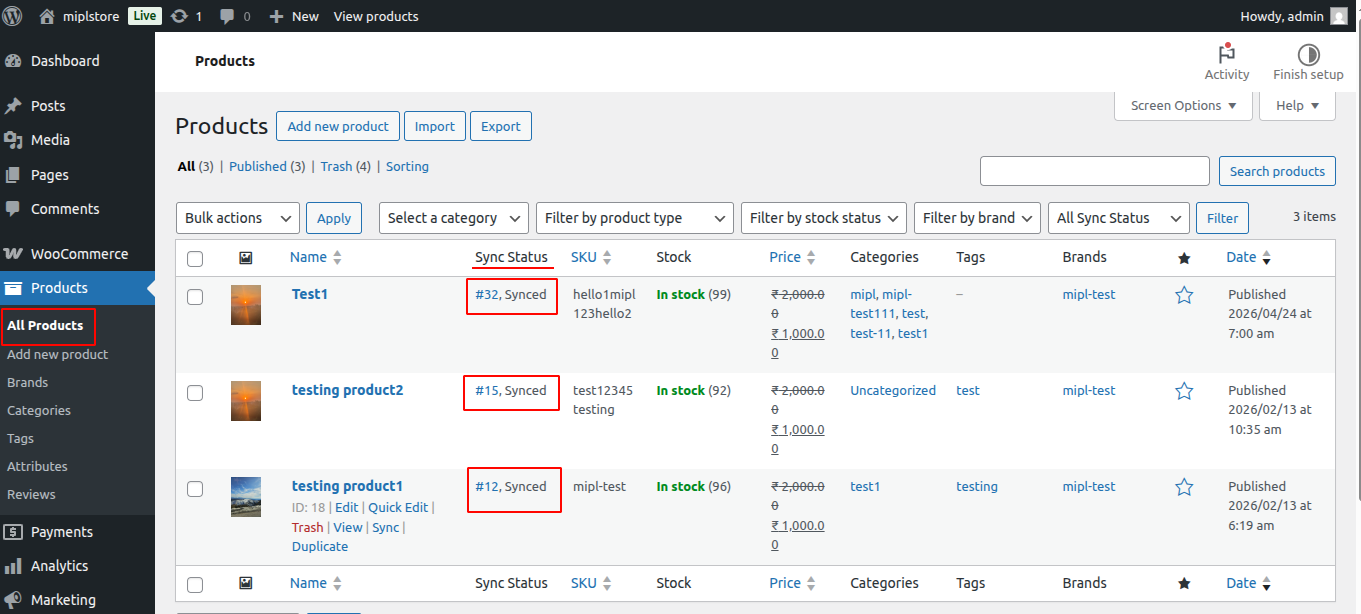
Method2 :
- Go to Products → All Products.
- In the product list, check the Sync Status column.
- If the product is synced, you will see the reference id (subsite product id) and sync status like(synced, trash).
- Click on this reference ID to be redirected to the subsite product.
Step 3. Bulk Sync Multiple Products :
Select multiple products and choose Bulk Sync to synchronize them multiple at once.
- Go to Main Site→ Products → All Products
- Select multiple products
- Choose Bulk Sync – MultiSite Sync
- Select the Sync Products
- Click Apply
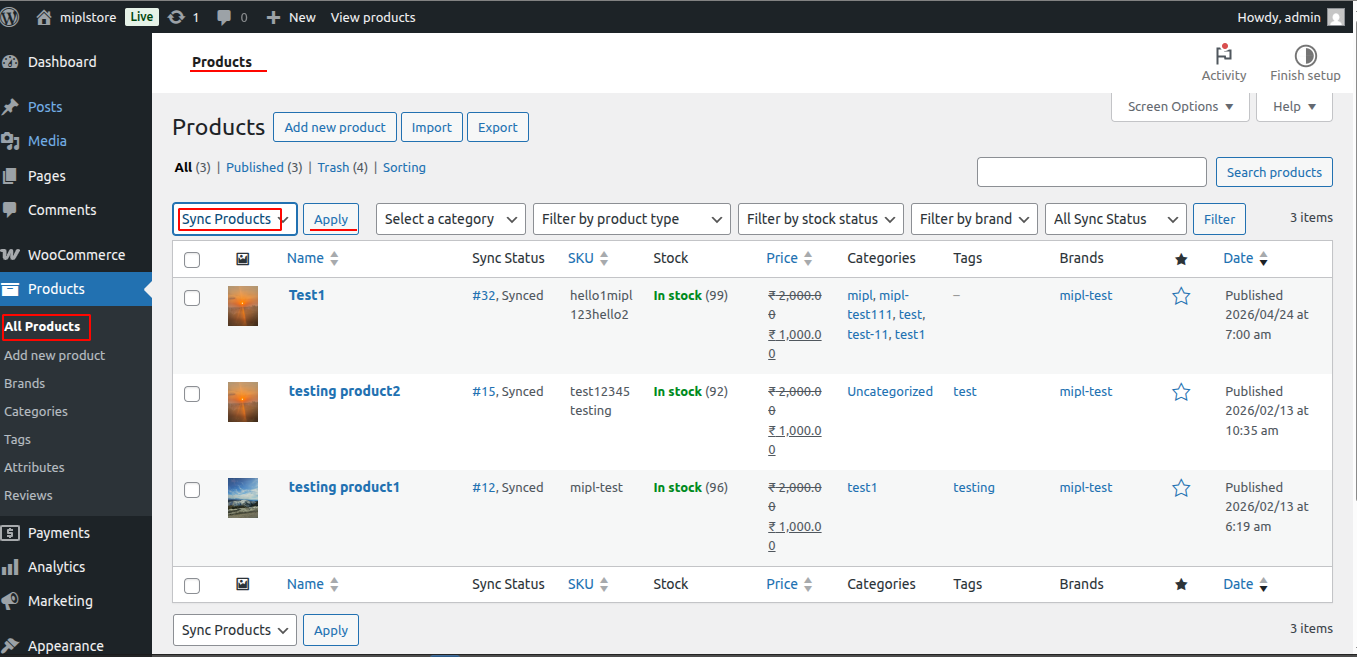
Step 4. Manually sync all products from the main site to the sub-site
- Go to:
Main Site → WooCommerce → Sync settings - Click Manually Sync
- Select Products (To Subsite)
- Click Sync Now
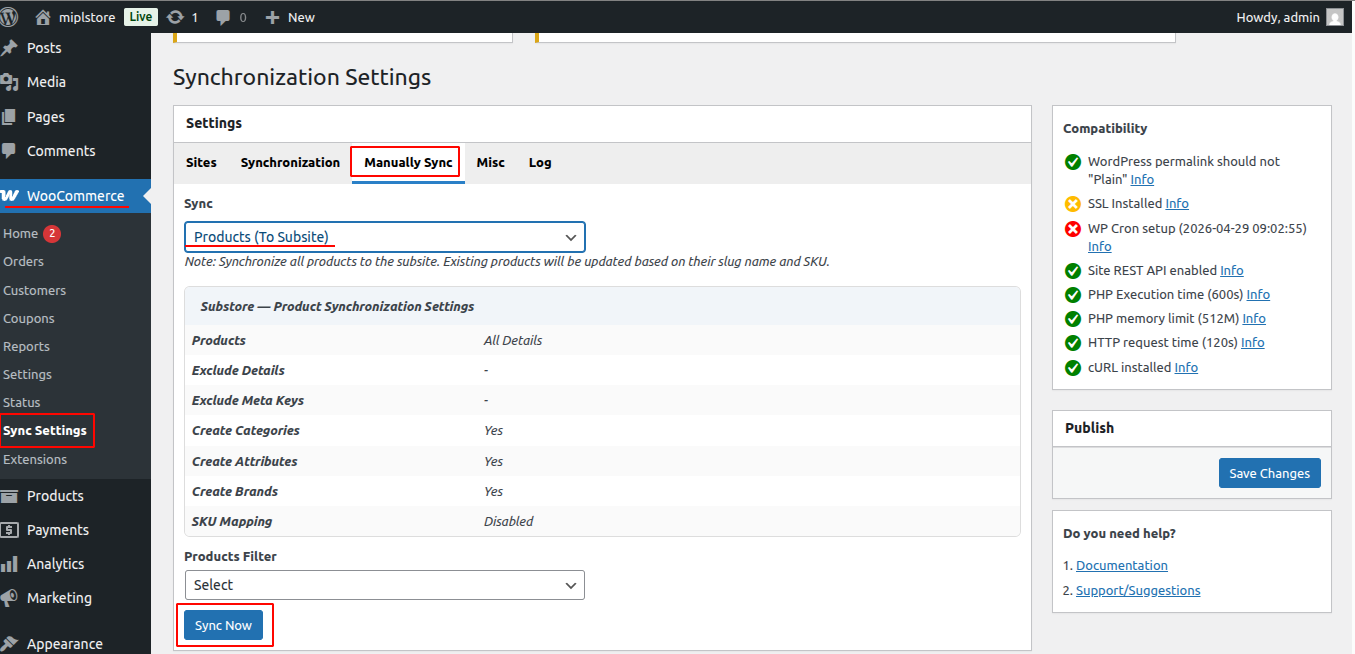
Step 5. Manually sync Specific products from the main site to the sub-site
To sync Manually sync Specific products from the main site to the sub-site, you can purchase the MIPL WC Multisite Sync Pro plugin from our website:
https://store.mulika.in/product/mipl-wc-multisite-sync-pro/
This functionality is available in the Pro version of the plugin.
Step 6. Manually sync Specific category from the main site to the sub-site
To sync Manually sync Specific category from the main site to the sub-site, you can purchase the MIPL WC Multisite Sync Pro plugin from our website:
https://store.mulika.in/product/mipl-wc-multisite-sync-pro/
This functionality is available in the Pro version of the plugin.
Step 7. Manually sync Specific product status from the main site to the sub-site
To sync Manually sync Specific product status from the main site to the sub-site, you can purchase the MIPL WC Multisite Sync Pro plugin from our website:
https://store.mulika.in/product/mipl-wc-multisite-sync-pro/
This functionality is available in the Pro version of the plugin.
Monitor Sync Logs
- Click on WooCommerce
- Select Sync Settings.
- Click on the Logs tab.
- Enable Log
The Sync Logs section allows you to track, review, and troubleshoot all synchronization processes between the Main site and Sub-site. This is especially useful for identifying sync errors, verifying successful transfers, and debugging issues.
After syncing a product, the system records the activity in the Sync Logs section. In this log, you can see the Main site Product ID and the Subsite Product ID, along with the sync time, message, and status (such as Success). This helps you track which product was synced, between which site, and whether the synchronization was completed successfully.
After syncing a product, the system records the activity in the Sync Logs section. In this log, you can see the Main Site Product ID and the Subsite Product ID, along with the sync time, message, and status (such as Success). This helps you track which product was synced, between which site, and whether the synchronization was completed successfully.
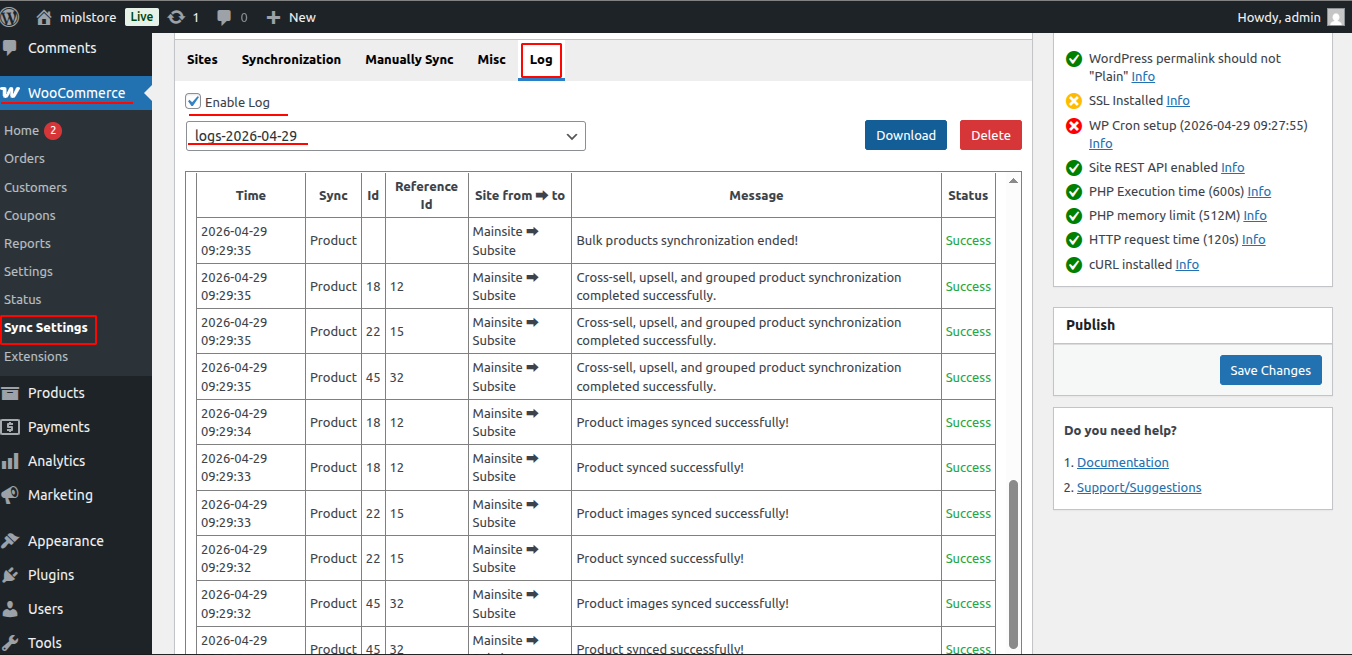
1. How to View Synced Products in the Subsite
After syncing products from the Main Site → Subsite, follow these steps to verify the synced products:
Step 1: Log in to the Subsite
- Open the Subsite URL (the one configured in Sync site).
- Log in to the Subsite WordPress Admin Dashboard.
- Step 2: Go to Products
- Navigate to : WooCommerce → Products
OR
Products → All Products
Step 3: Check the Product List
- You will see the synced products listed there.
- You can:
- Search by product name
- Search by SKU
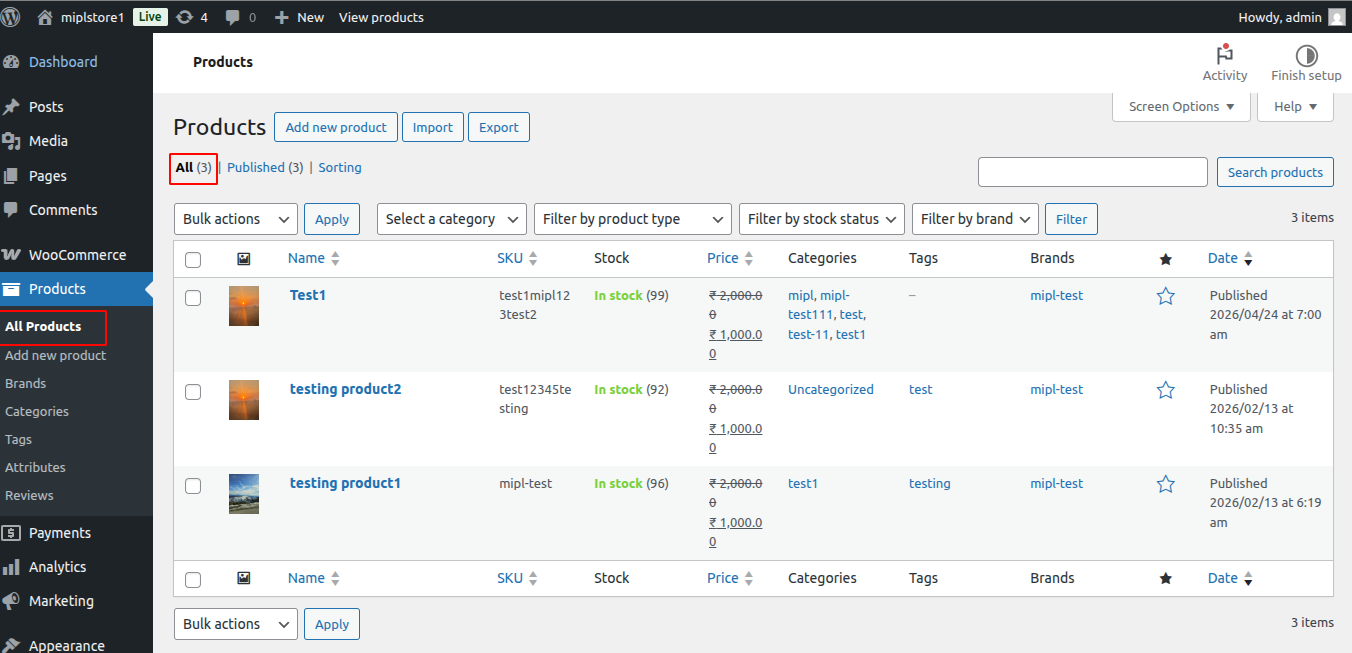
2. Syncing from Sub-site to Main site
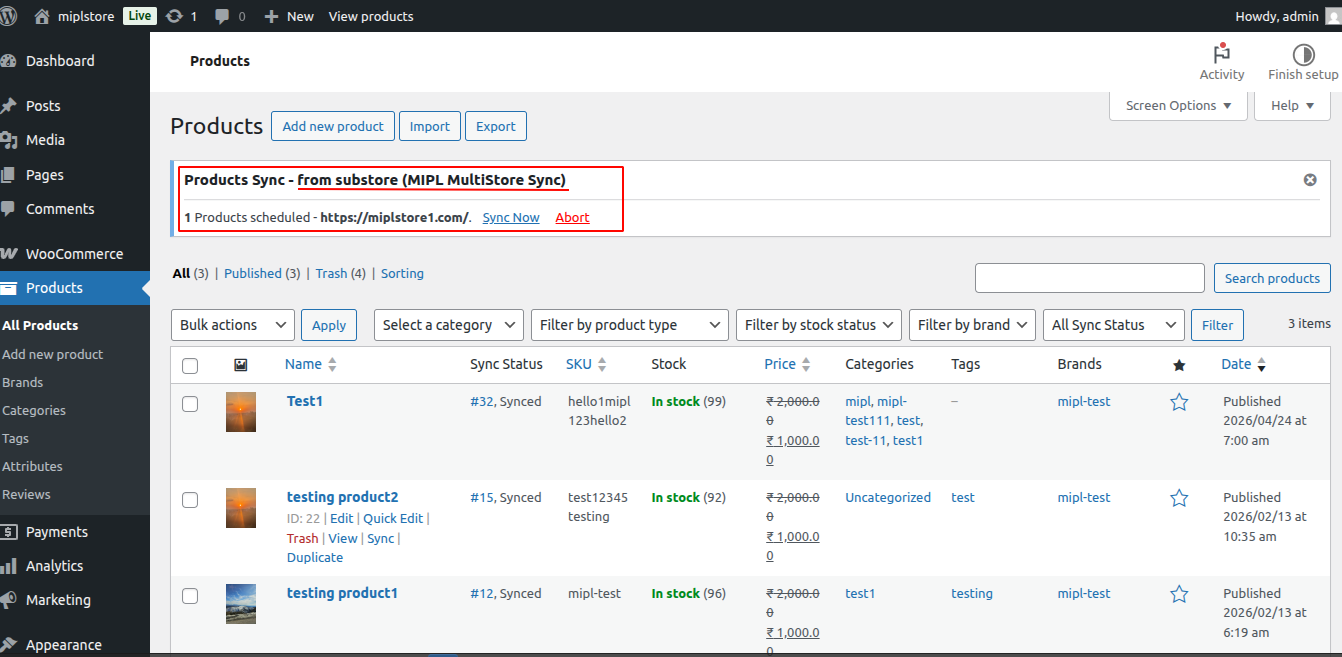
This process is automated. When a product is updated on a subsite, the changes will automatically sync to the main site via a scheduled process.
Alternatively, a notification will appear in the main site admin panel, informing you that a specific subsite product has been updated, allowing you to manually sync the changes.
Note: Ensure that sync settings are enabled for the process to work smoothly.
Step 1. Automatic sync products subsite to mainsite
Enable setting :
- Go to WooCommerce → Sync Settings on the Main Site.
- Click Synchronization
- Enable the option Enable Products Sync.
- In the sync direction setting, select Sync from sub-site.
- Click Save Chnages.
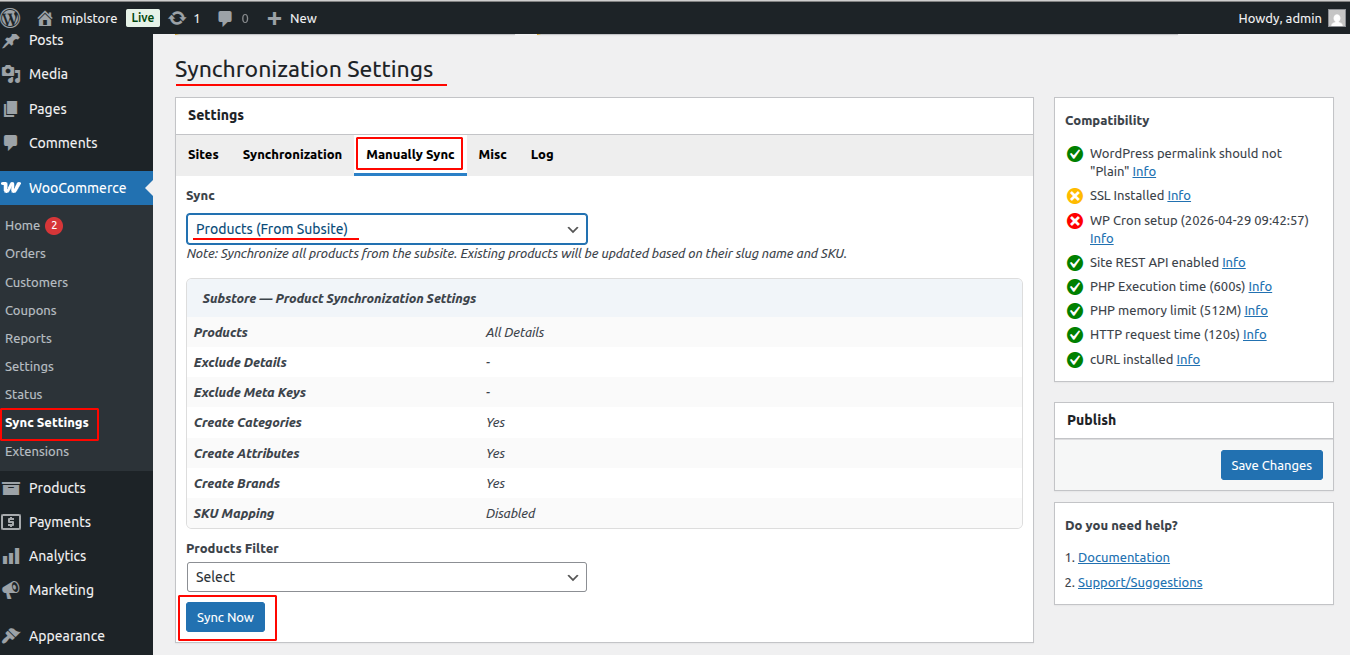
Step 2. Manually sync all products from the sub site to the main-site
- Go to:
Main Site → WooCommerce → Sync Settings - Click Manually Sync
- Select:
- Products (From Subsite)
- Start Sync
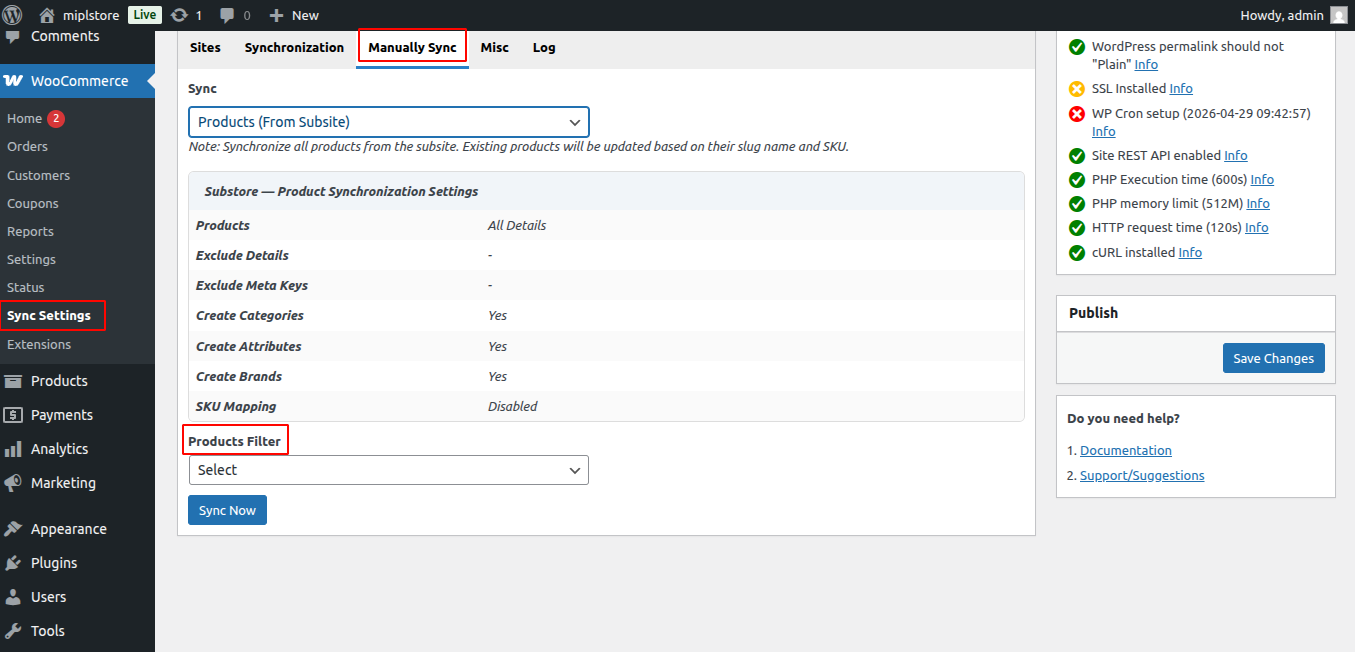
Step 3. Manually sync Specific products from the sub site to the main-site
To sync Manually sync Specific products from the sub site to the main-site, you can purchase the MIPL WC Multisite Sync Pro plugin from our website:
https://store.mulika.in/product/mipl-wc-multisite-sync-pro/
This functionality is available in the Pro version of the plugin.
Step 4. Manually sync Specific category from the sub site to the main-site
To sync Manually sync Specific category from the sub site to the main-site, you can purchase the MIPL WC Multisite Sync Pro plugin from our website:
https://store.mulika.in/product/mipl-wc-multisite-sync-pro/
This functionality is available in the Pro version of the plugin.
Step 5. Manually sync Specific product status from the sub site to the main-site
To sync Manually sync Specific product status from the sub site to the main-site, you can purchase the MIPL WC Multisite Sync Pro plugin from our website:
https://store.mulika.in/product/mipl-wc-multisite-sync-pro/
This functionality is available in the Pro version of the plugin.
Order Synchronization
1. Order Synchronization from Main Site to Sub-Site
To sync Order Synchronization from Main Site to Sub-Site , you can purchase the MIPL WC Multisite Sync Pro plugin from our website:
https://store.mulika.in/product/mipl-wc-multisite-sync-pro/
This functionality is available in the Pro version of the plugin.
2. Order Synchronization from Sub-site to Main site
Enable setting
- Go to WooCommerce → Sync Settings on the Main site.
- Click Synchronization.
- Enable the option Orders (Sync from Subsite).
- Click Save Setting.
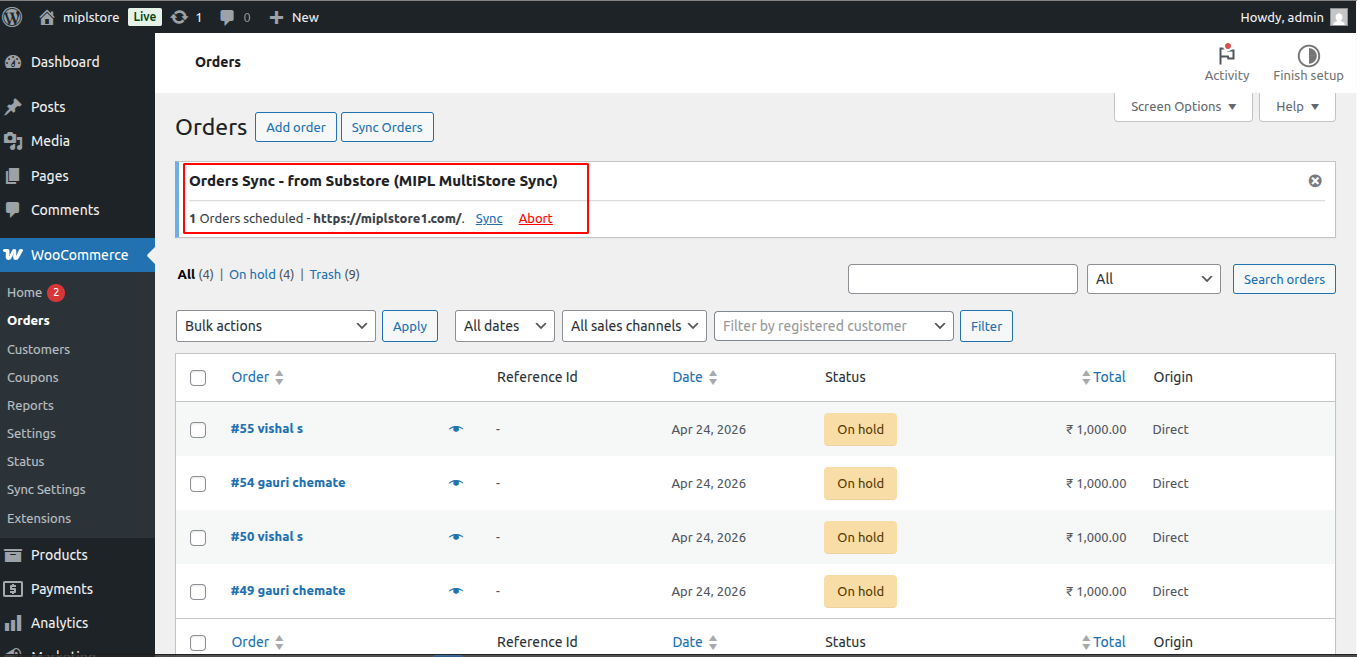
Now, when an order is created or updated on the Sub-Site, it will automatically sync to the Main Site.
You will see a notice like:
“Scheduled order(s) placed on [Sub-Site URL]”
This confirm that the order is scheduled for synchronization.
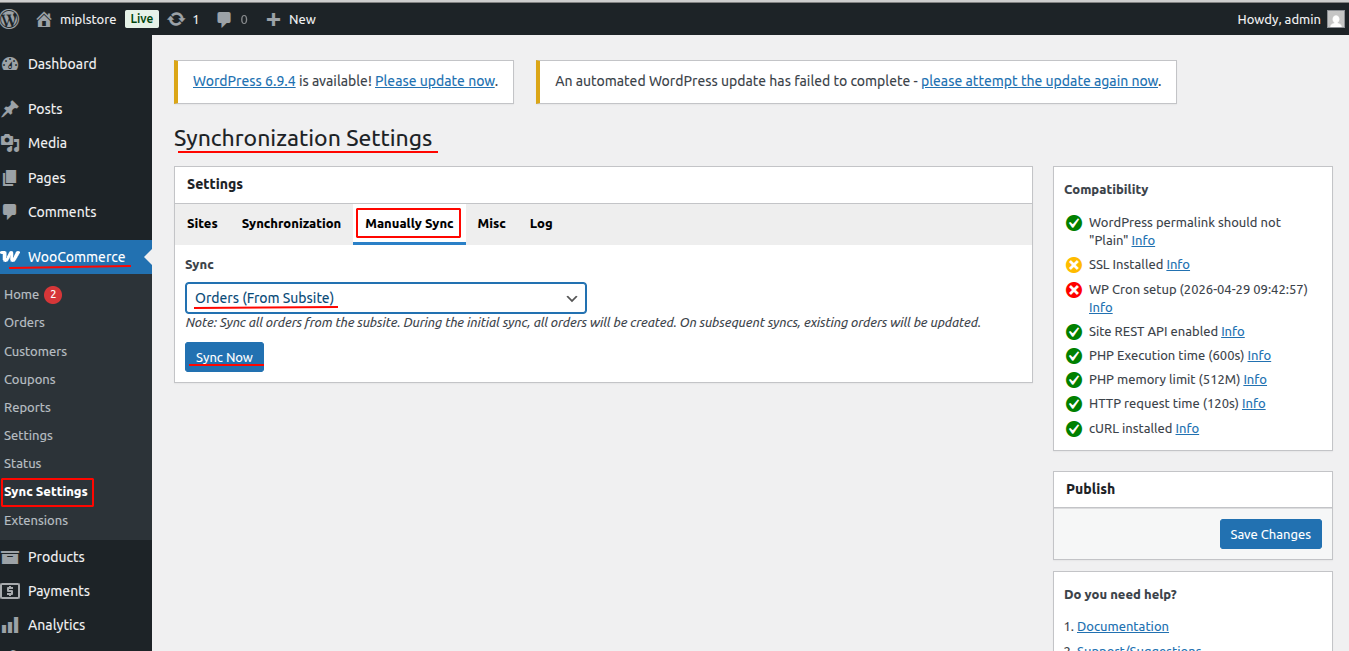
Manually sync orders from subsite
- Go to:
Main Site → WooCommerce → Sync Settings - Click Manually Sync
- Select:
- Orders (From Subsite)
- Click Sync Now
Coupons Synchronization
Enable coupons setting from :
- Go to WooCommerce → Sync Settings.
- Click Synchronization
- Locate the Enable Coupons Sync setting.
- Check/Enable the Coupons Sync option.
- Save or Update the Site settings.
- Go to Marketing → Coupons.
- Click Add new coupon (or edit an existing coupon).
- Click Sync.
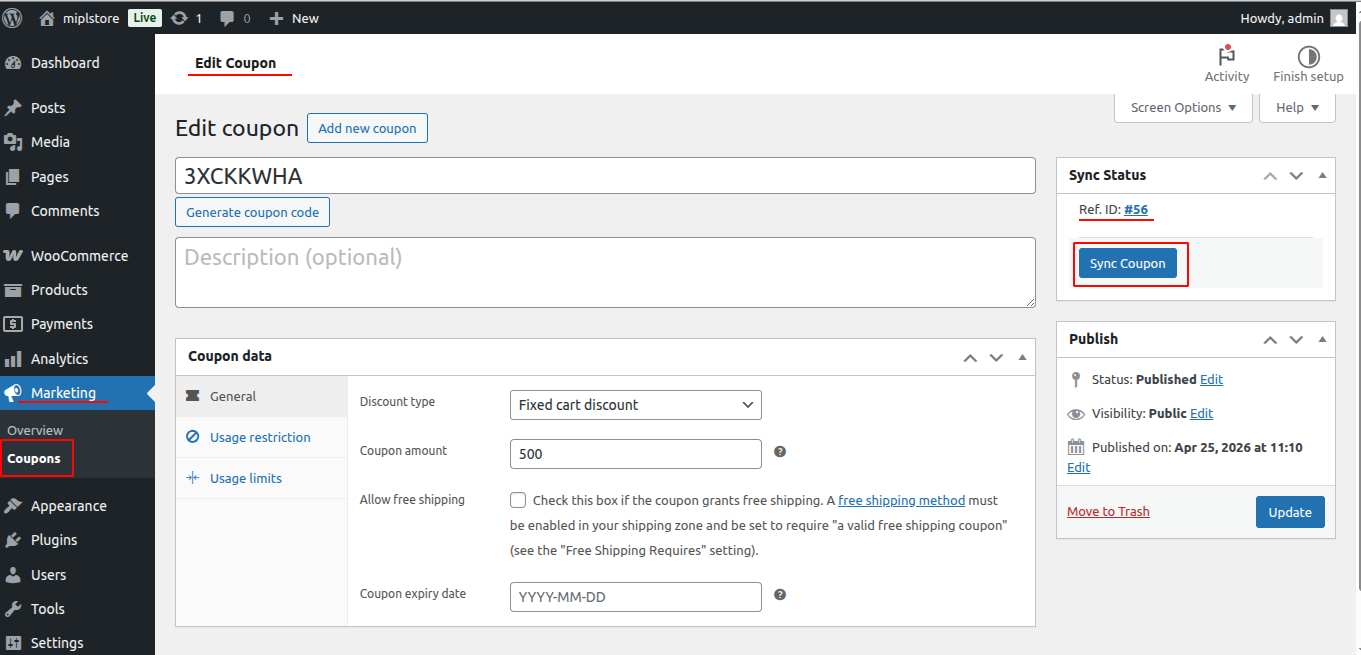
After syncing the coupon, the Sync Status will be displayed in the Main Site.
In the Sync Status section, you will see:
- ID – This is the Subsite Coupon ID.
- You can click on the Reference ID to be redirected directly to the corresponding Subsite.
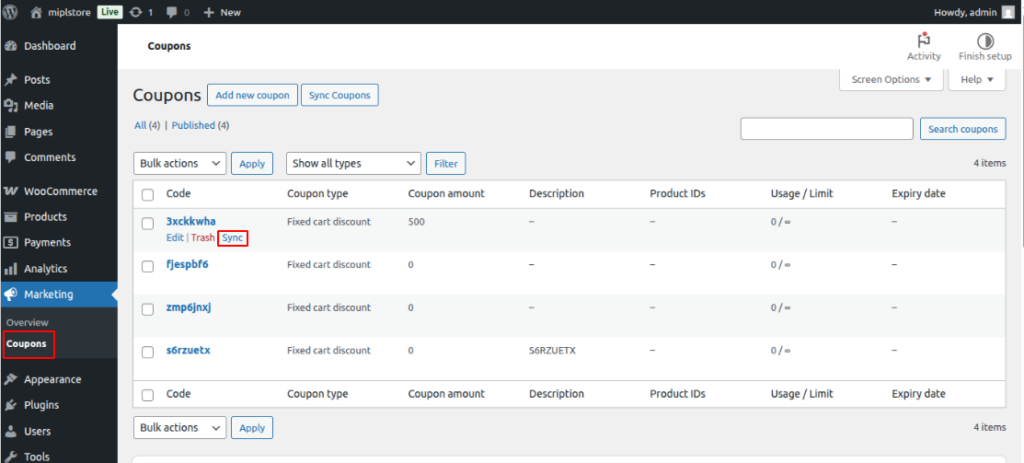
Coupon sync in row action:
- Go to WooCommerce → Sync Settings.
- Click Synchronization
- Locate the Enable Coupons Sync setting.
- Check/Enable the Coupons Sync option.
- Save or Update the Site settings.
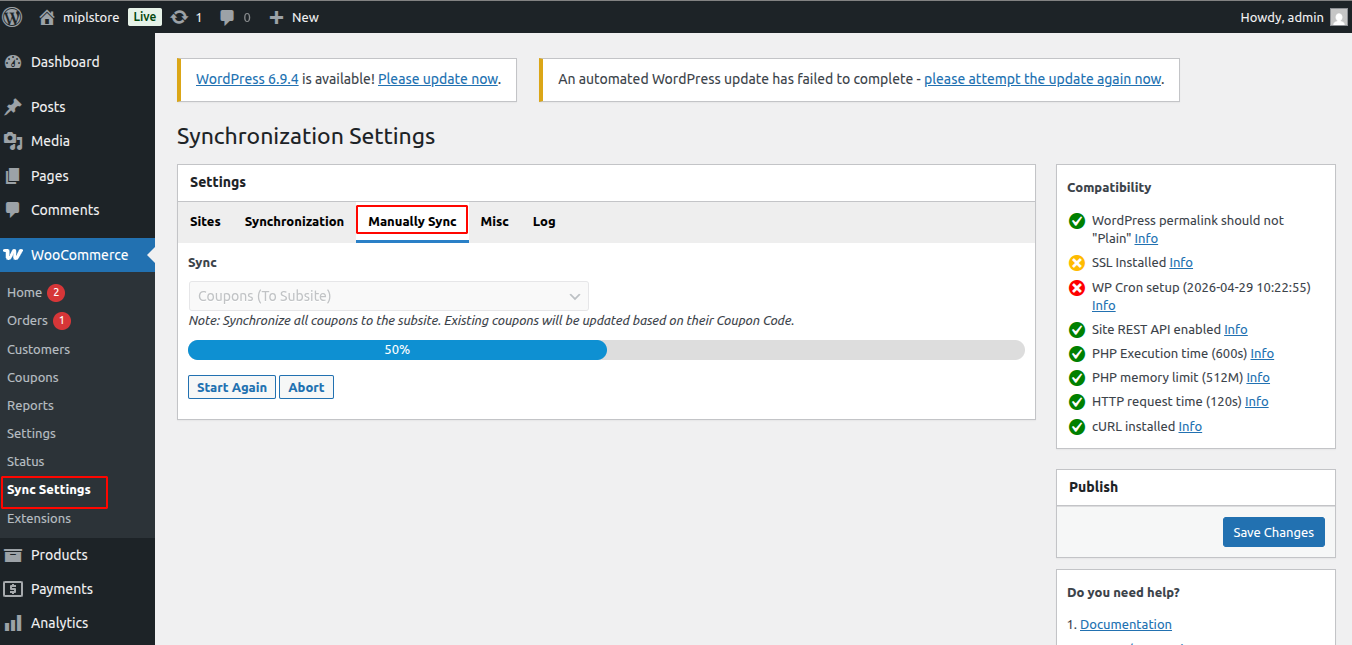
Manually sync all coupons from the main site to the selected sub-site.
- Go to:
Main Site → WooCommerce → Sync Settings - Click Manually Sync
- Select:
- Coupons (To Subsite)
- Click Sync Now
Customers Synchronization
- To sync customers , go to WooCommerce → Sync Settings →Synchronization.
- Enable the Enable Customers Sync option.
- Select Customers (Sync from Subsite) to sync customers from the subsite to the Main Site.
Go to Users → All Users to view the user list.
At the top of the page, you will see the Sync Users button. Click this button to sync users from the Subsite to the Main Site.
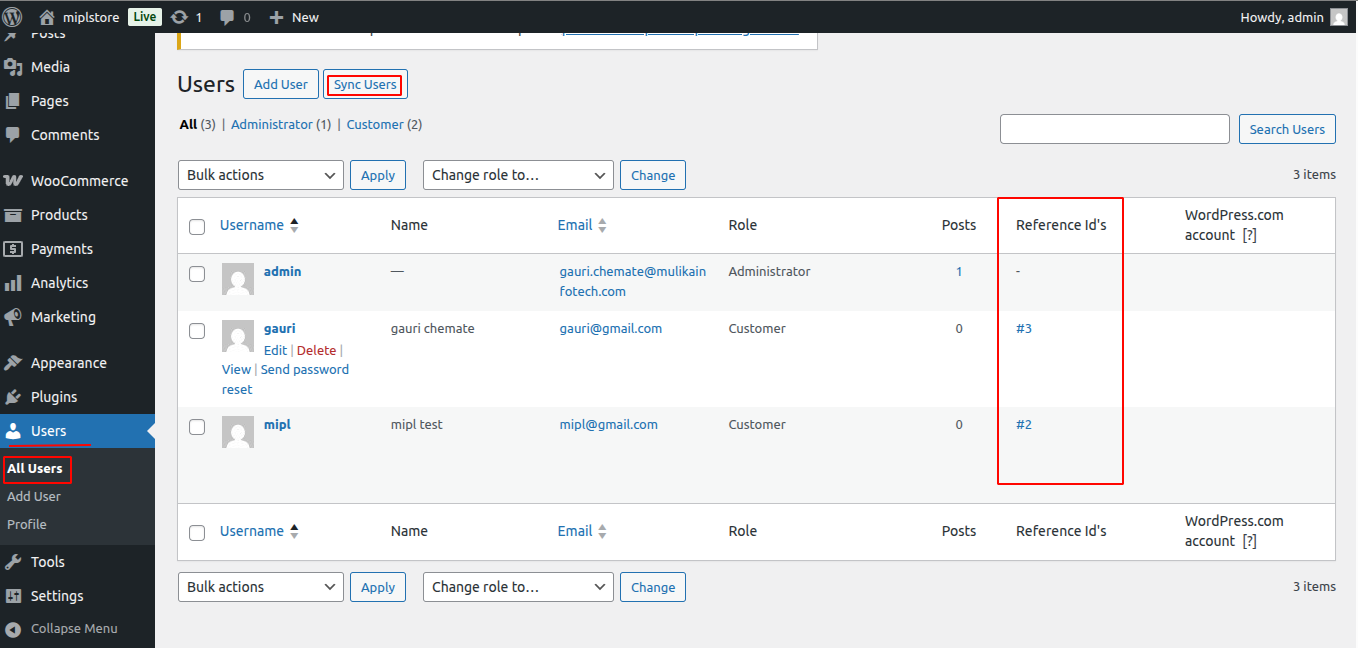
This Reference ID shows:
- The user’s ID in the connected subsite.
You can click the Reference ID to directly open and view that user in the linked subsite.
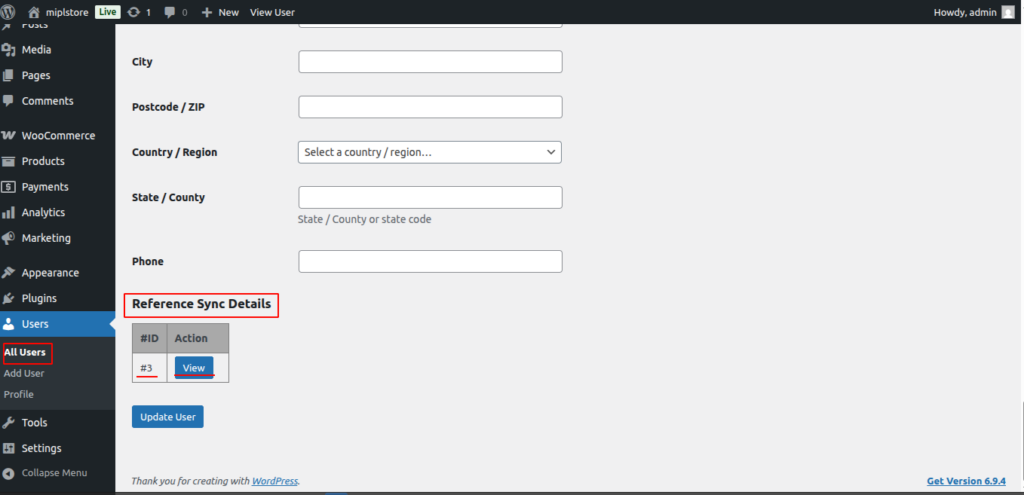
Go to Users → All Users and click on a specific user to edit their details.
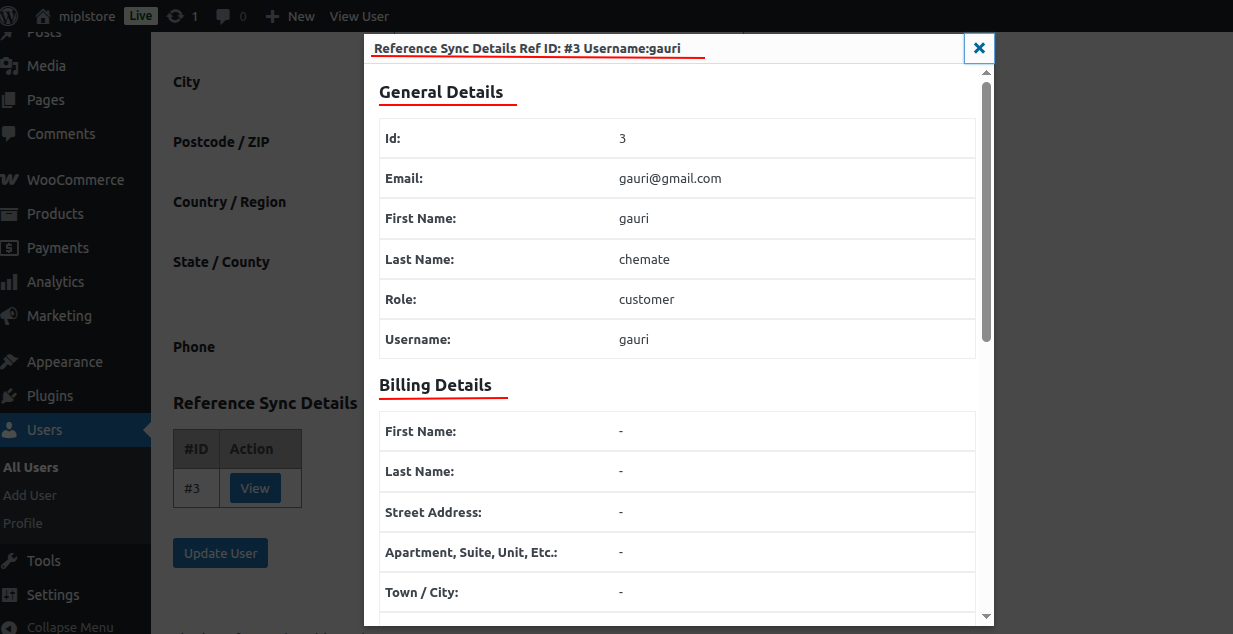
On the user edit page, you will see the Reference Details section. This section displays the following information:
- ID – The reference user ID
- Action – A View button
Click the View button to see the reference details of that user from the connected subsite.
After making any changes, click Update User to save the updates.
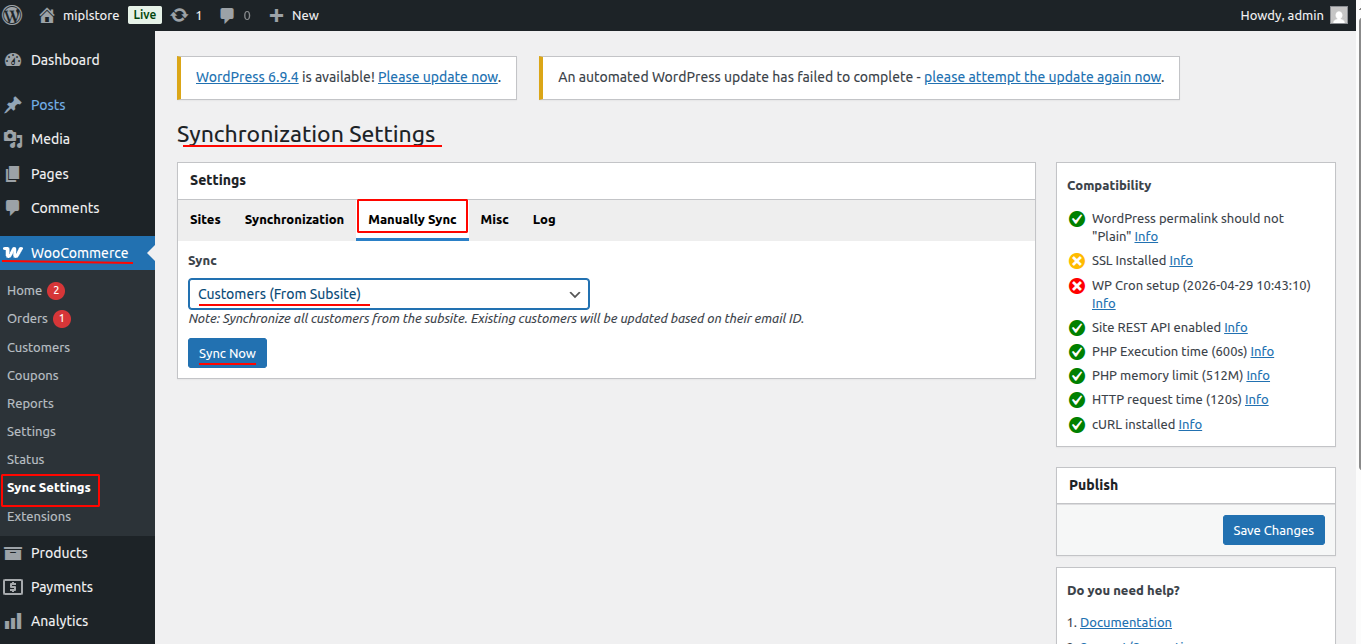
To sync customers manually:
Go to WooCommerce → Sync Settings -> Synchronization
In the Sync option, choose Customers (From Subsite).
Then click Sync Now to start syncing customers from the subsite to the main site.
Troubleshooting
For troubleshooting sync-related issues and monitoring sync status, logs are generated under:
WooCommerce > Sync Settings > Log.
These logs can help you identify and resolve any problems that arise during the synchronization process.
You can check compatibility by going to WooCommerce →Sync Settings → Synchronization Settings → Compatibility.
Common issues and fixes :
1) Why is the Site Connection Failing?
Possible Reasons:
- Incorrect Sub-Site URL
- Invalid Consumer Key or Consumer Secret
- REST API permissions not set to Read/Write
- SSL certificate issue.
Solution:
- Verify the Sub-Site URL is correct and accessible.
- Double-check the Consumer Key and Consumer Secret.
- Ensure REST API permissions are set to Read/Write.
Frequently Asked Questions (FAQ)
1. Does this plugin sync virtual and downloadable products?
Yes. The plugin fully supports synchronization of virtual and downloadable products across connected site.
2. If products have different names but the same SKU, will they sync?
Yes, products are matched and synced based on SKU, even if the product name is different on the site.
3. Does the plugin work with Advanced Custom Fields (ACF)?
Yes, the plugin supports syncing data created with Advanced Custom Fields (ACF) and also syncs all product meta fields, including custom fields added to products.
4. Can I sync products from sub-site to main site?
Yes. The plugin supports two-way synchronization based on the enabled settings.
5. Can I manually sync all products at once?
Yes. You can use the Manual Sync option under WooCommerce → Sync Settings -> Manually Sync to sync all products.